Type Collection
This documentation was created for the IP & Malacology Type Collection Renovation & Digitization project supported by IMLS # MA-30-18-0335-18, 2019-2021.
Introduction
What is a “type”?
Type specimens, or “types”, are the physical, name-bearing vouchers for new species. They are retained in a specially designated “type collection” so researchers can re-examine them. Rules regarding types and their classification are maintained by the ICZN. Because type specimens are among the museum’s most intellectually significant specimens, they must be handled with extreme care.
| ~ | Before accessing the type collection, review the following: |
|---|---|
| ⚠️ | Open drawers slowly and cautiously. Be aware that these cabinets do not have drawer stoppers. In other words, if you pull too far, the drawer may fall out. As a precaution, always pull out the drawer immediately below the one you wish to access about halfway. |
| ⚠️ | Always ask for help when moving drawers around. They may be much heavier than they appear. |
| ⚠️ | If type specimens are damaged or disassociated from their labels, alert the collections staff immediately. Never move specimens or labels between boxes, or reorganize the boxes within their drawers unless directed to do so. |
| 🔑 | All type specimens must be returned to their appropriate drawers and cabinets at the end of your shift. Similarly, the type room is a communal workspace (shared with Malacology) and should be kept tidy. Make sure to log out from the main computer at the end of your shifts. |
| 🔑 | Please do not invite visitors into the type collection without permission from the Collections Manager or Curator. |
| 🚫 | Water is allowed in the type room, but should be kept away from specimens and equiment at all times. Please store/consume food and other beverages elsewhere. |
| ❓ | Always ask questions when you’re not sure what to do! |
What is “taxonomy”?
In the biological sense, taxonomy refers to the identification and interpretation of organisms within natural groups. While you may not be entering or editing specimen identifications or taxonomy in EMu, taxonomy forms the foundation upon which the type collection is organized, and it is therefore important that you familiarize yourself with the basic concepts of taxonomy and binomial nomenclature by reviewing this article and/or the following video. The ICZN also provides helpful definitions.
QC/Editing vs. Cataloging
Most of the specimens in the type collection are cataloged, i.e. they already have a catalog number, which is a unique, human-readable identifier for a specimen lot to be cited when specimens are referenced in published research.
Instead of cataloging, you will be editing and updating–or “QC’ing” (quality controlling)–existing catalog records with missing information.
Before editing any catalog records for type specimens, please thoroughly review our comprehensive documentation for the Catalogue module, as well as all steps below outlined below.
Interns and volunteers will rarely catalog specimens in the type collection. As a point of diambiguation, true “cataloging” refers to the creation of new catalog records and is only needed when new types are received from researchers. This should only be done with guidance from the Collections Manager. LACMIP maintains a separate workflow for cataloging.
Type Collection QC Workflow
The workflow used to edit and quality control (QC) type specimen records is outlined below. To enlarge screenshots, right click and open them in a new tab or window.
I. Search for a specimen
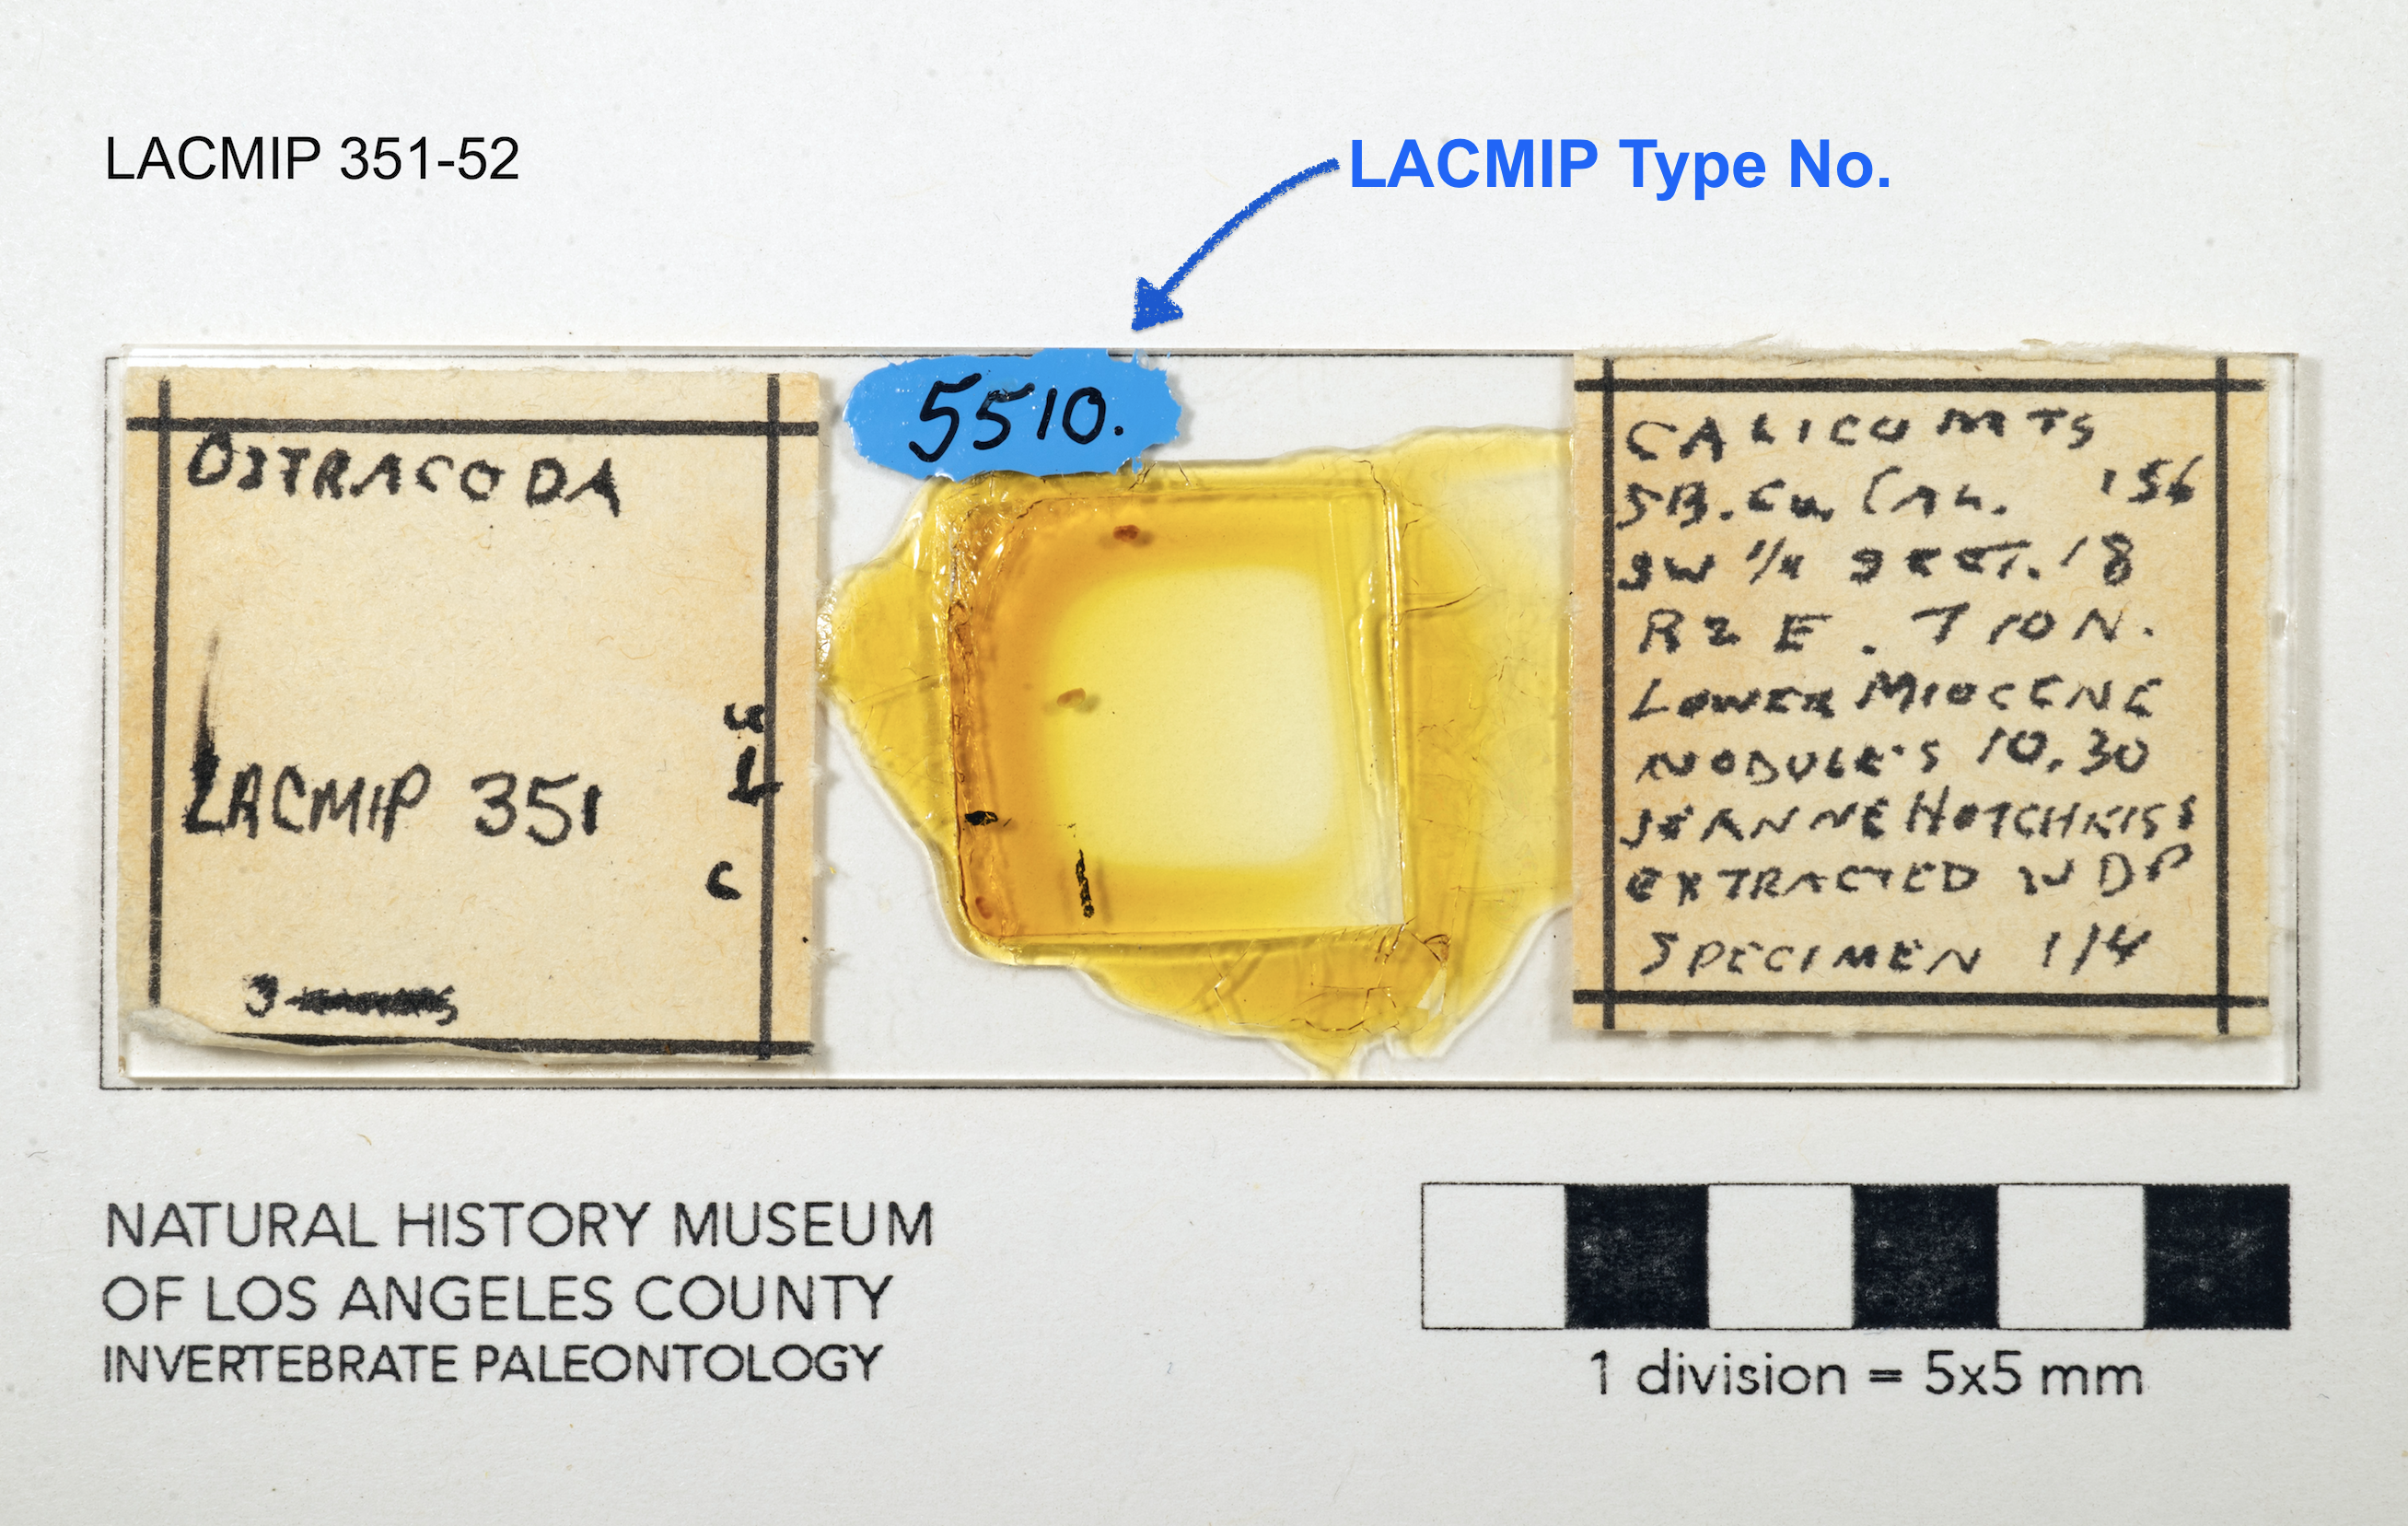
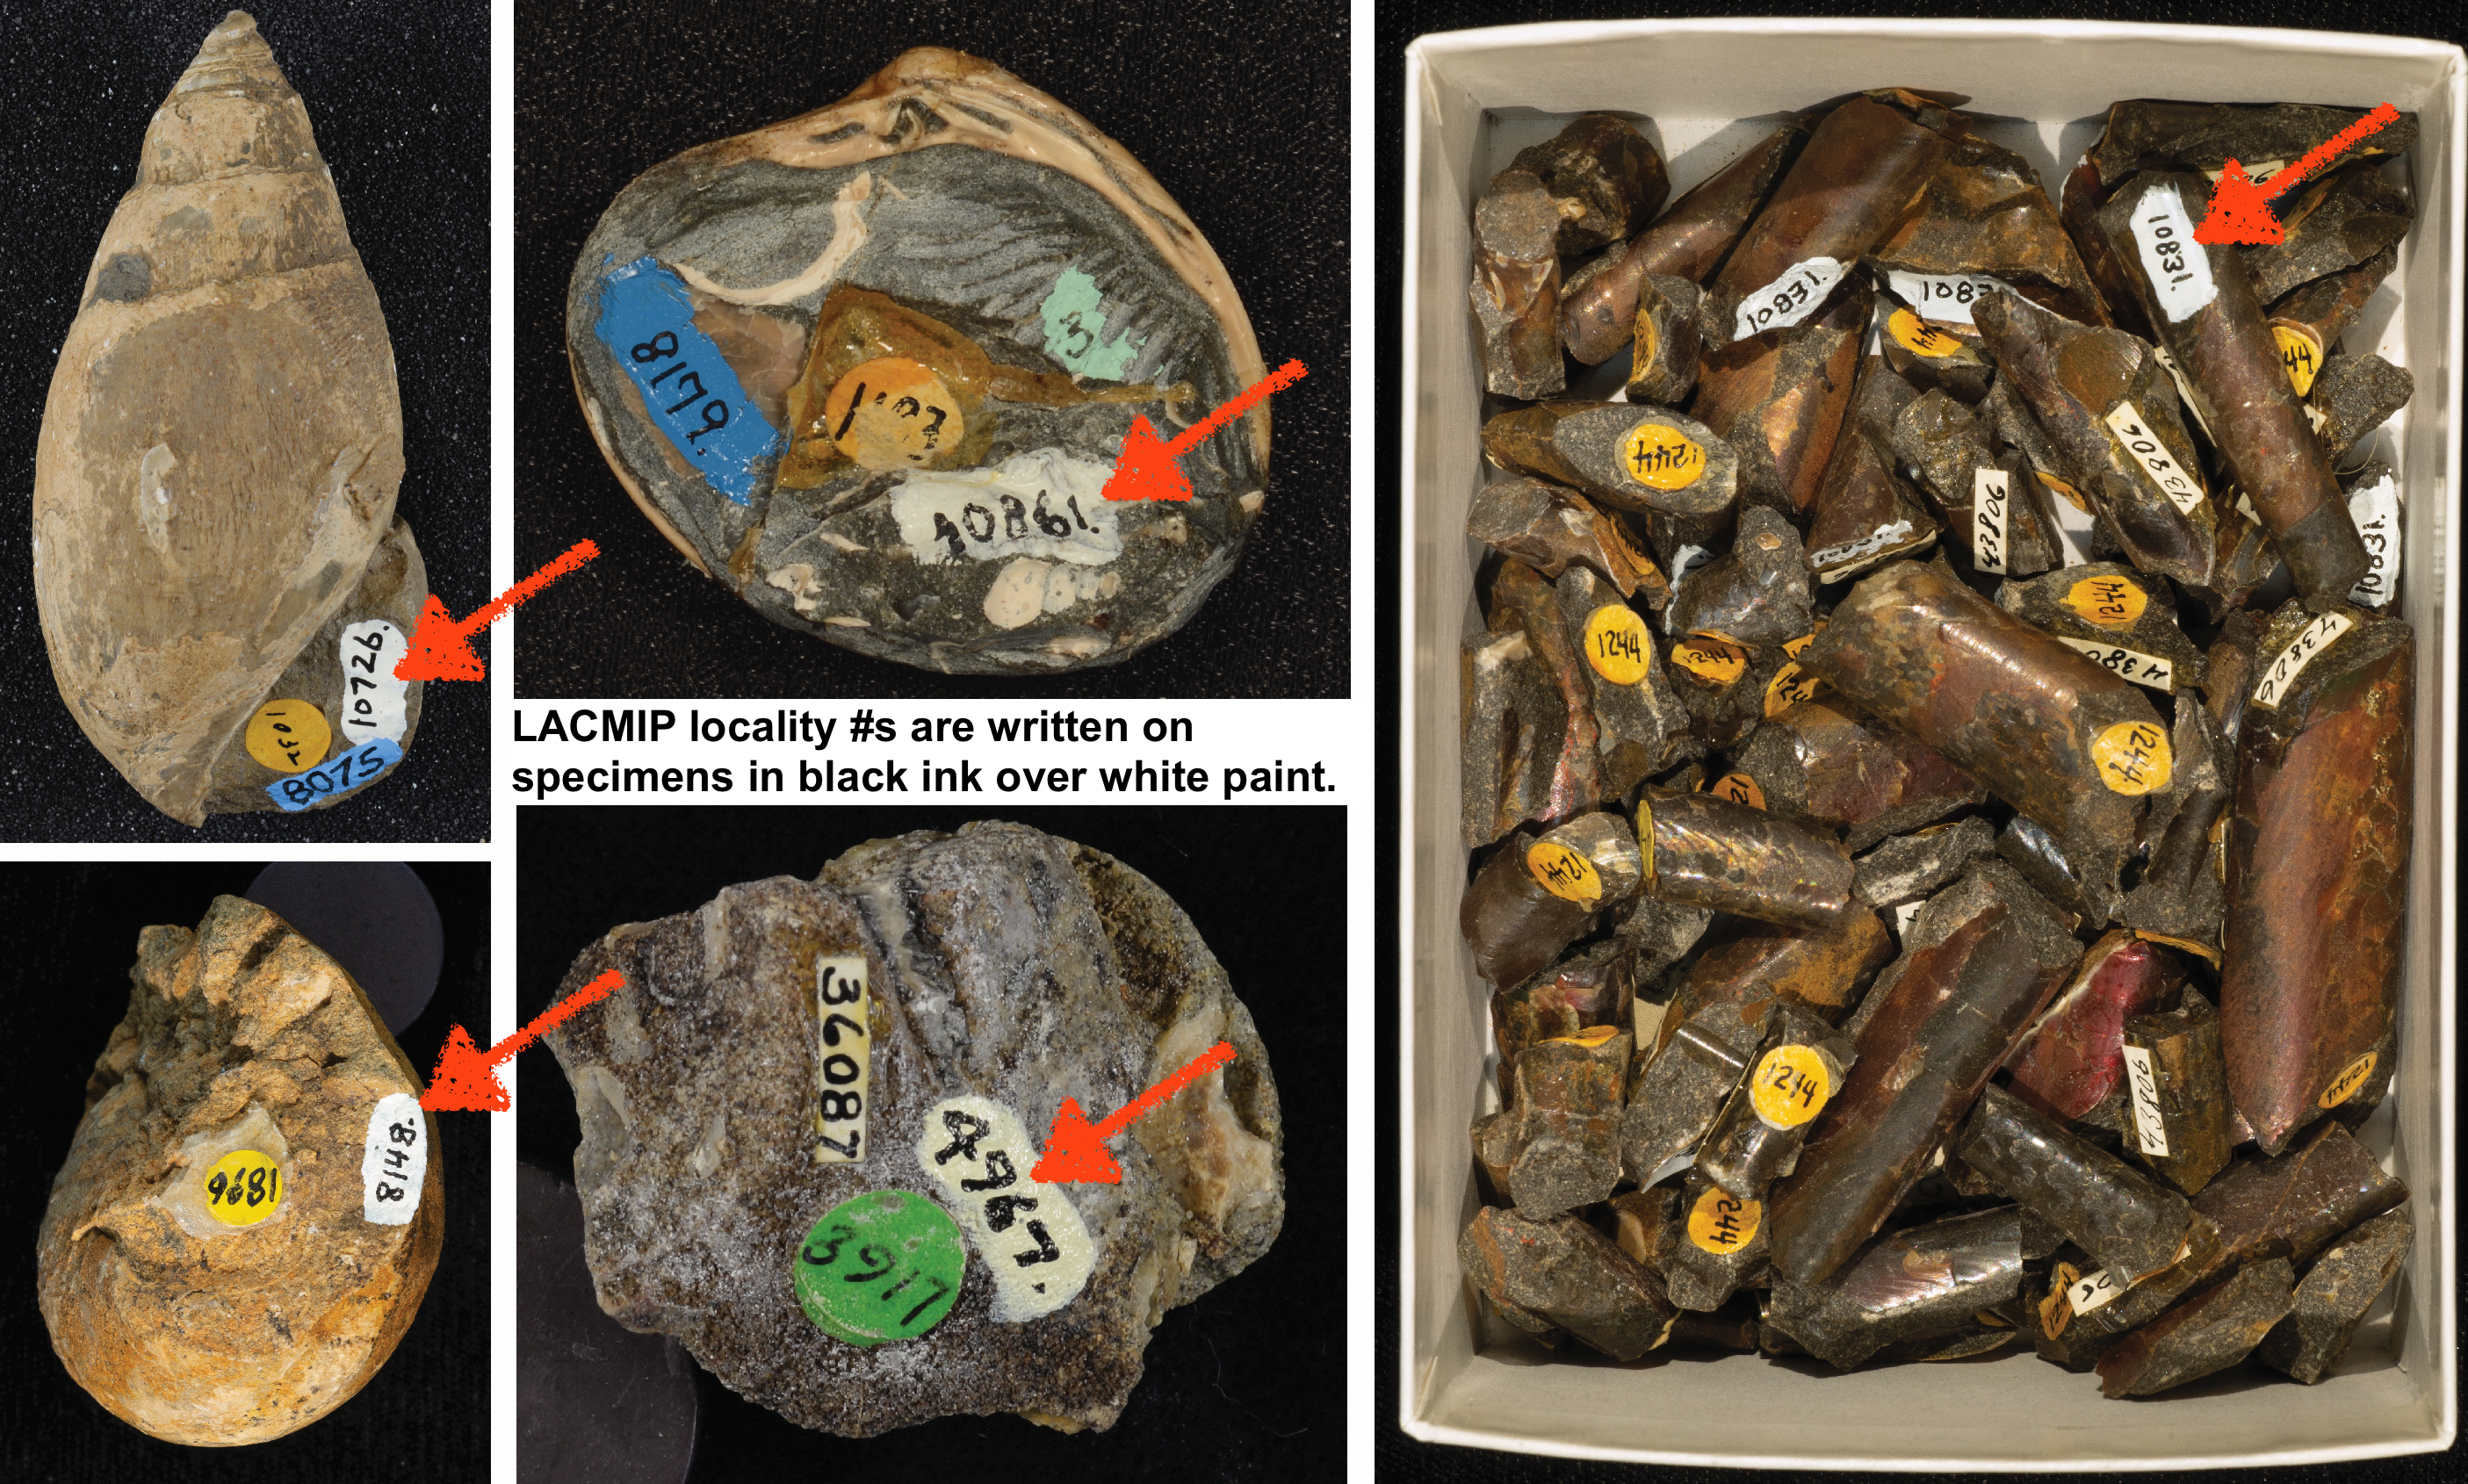
Search for type specimens using their LACMIP type numbers. These numbers are always labelled on specimens in bright red, yellow, or blue paint (never white paint or stickers). If you are unsure whether a number represents a type number, consult these keys.
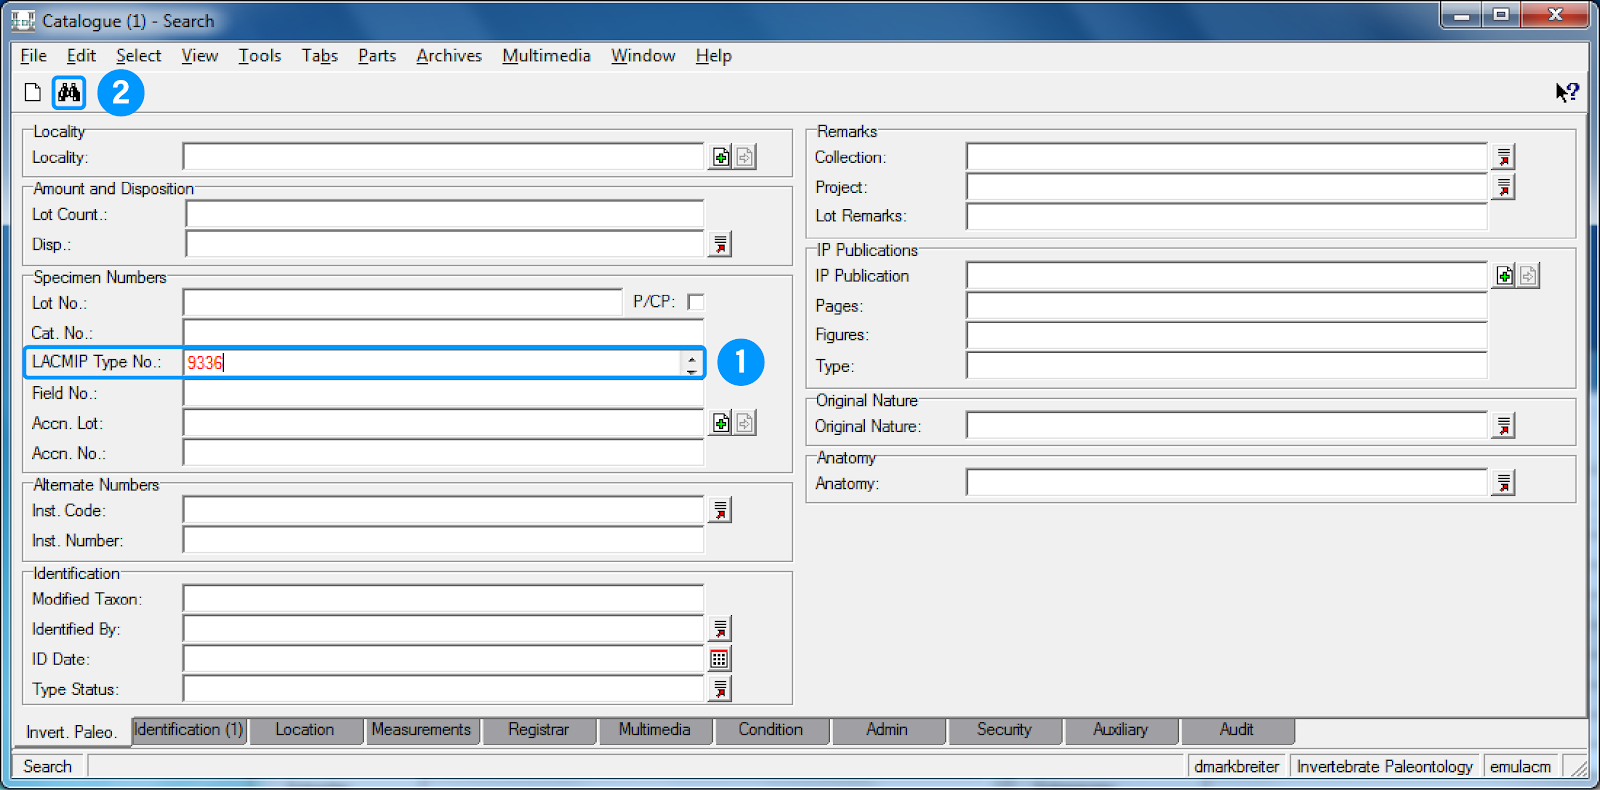
| Step | On the search form… |
|---|---|
| 1 | In LACMIP Type No., enter the type number. |
| 2 | Select the binoculars icon to execute the query. |
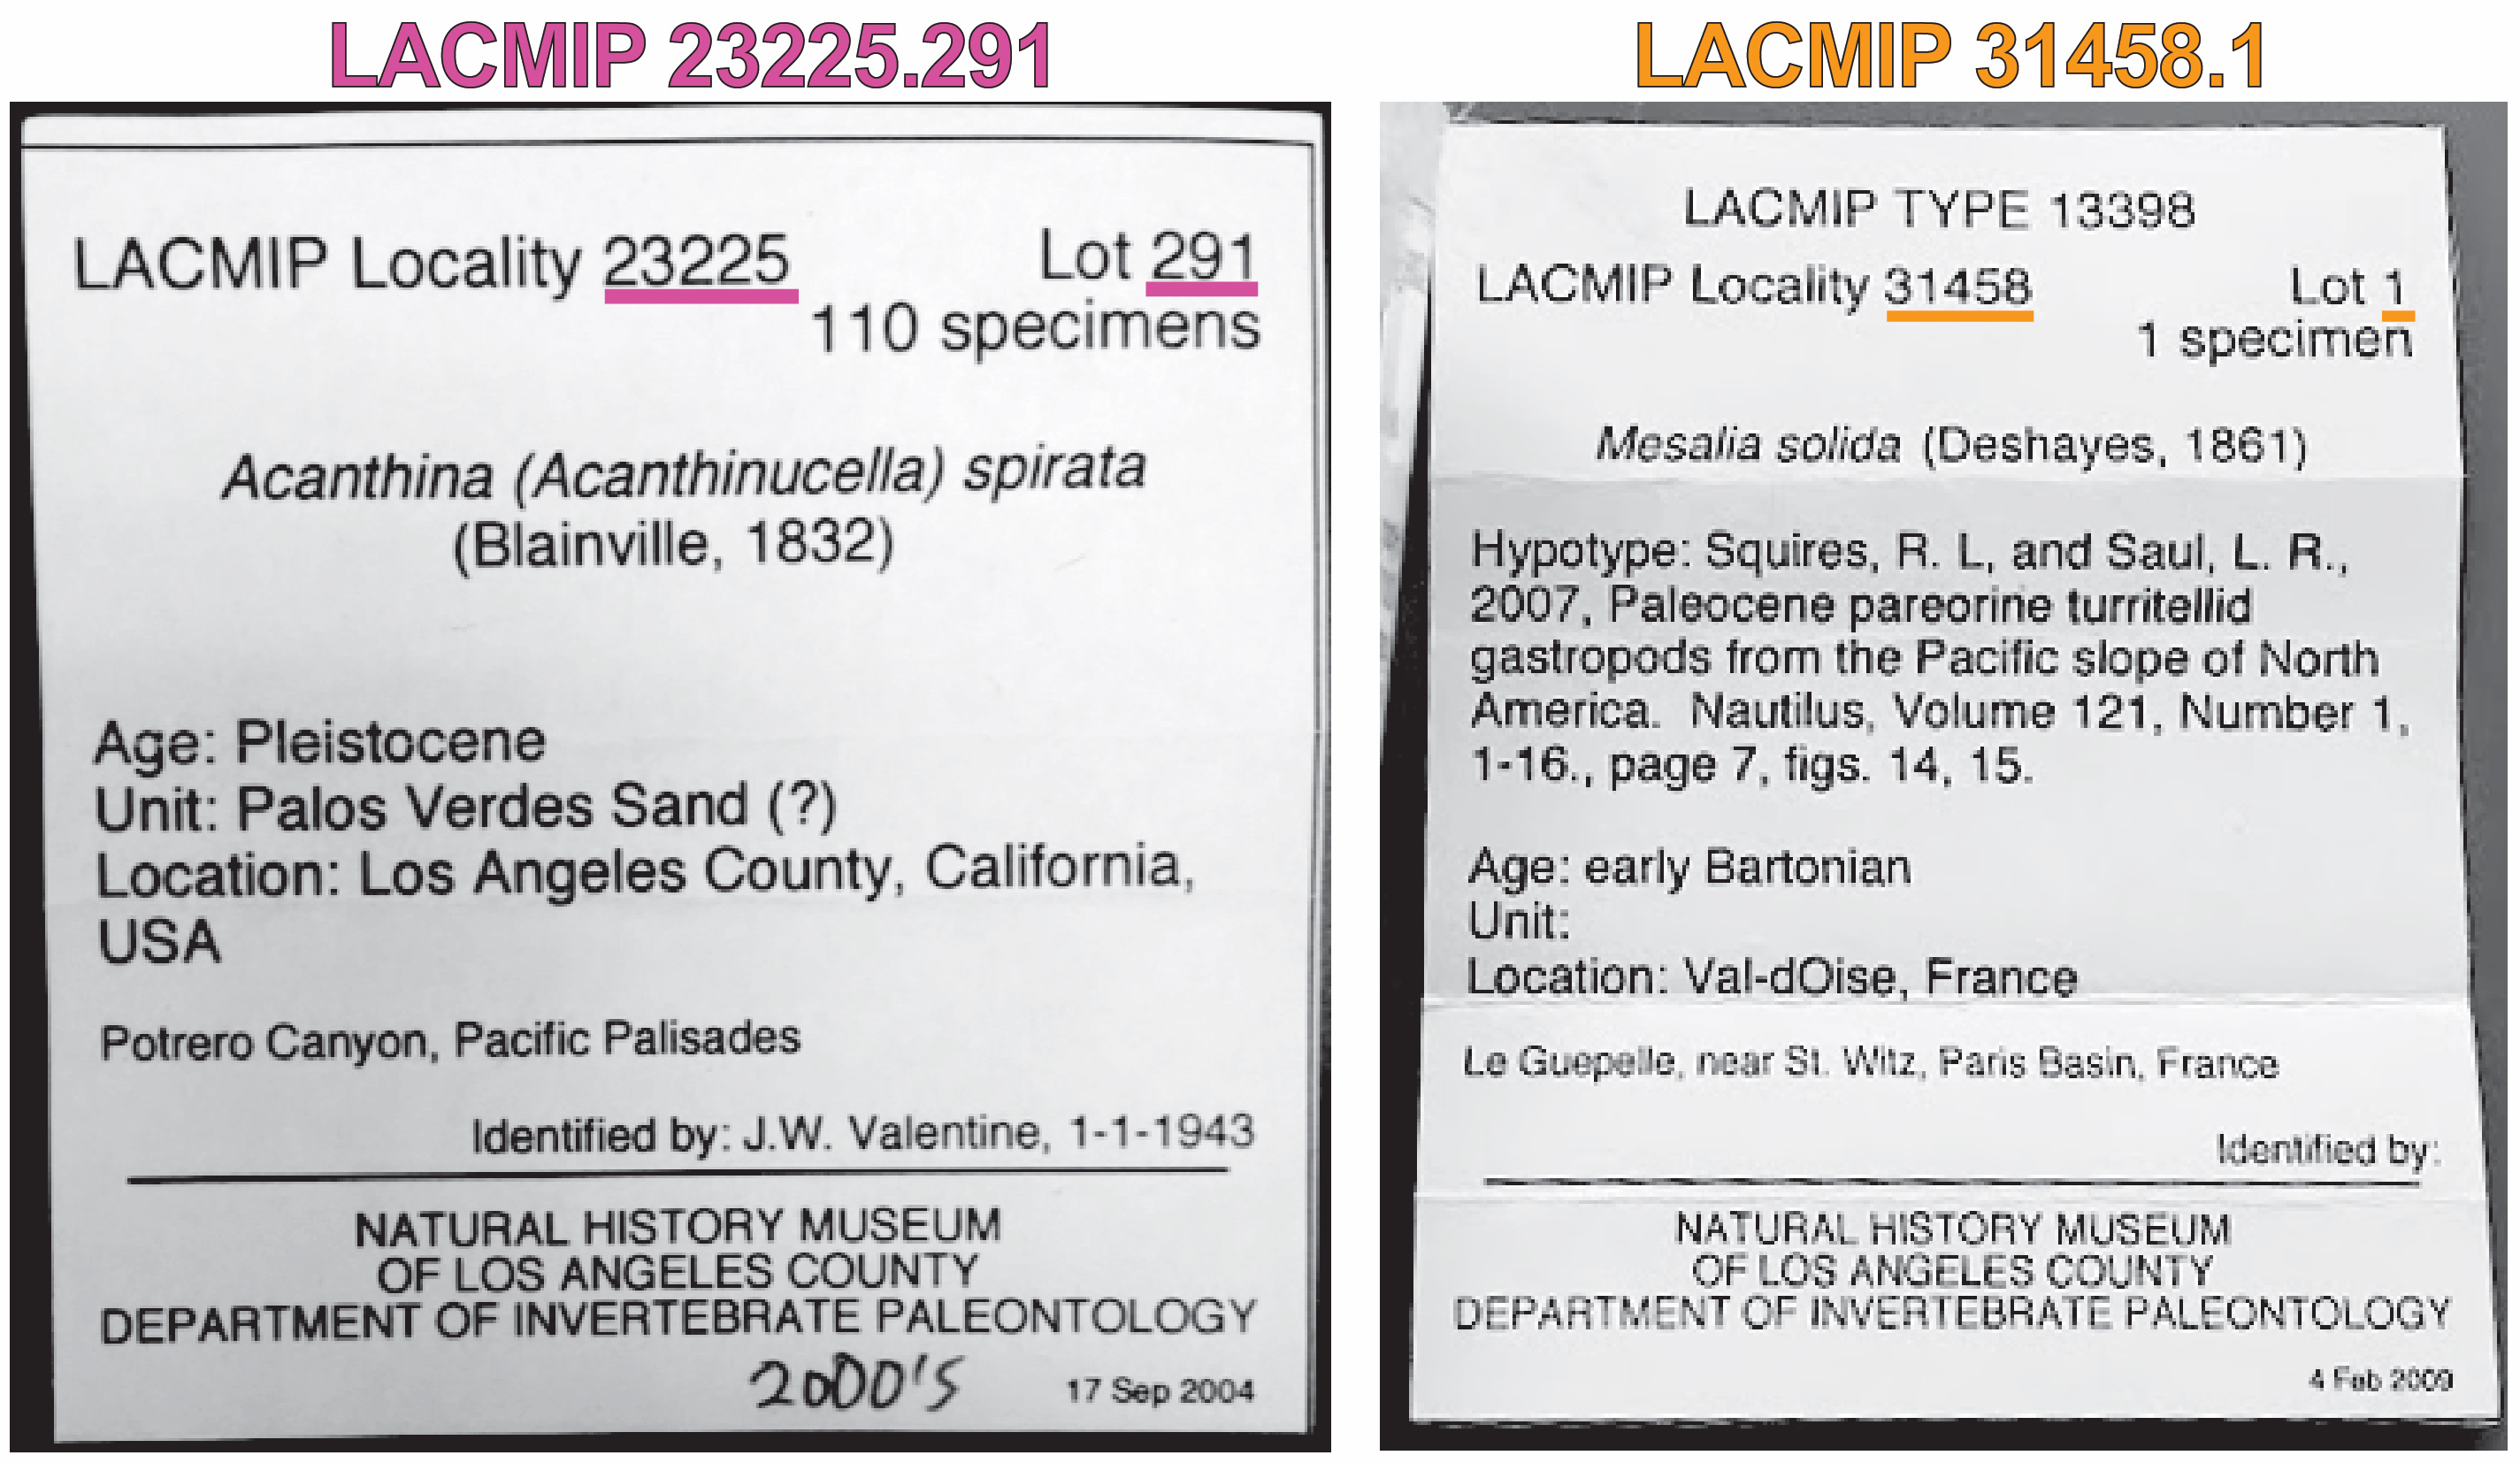
| 3 | If no records are returned using LACMIP Type No., but the catalog number is indicated on an old specimen label in the box, use it to search for the specimen in Cat. No. In this example, you would search for “23225.291” or “31458.1”. |
| 4 | If no records are returned and you are certain there were no typos in your searches, ask the collections staff for help. |
Once you get comfortable with EMu, tips on searching for records can be found here.
II. Assess the catalog record
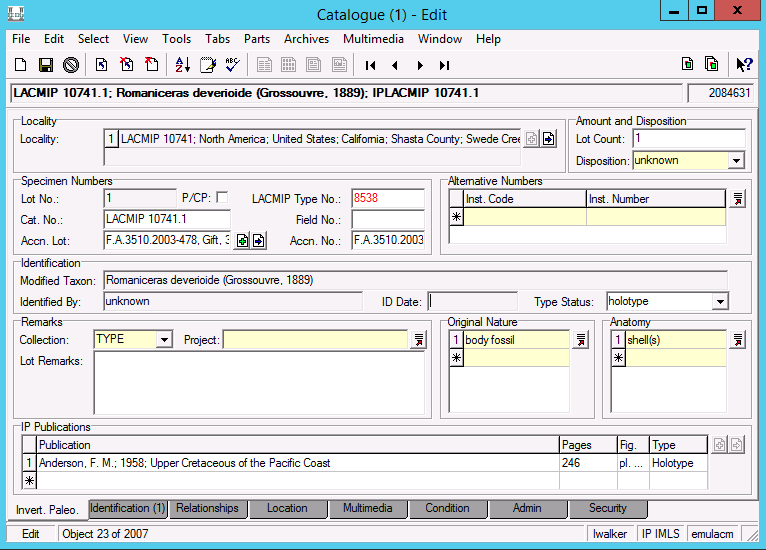
For each type specimen, assess the information on its catalog record according to guidance outlined below. You should only be concerned with information on the Invert. Paleo. tab and, in the uncommon event that several specimens are stuck together, the Relationships tab.
| Field | On the Invert. Paleo. tab… |
|---|---|
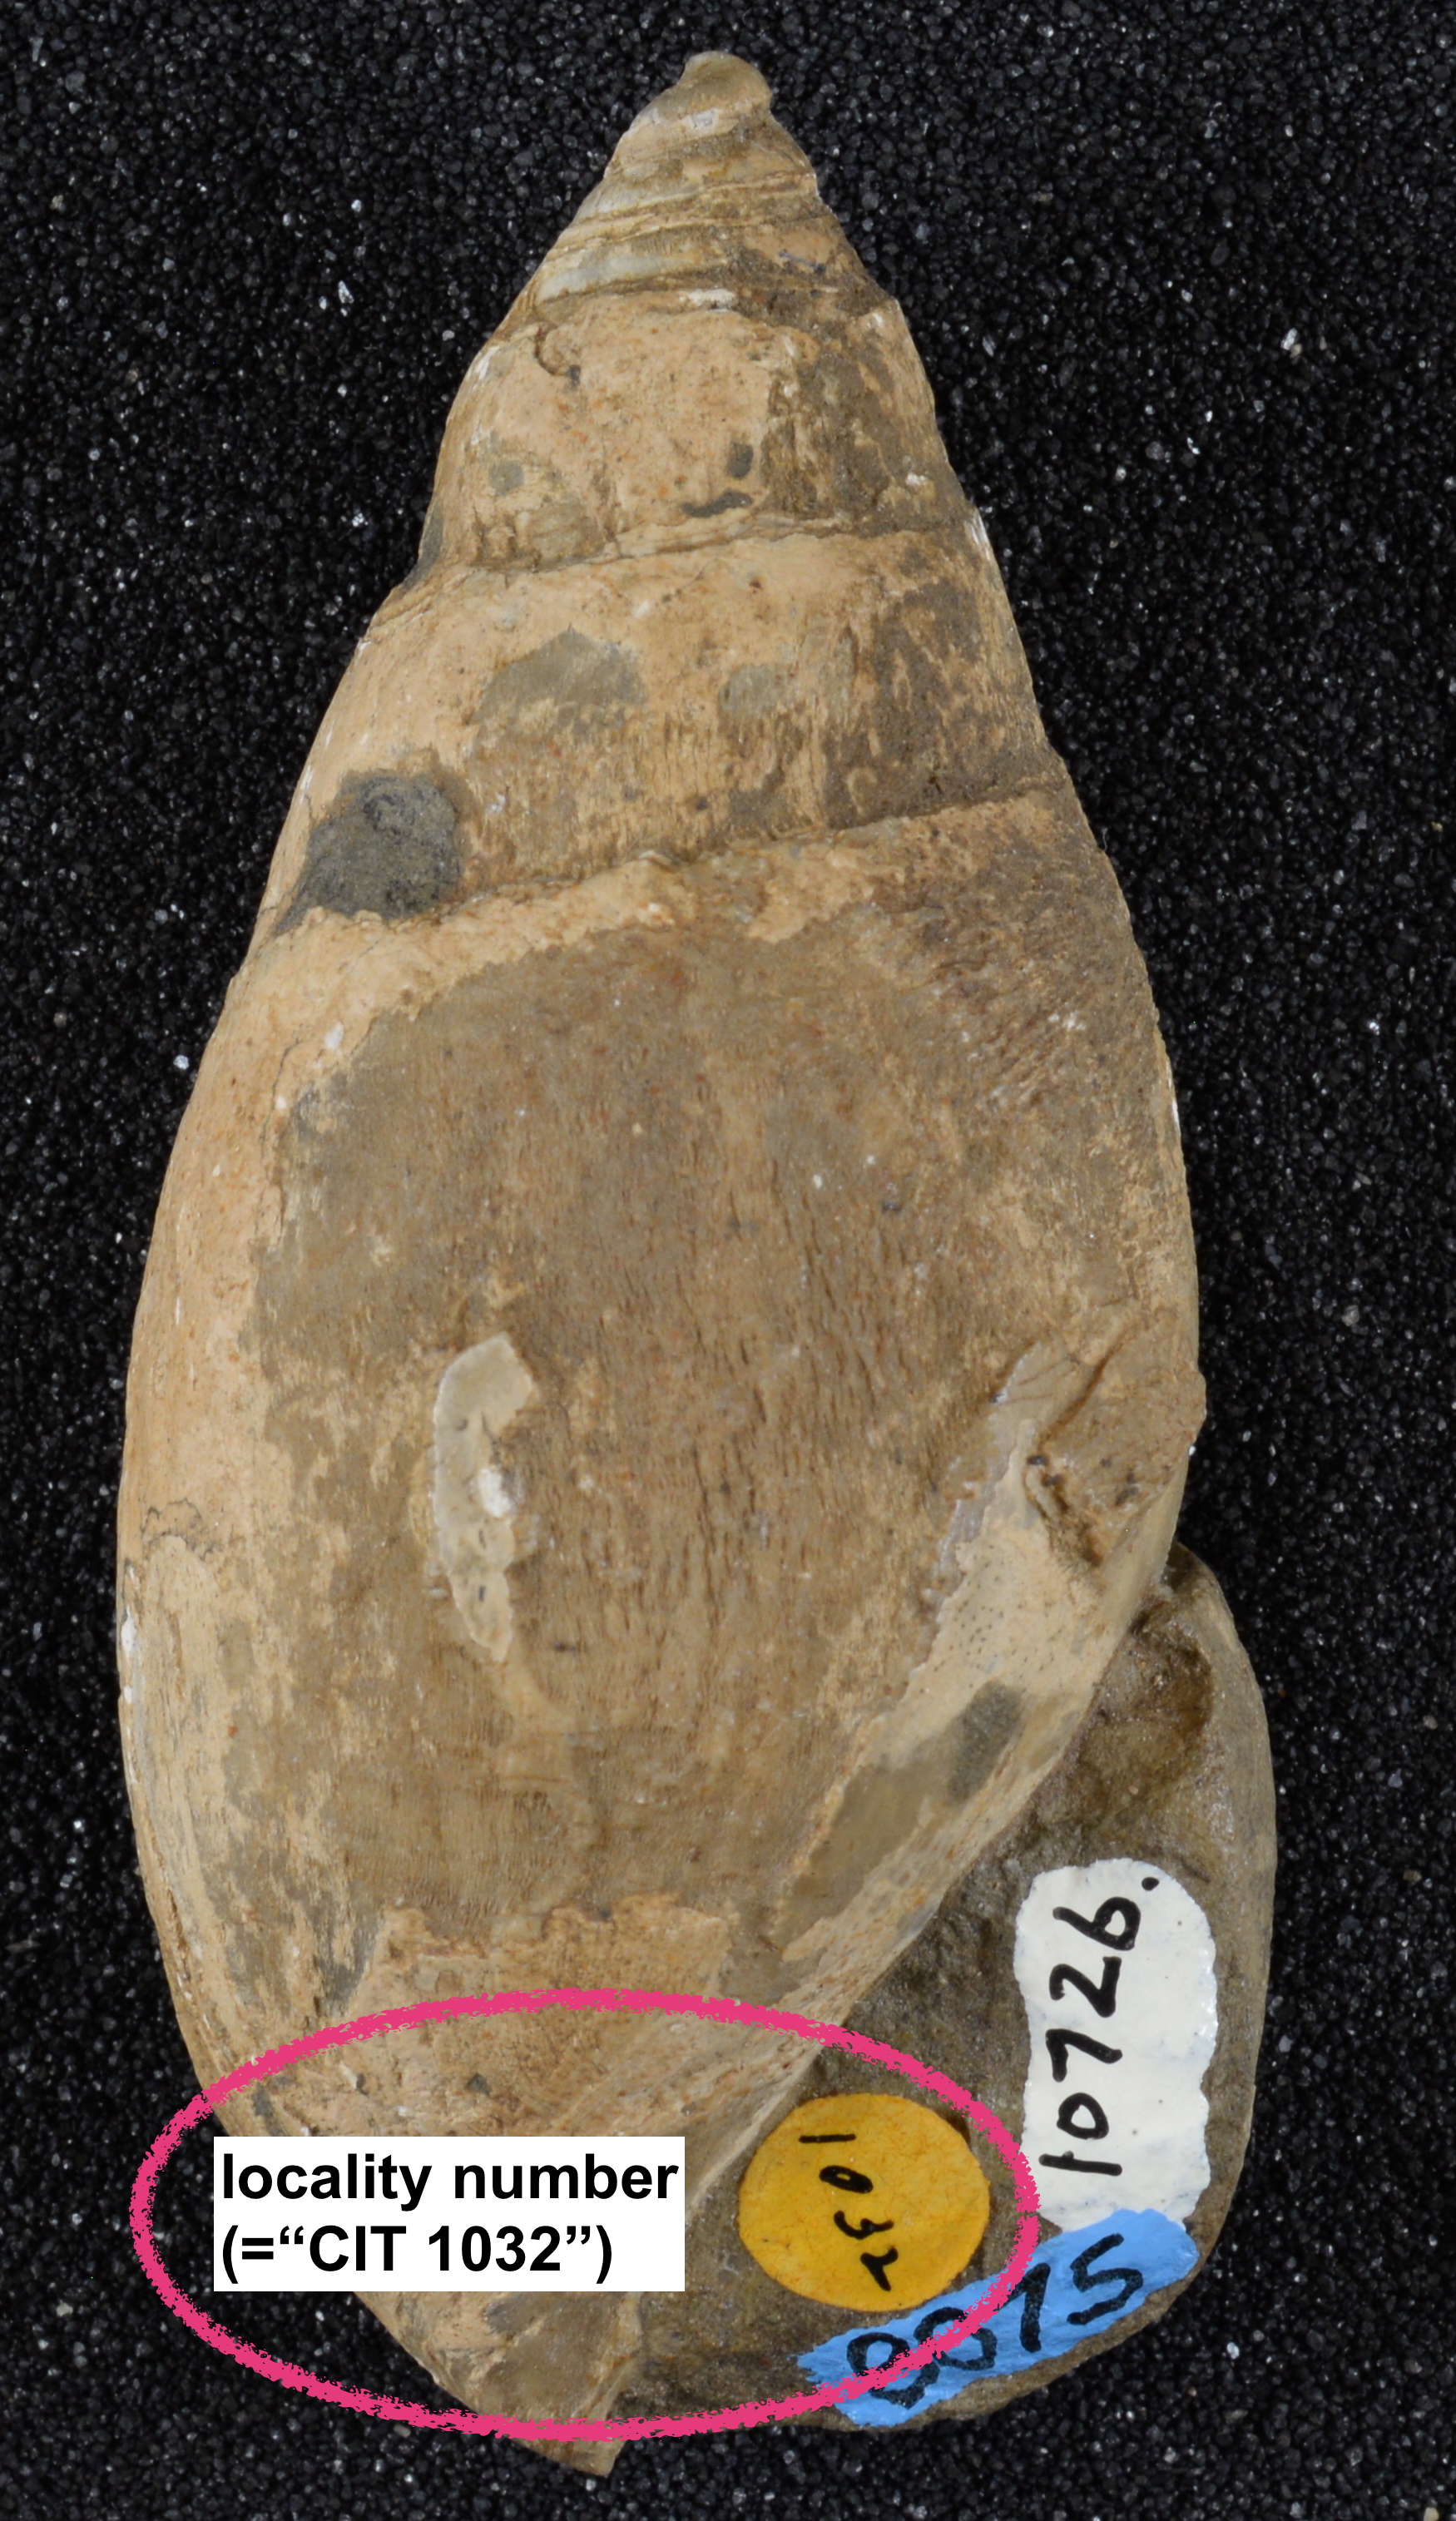
| Locality & Cat. No. | Verify that the LACMIP locality and catalog numbers listed on the catalog record match the locality number painted on the specimen in white paint, as well as what’s on the specimen’s old label(s) in its box. (Reminder: This is what a locality number looks like and this is what a catalog number looks like.) You may need to open the corresponding Sites record to compare (use the blue arrow to open it). While mismatches are uncommon, immediately alert the collections staff if you find one. |
| Lot Count | Verify the number of specimens in the lot that have the same type number. In the type collection, this value is typically “1”, but occasionally there will be more than one fossil (or piece of fossil) with the same type number; in either case, update the lot count to reflect the true number of specimens. Refer to the guidelines for counting and ask for help if you’re still unsure. Do not count synthetic objects, like rubber peels, that may also be in the box. |
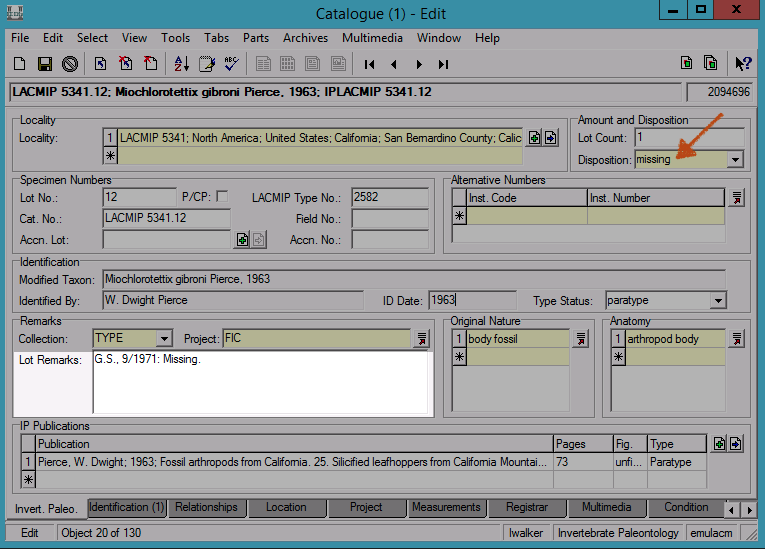
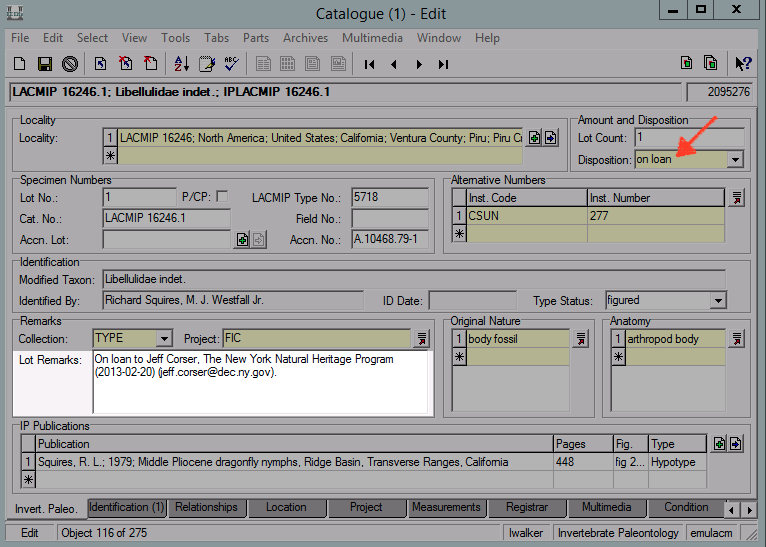
| Disposition | Verify the physical state of the specimen lot. For the vast majority of lots, you will verify that they are in the collection by choosing “in collection”. However, if you encounter an empty box, a specimen may be “missing” or “on loan”, and Disposition should be updated accordingly. If the specimen is missing, transcribe any relevant notes you find in the box into Lot Remarks, for example, “G.S., 9/1971, Missing”. Likewise, if the specimen is on loan, transcribe any relevant information at your disposal into Lot Remarks in this format: “On loan to [name], [affiliation] (YYYY-MM-DD) (email)”. Ask the collections staff if the correct disposition is not readily apparent. |
| P/CP | Refers to “part” (P) and counterpart” (CP) and is typically used for compression fossils and concretions. If both parts (halves) are present, check this box and make sure Lot Count is updated accordingly. |
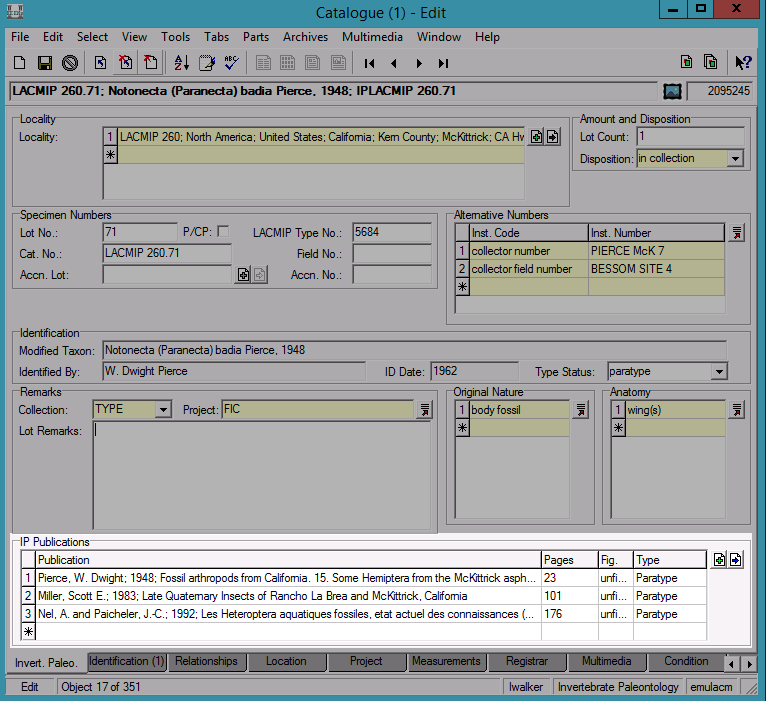
| Alternative Numbers |
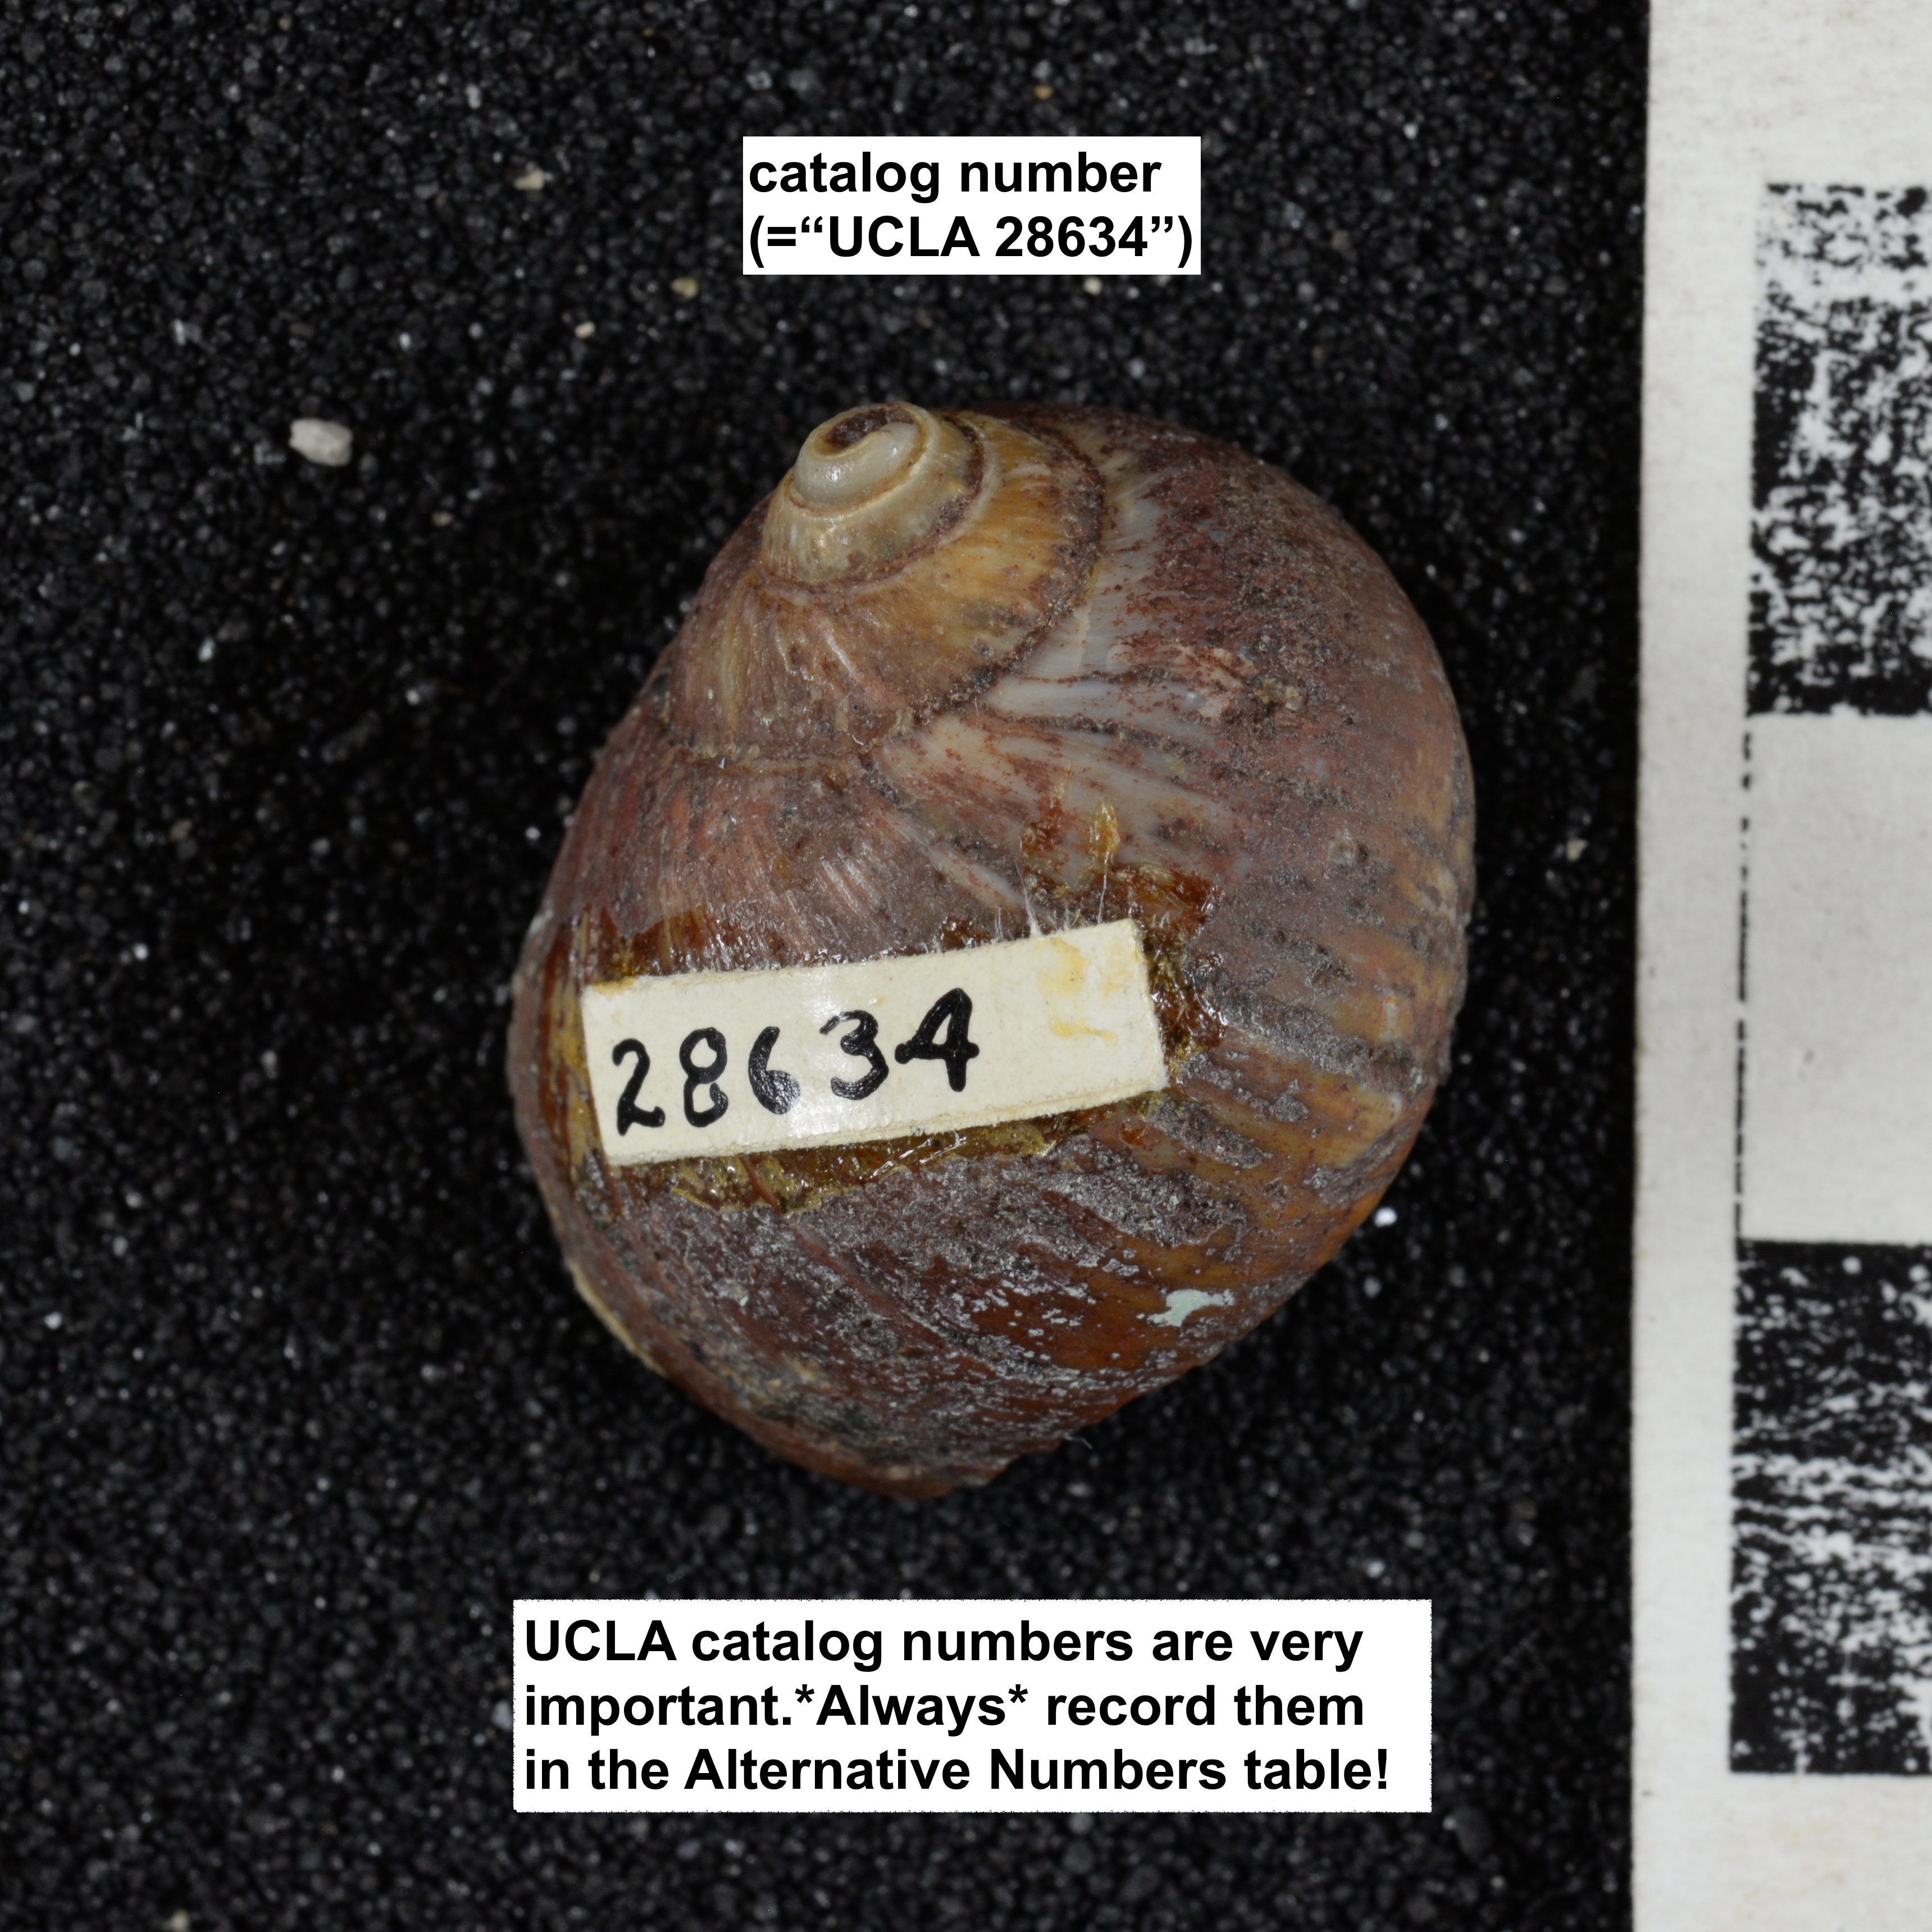
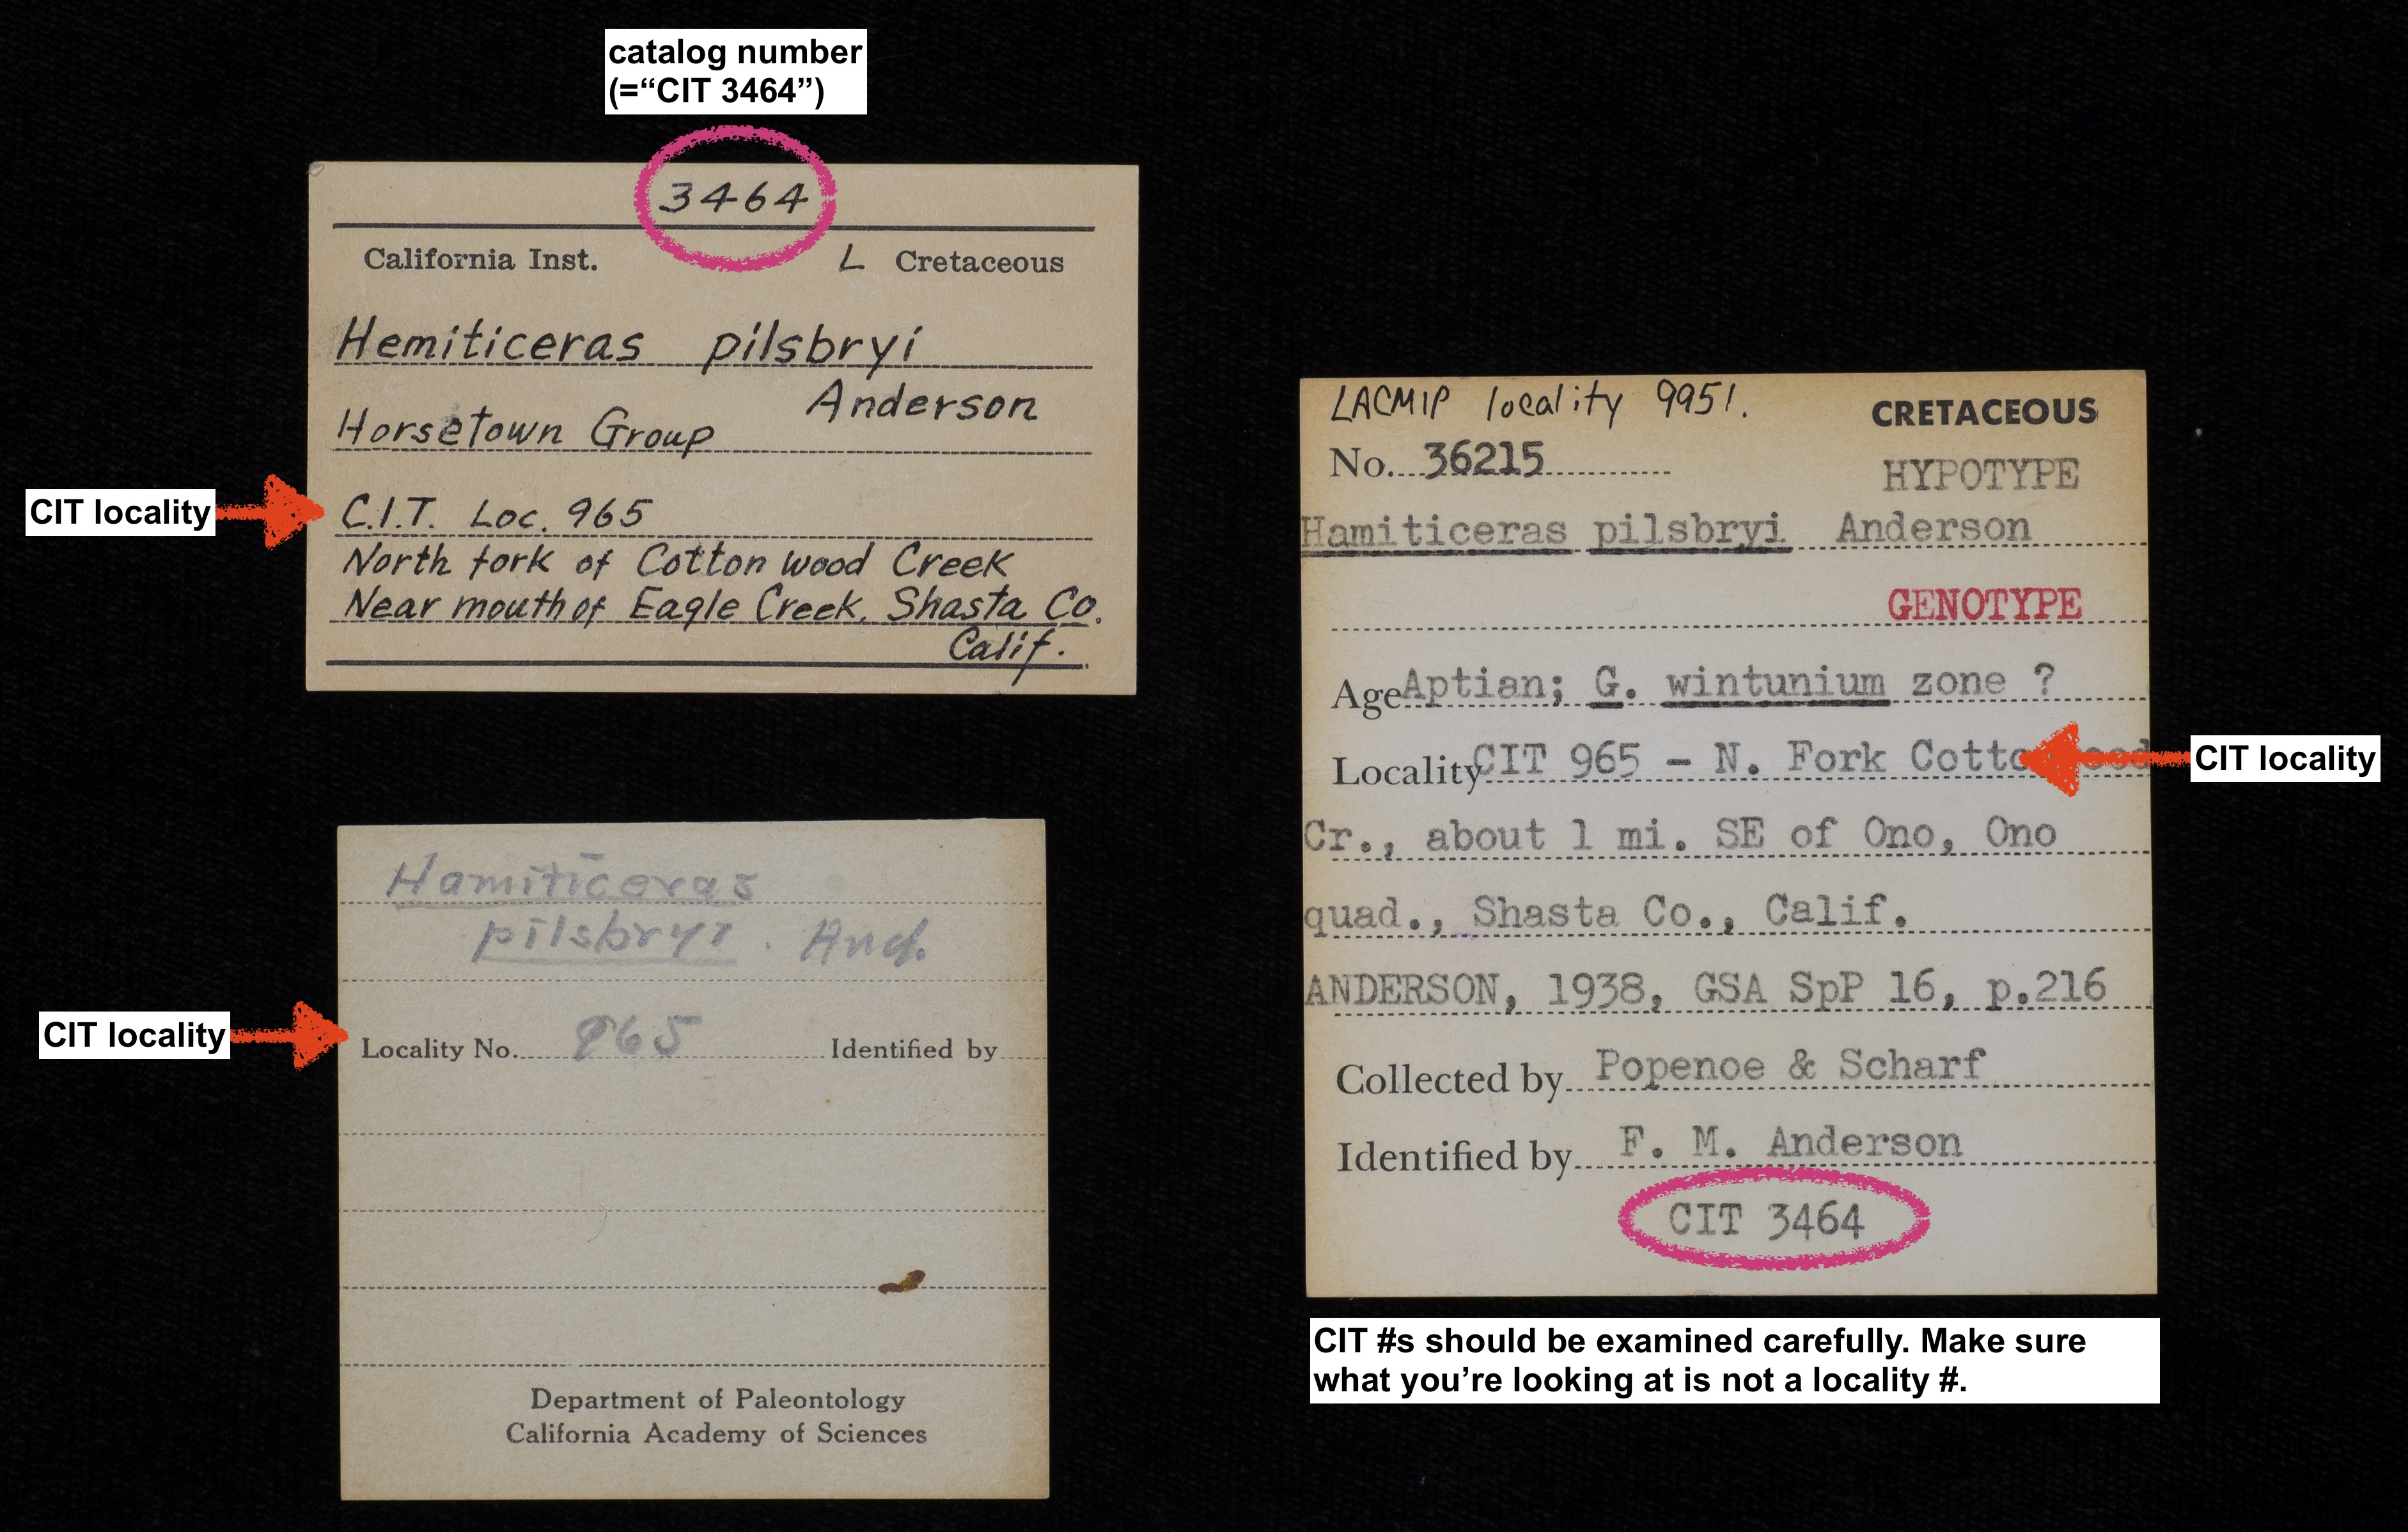
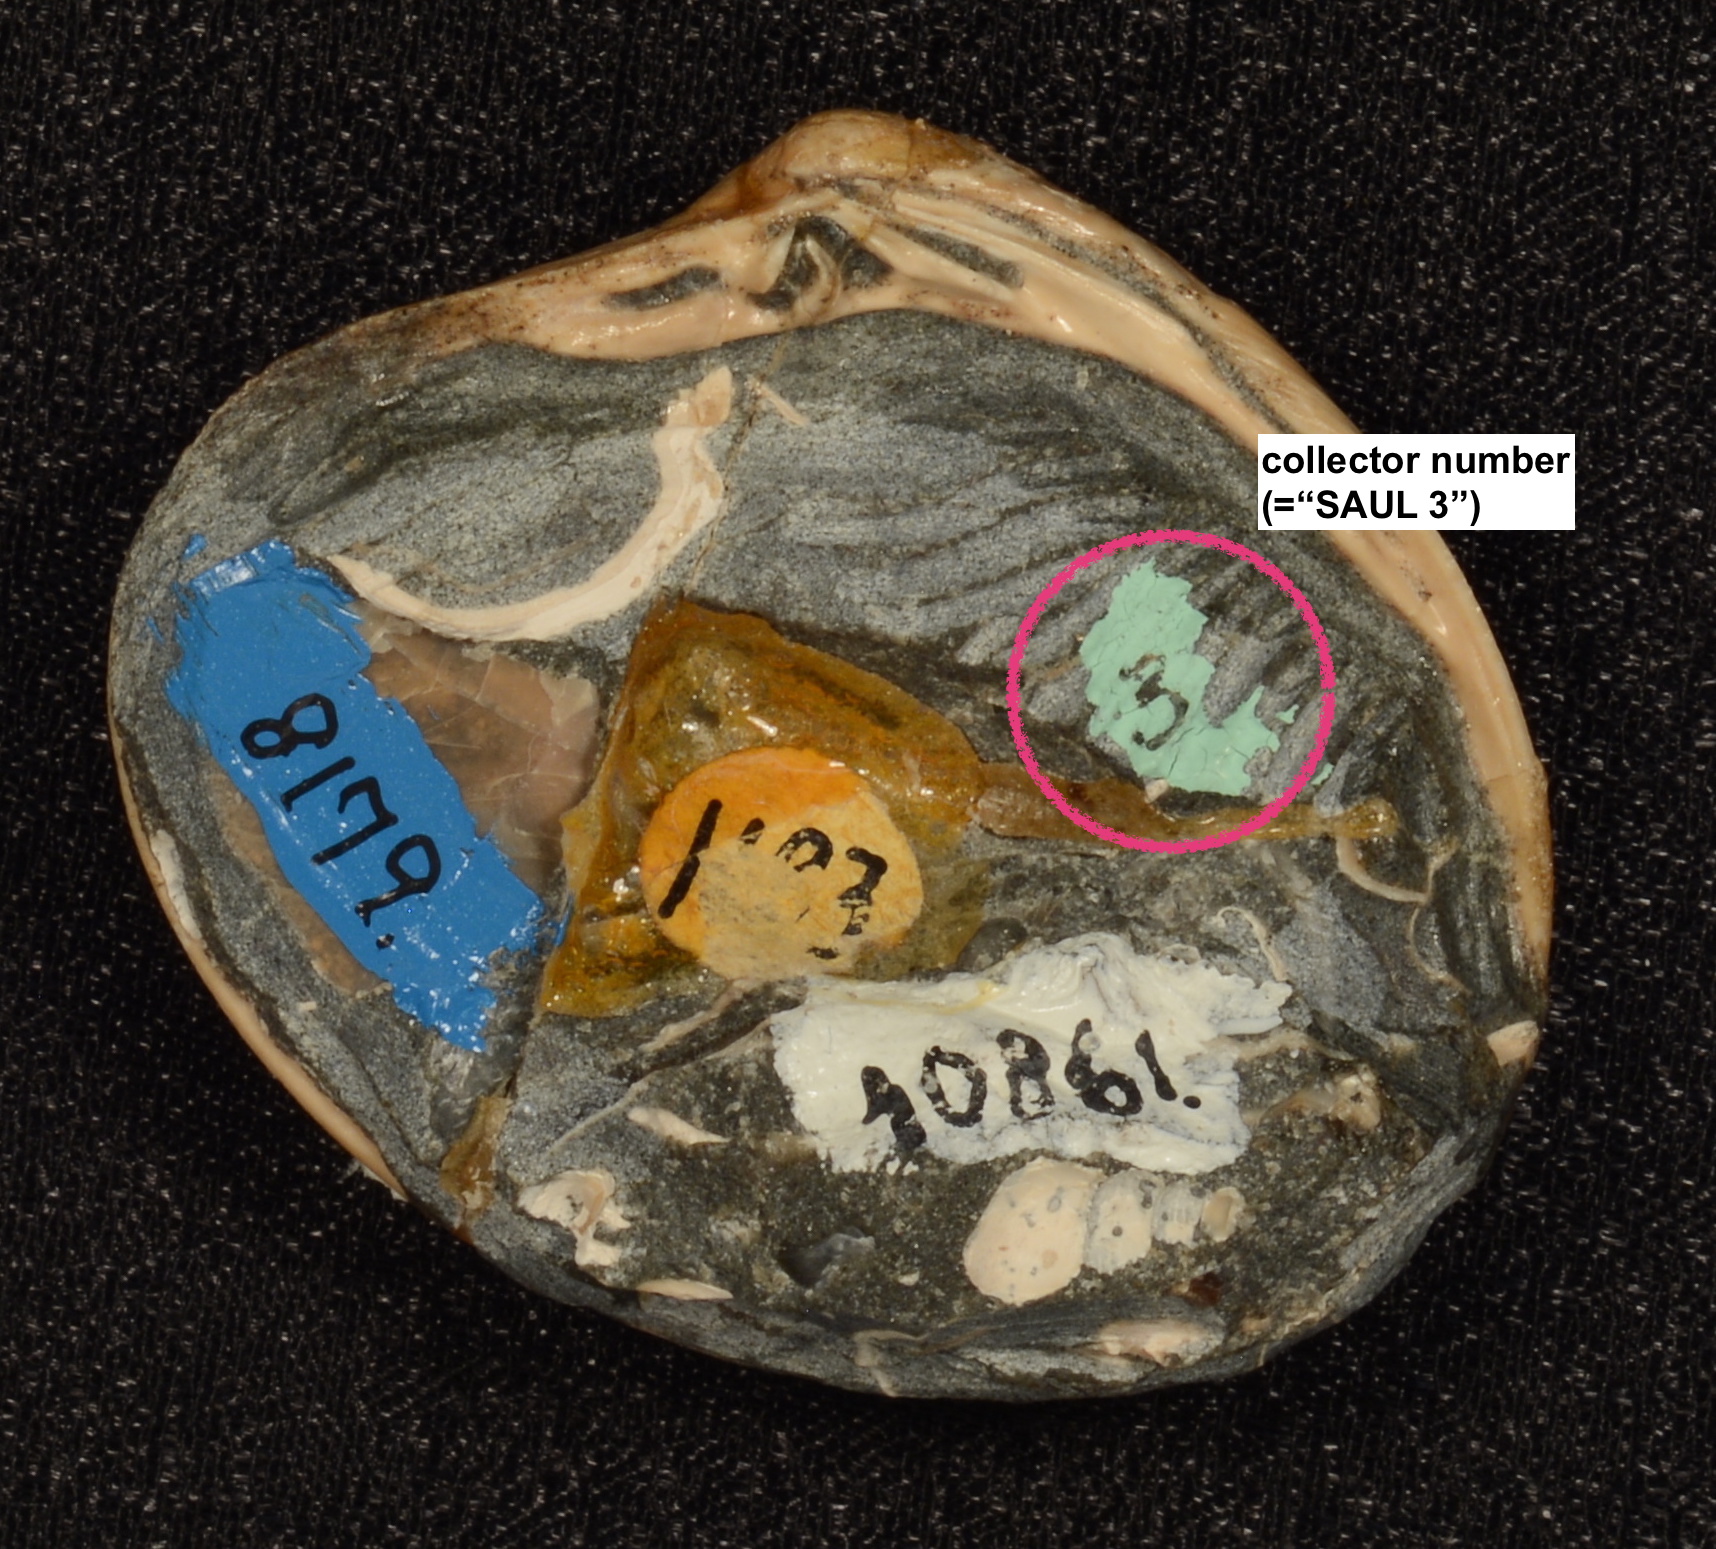
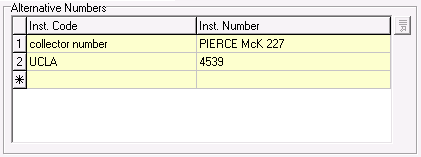 Record legacy catalog numbers assigned by another institution or the collector in this table. Inst. Code typically refers to an institution, like “UCLA”, “CIT”, or “CSUN”. Use the lookup list button when entering an Inst Code to validate your entry. If you are trying to add a new institution code, please ask for assistance. Occasionally, the number might be a collector number. In that case, enter “collector number” in this field. Inst. Number can either refer to a number assigned by an institution (such as UCLA) or a collector (such as W. D. Pierce). In the case of a collector, the number should be formatted as capitalized name and number (e.g. “PIERCE 32a”). Do not record old locality numbers in this table, which are typically found on circular stickers in the type collection. Use the number keys appendix to guide you. Record legacy catalog numbers assigned by another institution or the collector in this table. Inst. Code typically refers to an institution, like “UCLA”, “CIT”, or “CSUN”. Use the lookup list button when entering an Inst Code to validate your entry. If you are trying to add a new institution code, please ask for assistance. Occasionally, the number might be a collector number. In that case, enter “collector number” in this field. Inst. Number can either refer to a number assigned by an institution (such as UCLA) or a collector (such as W. D. Pierce). In the case of a collector, the number should be formatted as capitalized name and number (e.g. “PIERCE 32a”). Do not record old locality numbers in this table, which are typically found on circular stickers in the type collection. Use the number keys appendix to guide you. |
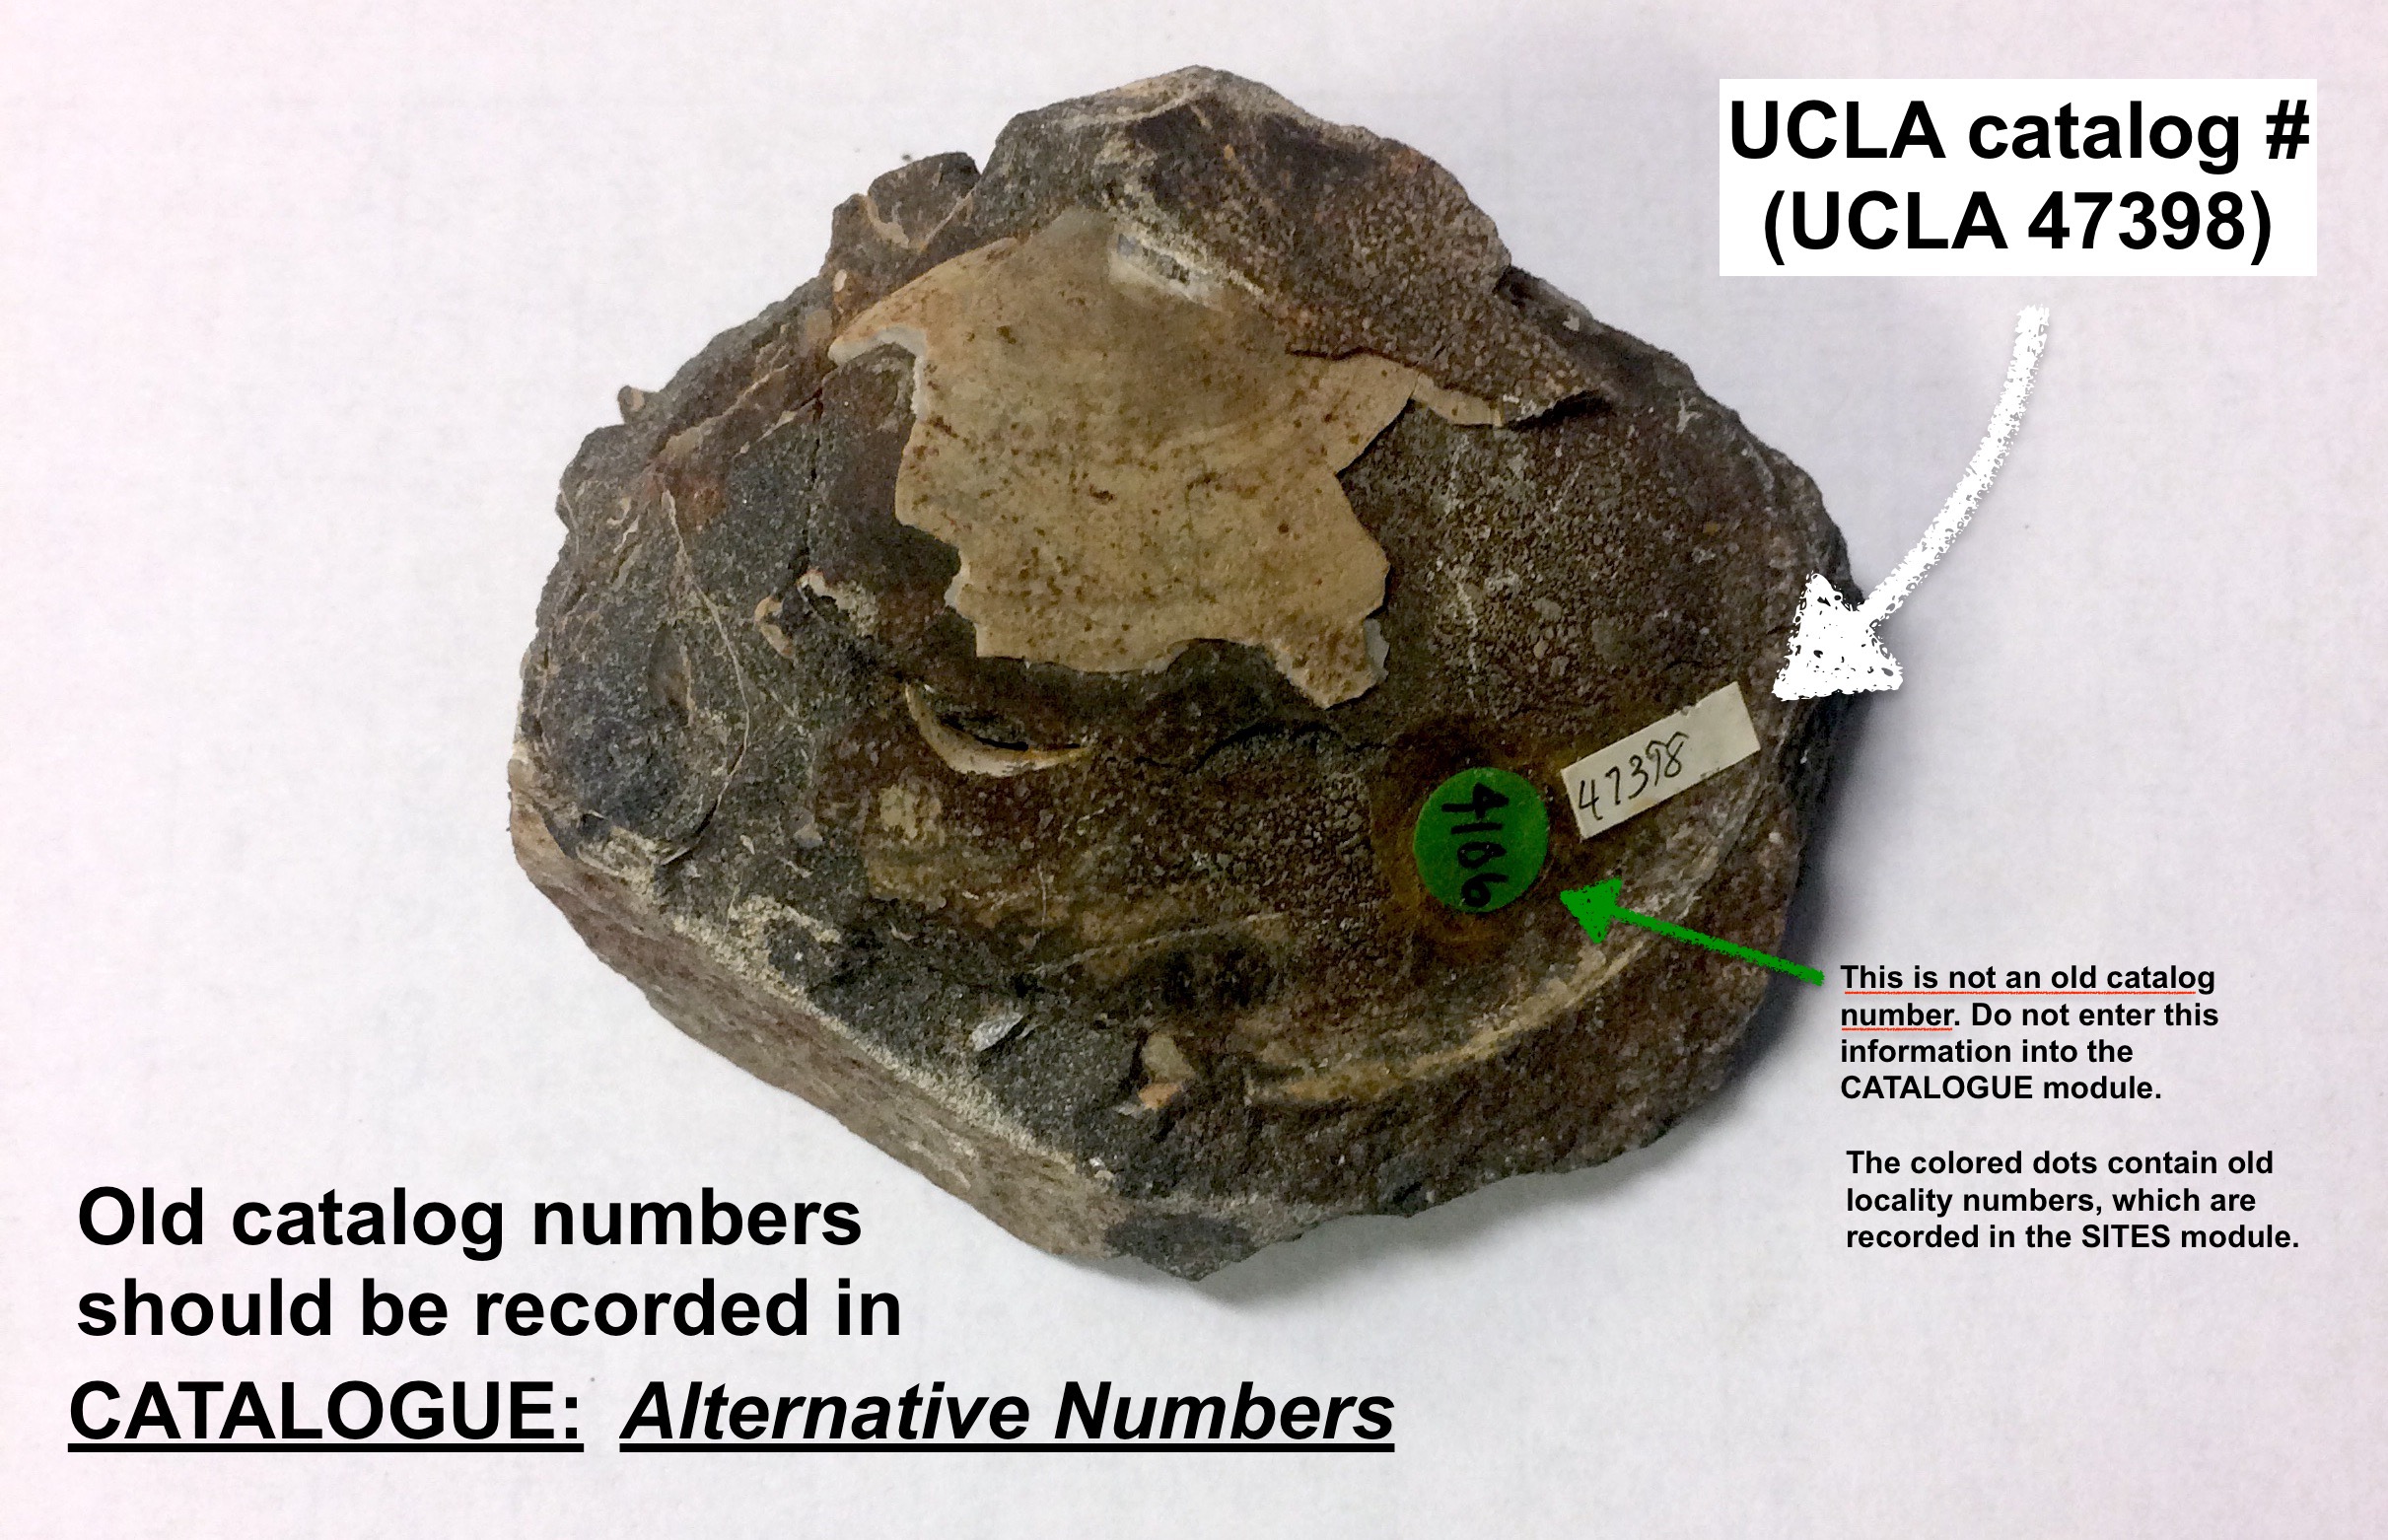
If you are unsure how to record a number, take a quick photo of the specimen (with the number visible), as well as any relevant specimen labels, and send them to the IP collections staff in Google Chat.
| Field | On the Invert. Paleo. tab… |
|---|---|
| Type Status | Refers to the most important status conferred upon a type specimen. In the unlikely event that this value is incorrect, use the dropdown and select the most important kind of type listed the IP Pubications table: 1, most important: holotypes, syntypes, lectotypes, neotypes; 2: paratypes, paralectotypes, allotypes; and 3, least important: hypotypes, figured and unfigured. |
| Collection | Value should always be “TYPE”. |
| Project | If blank, choose “IMLS”. |
| Original Nature | Ignore this field. The default value is “body fossil”. This information will be updated at a later time. |
| Anatomy | Ignore this field. The default value is “body”. This information will be updated at a later time. |
| Lot Remarks | Only enter information in this field if you find a lot with a missing specimen or a specimen on loan. See Disposition for more information on missing and loaned lots. |
III. Verify publication history
Specimens are designated as types if they are cited in publications, and this information is tracked in the IP Publications table.
| Field | In the IP Publications table… |
|---|---|
| Publication (Scenario 1) | If a publication is already listed in the table, verify the information in the Pages, Fig., and Type fields using a copy of the book or paper. LACMIP maintains a collection of reprints for this purpose. If you need to search for a digital copy, please consult the appendix. |
| Publication (Scenario 2) |
If a publication is missing from the IP Publications table, it needs to be attached using the Bibliography module. To do so, in a blank row the Publication field of the table, search for the publication by typing in a few words from the title or a few last names from the author list, then press ‘tab’ or select the green ➕ button. If an entry for this publication already exists in the Bibliography module, it may automatically attach itself to the row. Verify that the correct record was retrieved by opening it with the blue |
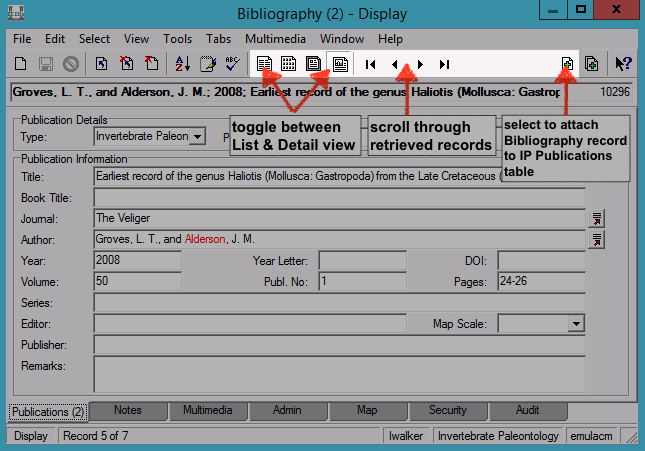
If you need to create a new Bibliography record, search for an existing one from the same journal and use it as a template for the new record using ditto. The gathering literature section of the appendix outlines where and how to add digital literature to the LACMIP reprint library.
| Field | In the IP Publications table… |
|---|---|
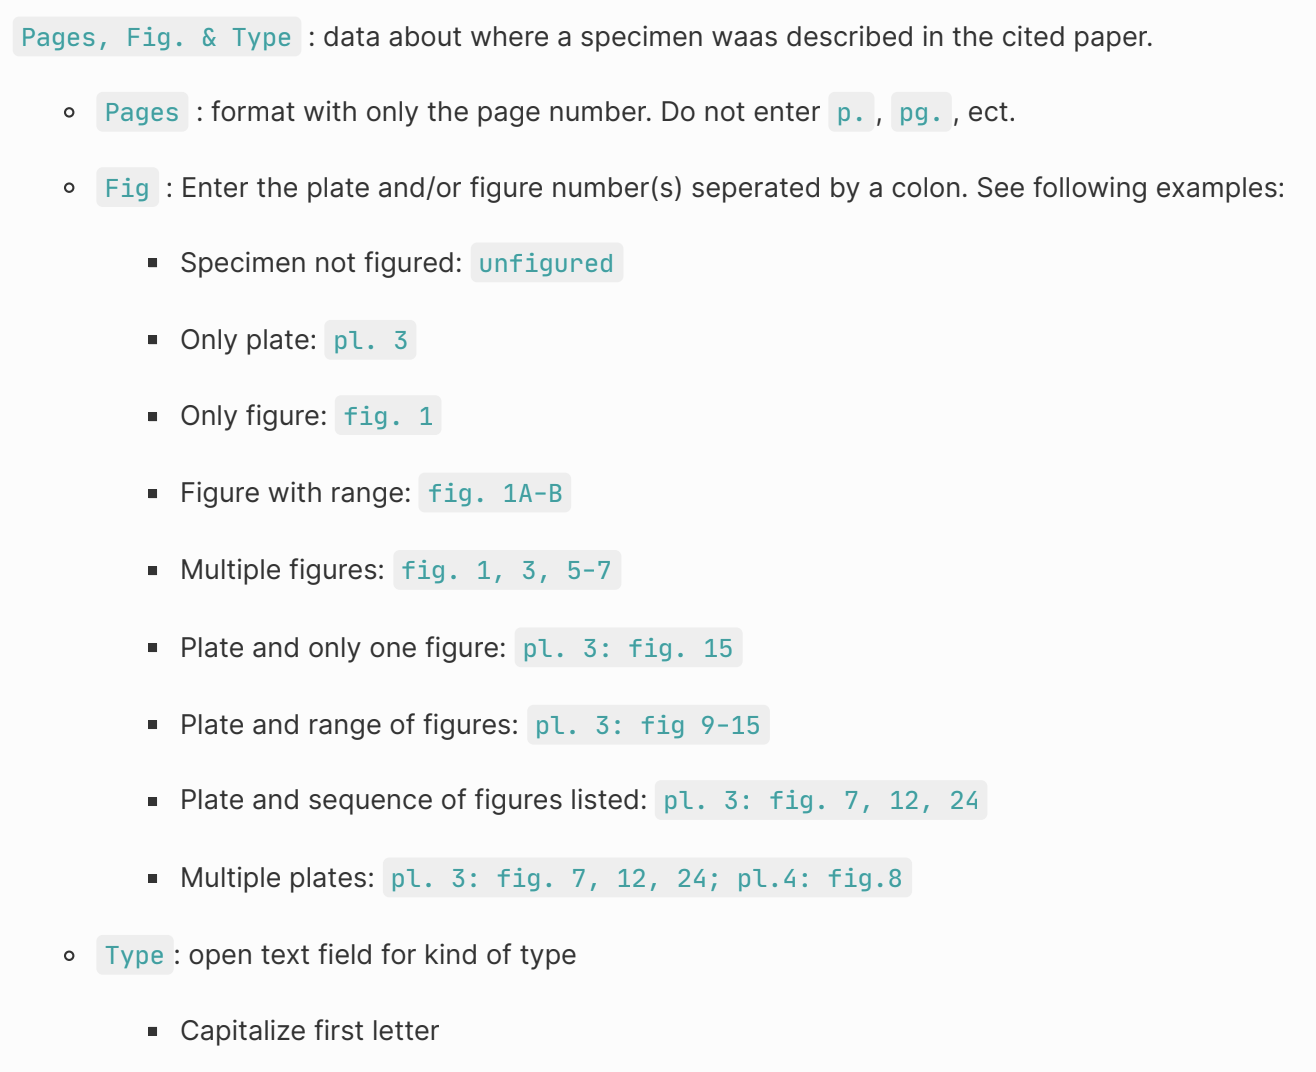
| Pages | Enter the page number(s) where the specimen is described. Do not enter “p.”, “pg.”, etc. before the number(s). |
| Fig | Enter the plate and figure number(s) separated by a colon. For example: “pl. 1: fig. 1-3”. If a specimen is figured on multiple plates, separate these entries with a semicolon. For example, “pl. 1: fig. 1-5; pl. 4: fig. 3b-c”. If the figure is unnumbered, enter “fig. unnumbered”. If the specimen is unfigured, enter “unfigured”. This field can be stretched horizontally if needed. |
| Type | Indicate what kind of type the specimen is according to the publication. For specimens cited in theses, dissertations, and historic manuscripts, enter “Unpublished”. The first letter should be uppercase, e.g. “Holotype”. |
Publications in this table should be listed chronologically with the oldest (first) publication appearing in the top row. If needed, click and drag to reorder these entries. You may wish to print this formatting cheatsheet for values in Page and Fig.
More on how LACMIP types are cited and the history of these numbers can be found here.
IV. Relate associated specimens
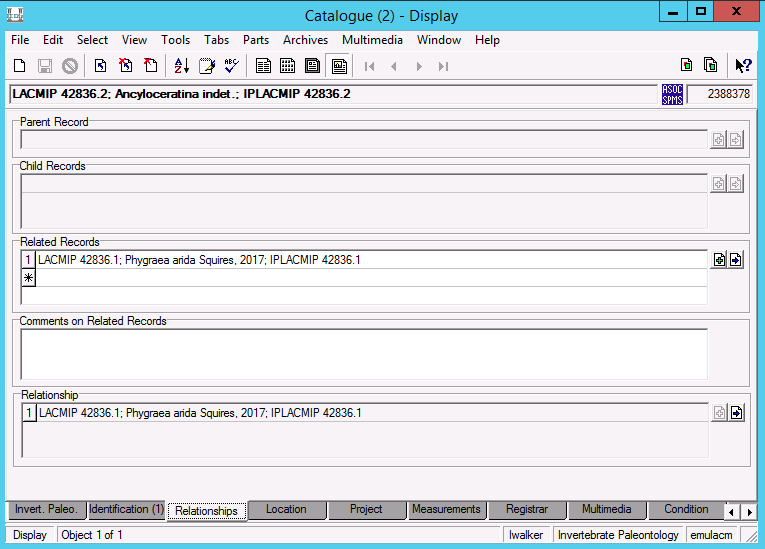
Occasionally, you will encounter specimens that are physically stuck together but cataloged separately (they should also have different type numbers). In this case, their respective catalog records need to be associated using the Relationships tab. The general workflow for using the Relationships tab can be found here. This workflow is also demonstrated in this video:
V. Note special conditions
Oversized Lots
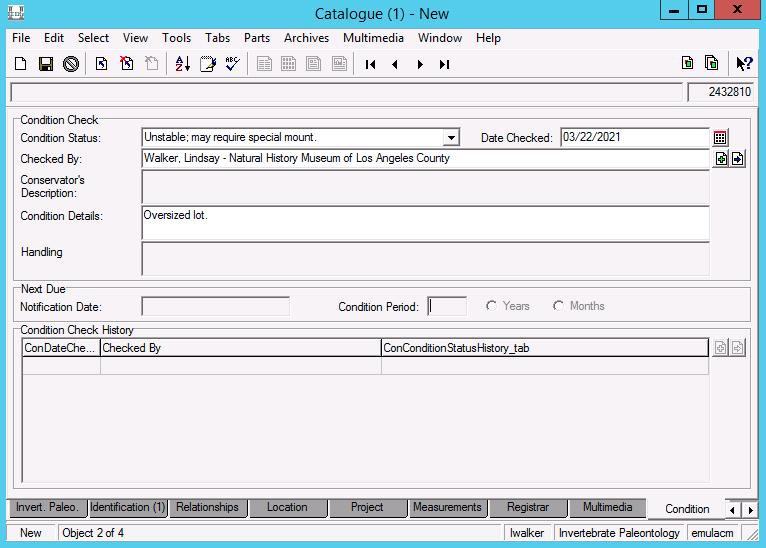
Specimens that do not fit in one of our standard box sizes are considered oversized. In this situation, a special mount/box will need to be created for it at a later time. Please indicate this information by completing the following fields on the Condition tab:
| Field | On the Condition tab… |
|---|---|
| Condition Status | Select “Unstable; may require special mount.” |
| Date Checked | Select today’s date. |
| Checked By | Attach your Parties record. |
| Condition Details | “Oversized lot.” |
Damaged Lots
Specimens that are clearly damaged or deteriortating should be noted. Please indicate this information by completing the following fields on the Condition tab:
| Field | On the Condition tab… |
|---|---|
| Condition Status | Select “May require treatment.” |
| Date Checked | Select today’s date. |
| Checked By | Attach your Parties record. |
| Condition Details | Briefly describe the problem, e.g. “Specimen is deteriorating. Consolidation required.” or “Number painted on specimen should be removed and corrected. It should be 12760.” |
If a specimen is deteriorating such that pieces are starting to break off, contain the pieces in a vial or small box, and nest this container next to the specimen they came from. Put a label in the vial or box indicating which specimen they belong to.
VI. Locate specimens
The final step is to assign (or reassign) the physical location data to specimen lots.
On any given day, you’ll likely be working with specimens in only one or two drawers. At the end of your shift, or if you finish working on a drawer mid-shift–whichever comes first–you’ll need to update the physical location data for all the lots you worked on.
To update locations for multiple records at once:
| Step | In the Catalogue module… |
|---|---|
| 1 | Navigate to the search form (File > New Search). |
| 2 | On the search form, navigate to the Admin tab. |
| 3 | Enter your name in Modified By, the date in Modification Date, and execute the search. |
| 4 | Review the results using the List view “IP Locations” (View > List Settings > Choose List) and sort them by “Modification Date-Time” (Tools > Sort Results). |
| 5 | Hold shift to select all records from the same drawer. ⚠️Critical: Make sure you’re only selecting lots that came from the same drawer. |
| 6 | Navigate: Tools > Relocate > Selected Records |
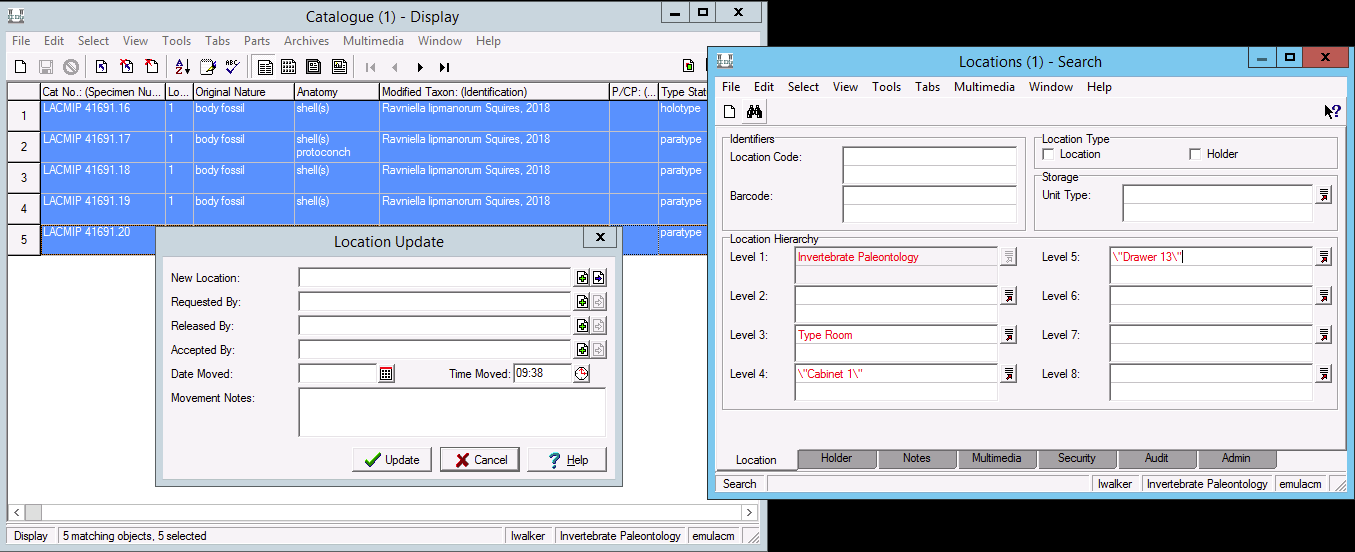
| 7 | In the Location Update window, click on the green ➕ to open the Locations module. |
| 8 | In the Locations module, enter “Type Room” in Level 3. |
| 9 | In the Locations module, use the lookup list buttons for Level 4 and Level 5 to enter the cabinet and drawer. (Example.) |
| 10 | Execute the search and open the record to verify the correct one was returned. |
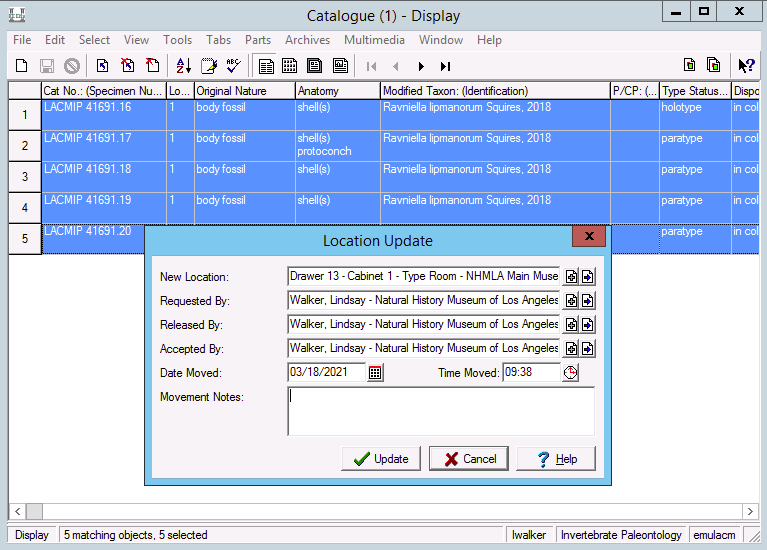
| 11 | Attach this record to the Location Update window with the green ➕. |
| 12 | In the Location Update window, attach your Parties record to Requested By, Released By, and Accepted By and enter the date in Date Moved. (Example.) |
| 13 | Select Update. |
| 14 | Review the updated records to check for errors. |
Location history cannot be deleted. It is therefore very important that you take care when selecting records to be batch relocated.
Updating type taxonomy
The following steps will be followed to update the Taxonomy Module using the taxonomic names written on historic labels. These names originated from the initial publication which can be found in the gray archival folder in the Type Room labeled “LACMIP Type Reprints” and/or under the IMLS folder in the LACMIP Shared Folder in the Google Drive. Our curator is in charge of updating the taxonomy with currently accepted names. This workflow ONLY applies to the Type Collection (TYPE) and should not be followed for the Stratigraphic (ST),Taxonomic (TX), or Education (ED) collections.
⚠️ Critical: Make sure that you are not adding the taxonomic string for a specimen that is awaiting publication. We do not want to share taxonomic identifications with database aggregators for new types without approval from the researcher
To add taxonomic names in the Type Collection:
| Step | In the Catalogue and Taxonomy Module… |
|---|---|
| 1 | Start by querying the Catalogue Module for all specimens in the Type Collection. |
| 2 | Sort the specimens by “Current Location”. Start with Drawer 1,Cabinet 1 and work in ascending cabinet order. |
| 3 | Open Cabinet 1, Drawer 1. Pull out specimens starting in the left most corner and work from front to back. Place specimens in a wooden tray as the white metal drawer of the cabinet is heavy. Make sure to keep the specimens in the same arrangement as they were ordered in the drawer. |
| 4 | Check that the name in the original publication, in its original form, is listed under the Identifications tab. If the identification is Kingdom - Unknown, then you will need to open the Taxonomy module to add the name. If you cannot find the publication in the google drive under LACMIP Shared Folder > IMLS > Type Publications OR in the Reprint Library in the Type Room, add the publication, author, and catalog number details to the google sheet “Type Publications needed/missing”. |
| 5 | Follow the instructions listed here under Creating a new Taxonomy Record to input a new genus or species name. If the genus does not exist in EMu yet, then add it to the google sheet “Type taxonomic names to review - Type Collection” to confirm whether it is appropriate to add. |
| 6 | Mark the new taxonomic entry as “Unknown” under “Currently Accepted” and leave the “Currently Accepted Name” field blank (Example.) |
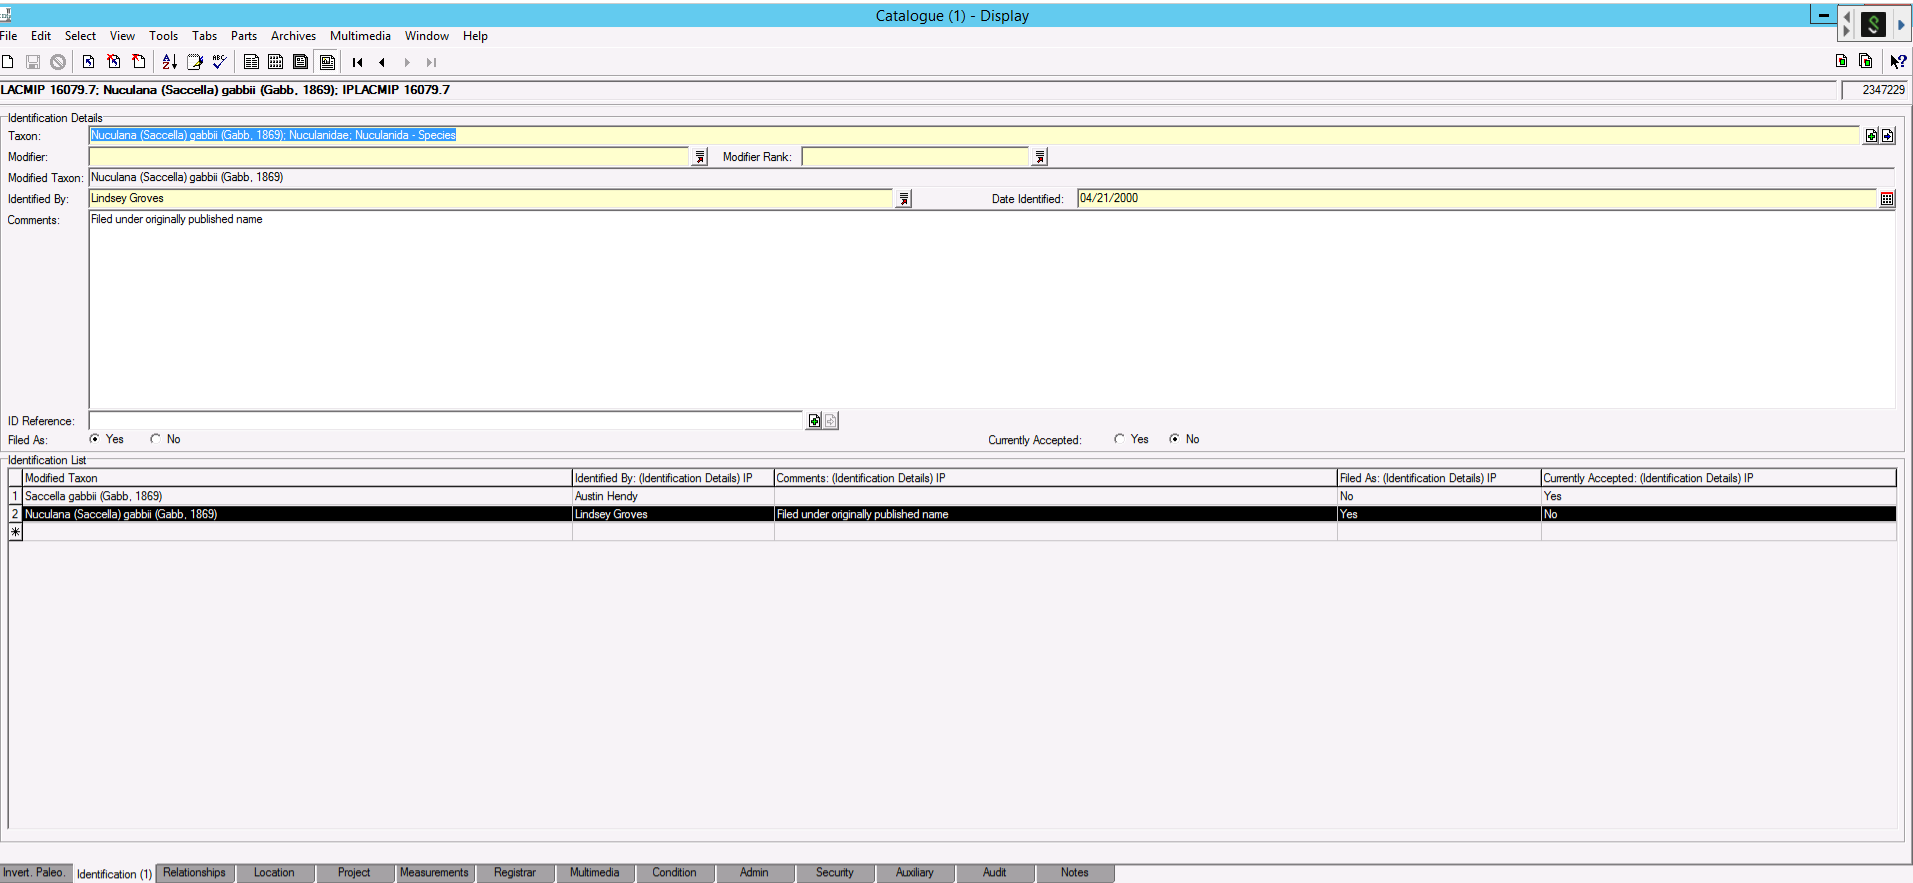
| 7 | After adding the species name, replace this identification with the prior “Unknown” identification. |
| 8 | In the comments on the Identification tab, add this phrase “Filed under originally published name.” If it is the only identification, check mark “Yes” under “Currently Accepted” and check mark “Yes” under “Filed as”. However, if there are multiple identifications follow this (Example.) |
Do not delete previous identifications. There might be some specimens with the complete wrong identification attached. Inform collections staff of this occurrence.
Assimilating New Types
Numbering
Specimens
Type numbers are created by painting white, 20lb archival quality paper with acrylic paint (primary red, yellow, or blue) and allowing it to dry at least 24 hours. Once completely dry, the painted paper is then cut into 1 cm strips in preparation for adhesion to specimens. New type specimens to be numbered should be accompanied by their newly printed specimen label for simultaneous quality control.
If you’re asked to apply numbers to new type specimens, please consult the following workflow.
Work with only one specimen lot at a time to avoid mixing up specimens and labels.
| Step | Type Numbering Workflow |
|---|---|
| Organize | All new type specimens to be numbered should be organized by ascending type number in their tray. |
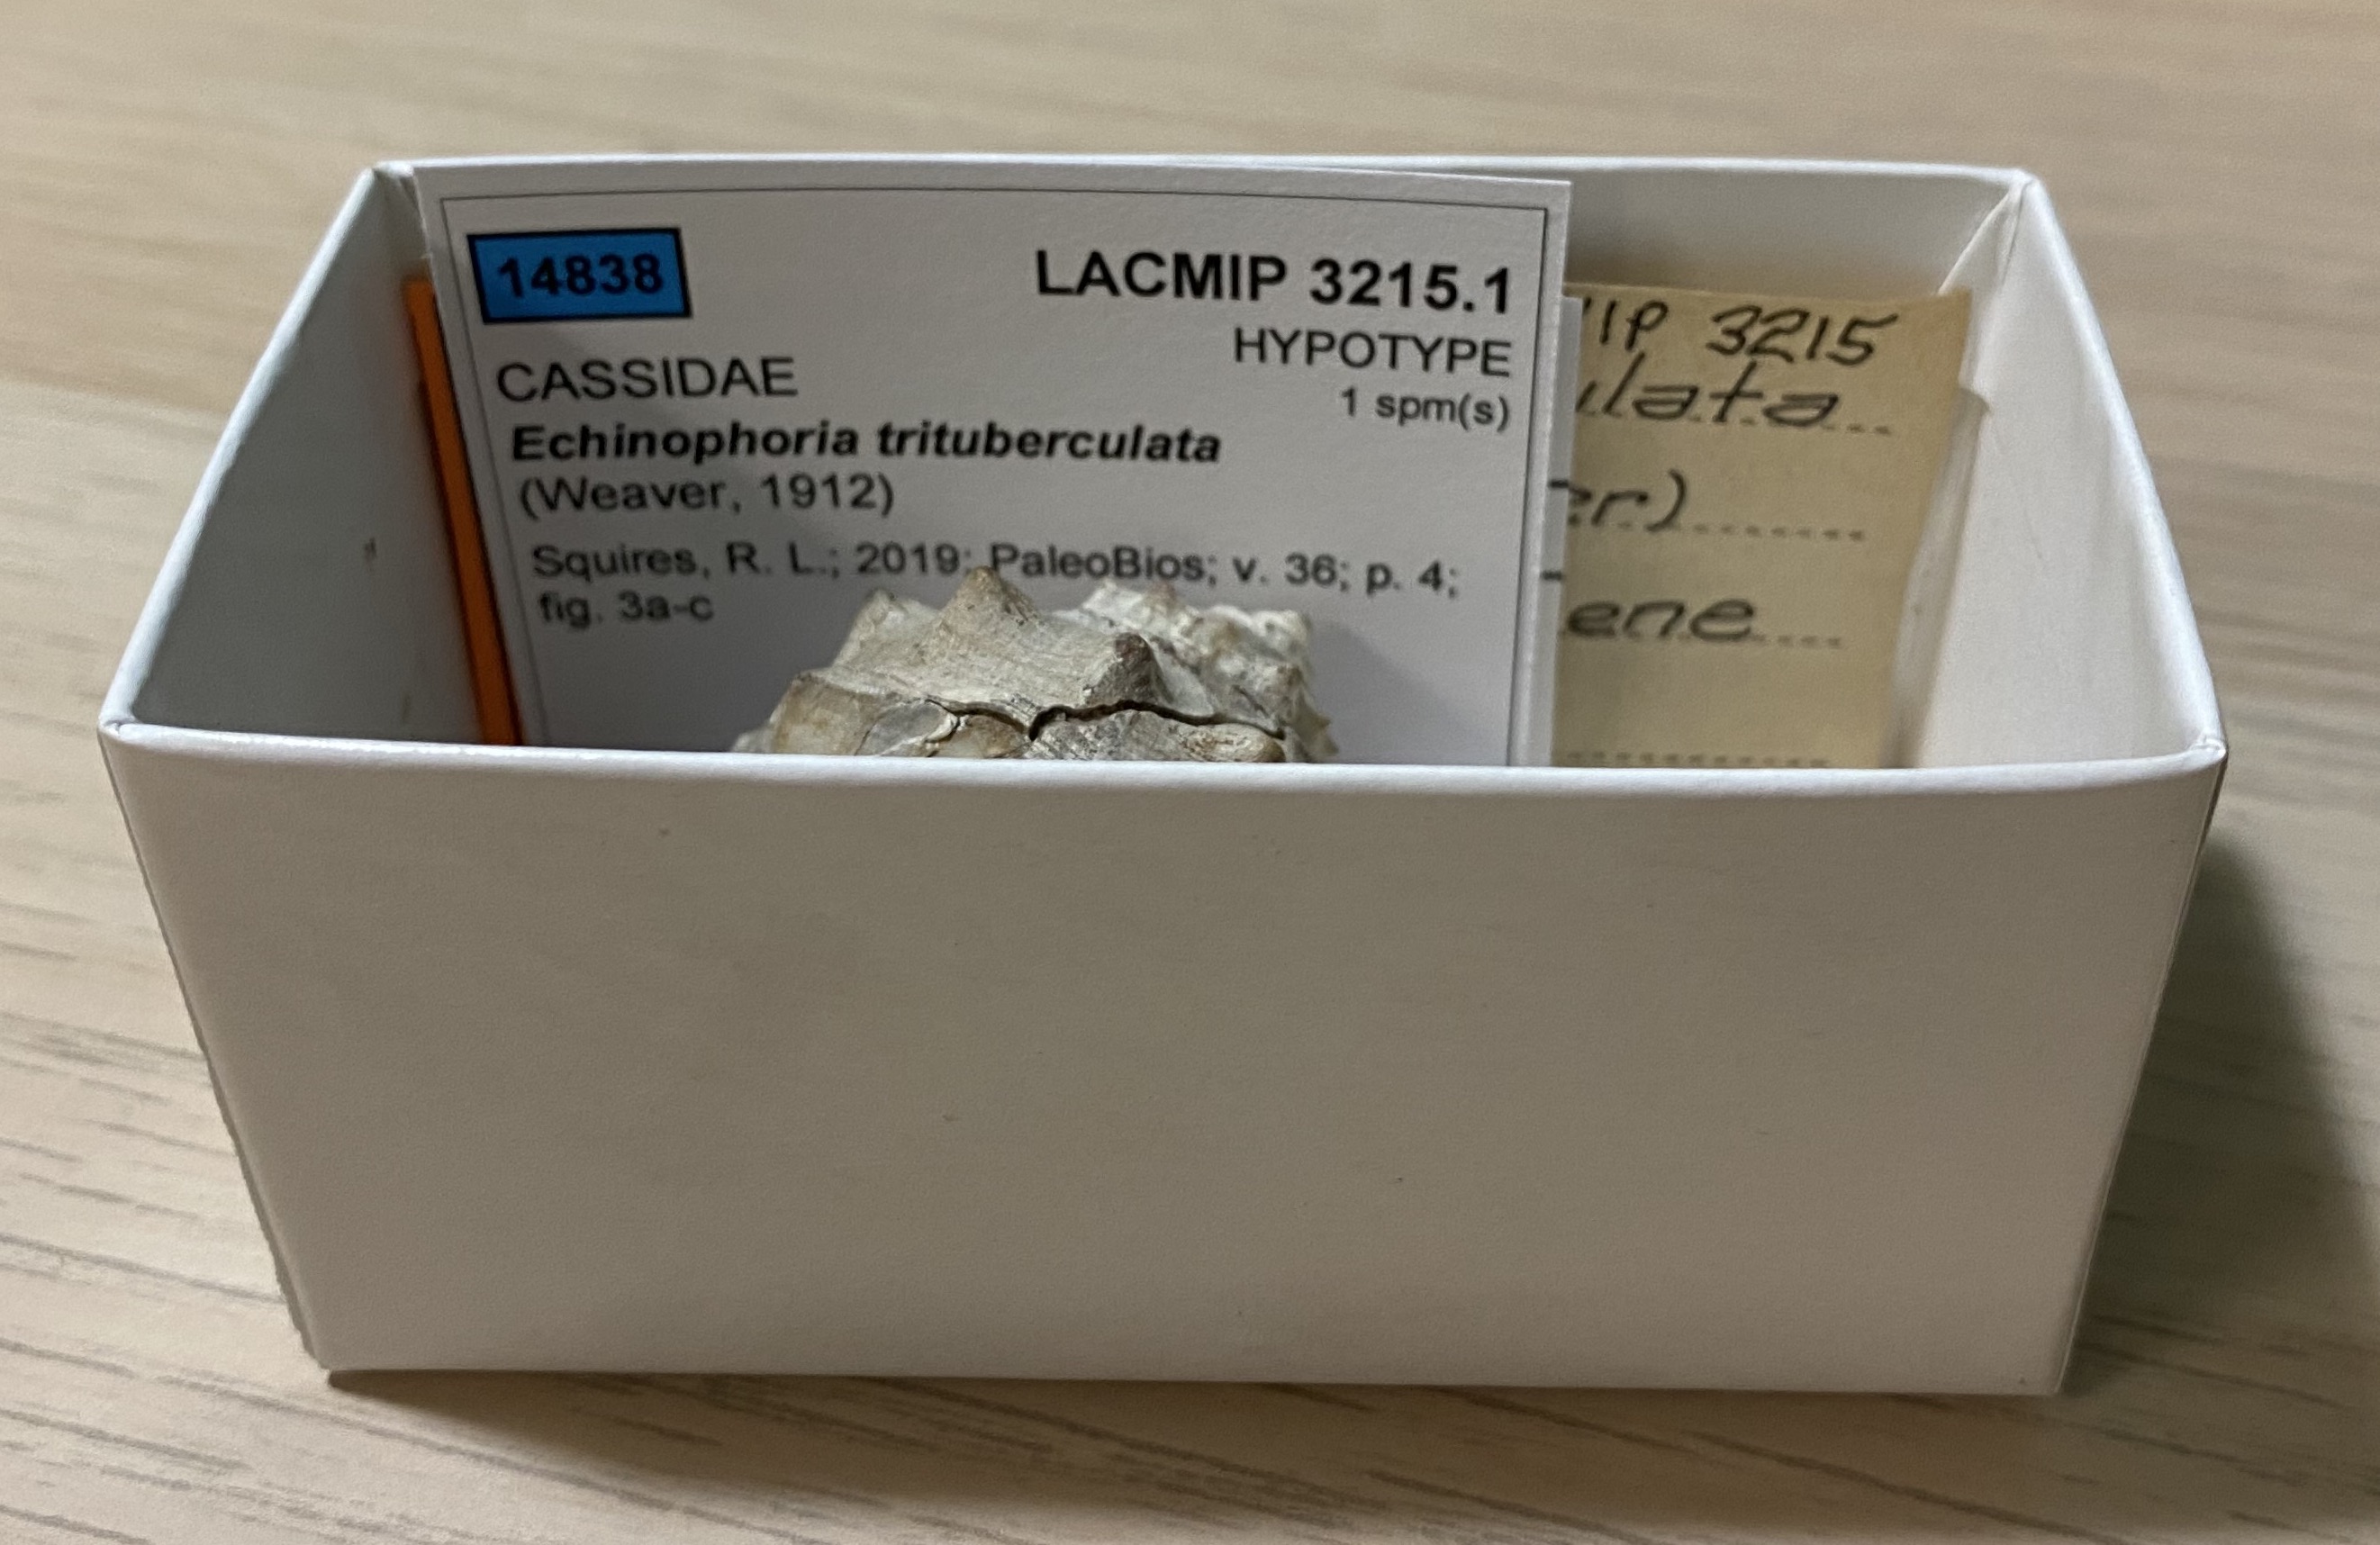
| Labels | All lots should be accompanied by a newly printed specimen label. The colors (red, yellow, or blue) correspond to each specimen’s highest conferred type status. |
| Lettering |
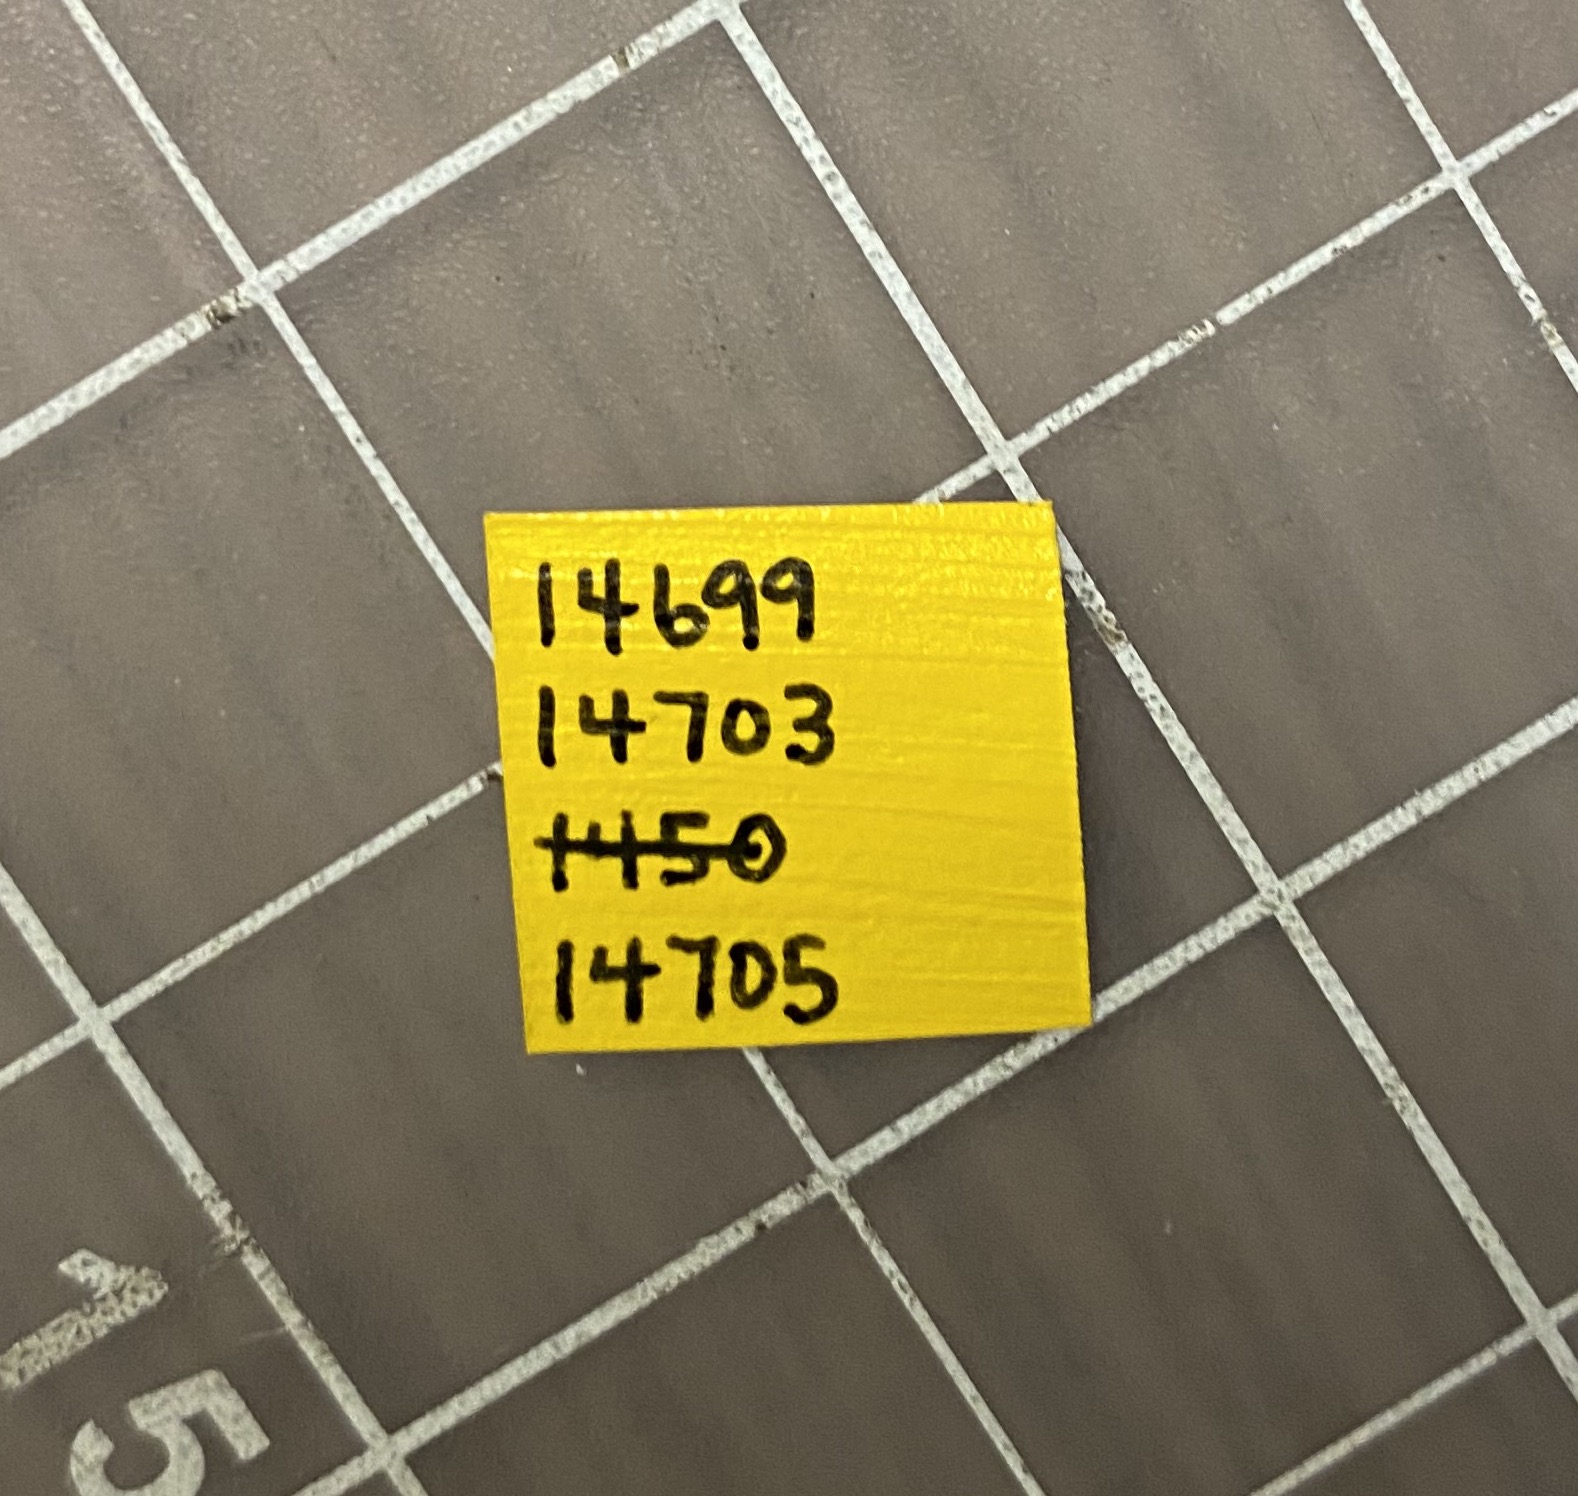 If it hasn’t been done for you, begin writing the type specimen numbers on the strips of colored paper using a black 01 Pigma Micron pen. The color of the number should match the color on the printed specimen label. The goal is to make your numbers as small, condensed, and neat as possible. Consult the lettering style guide for examples. The goal is to create legible numbers that minimally obstruct specimen morphology. If it hasn’t been done for you, begin writing the type specimen numbers on the strips of colored paper using a black 01 Pigma Micron pen. The color of the number should match the color on the printed specimen label. The goal is to make your numbers as small, condensed, and neat as possible. Consult the lettering style guide for examples. The goal is to create legible numbers that minimally obstruct specimen morphology.
|
| Drying | Set aside the numbers so the ink can dry, and avoid touching the freshly numbered paper strips to prevent smudges. Ideally, the numbers should be left to dry overnight. |
| QC | Select the first specimen in the tray to be numbered (i.e., the specimen with the lowest type number). Compare the information on the newly printed specimen label to its publication. When making this comparison, pay close attention to the specimen numbers, figure numbers, and type status on the specimen label vs. the paper. If there are mismatches, they will need to be corrected in EMu and the label must be reprinted. If the type status is incorrect, the type number may need to be rewritten on a different color. Discard or cross out incorrect number labels so they are not inadvertently used. Ask for help when you encounter new errors/mismatches. |
| Trim |
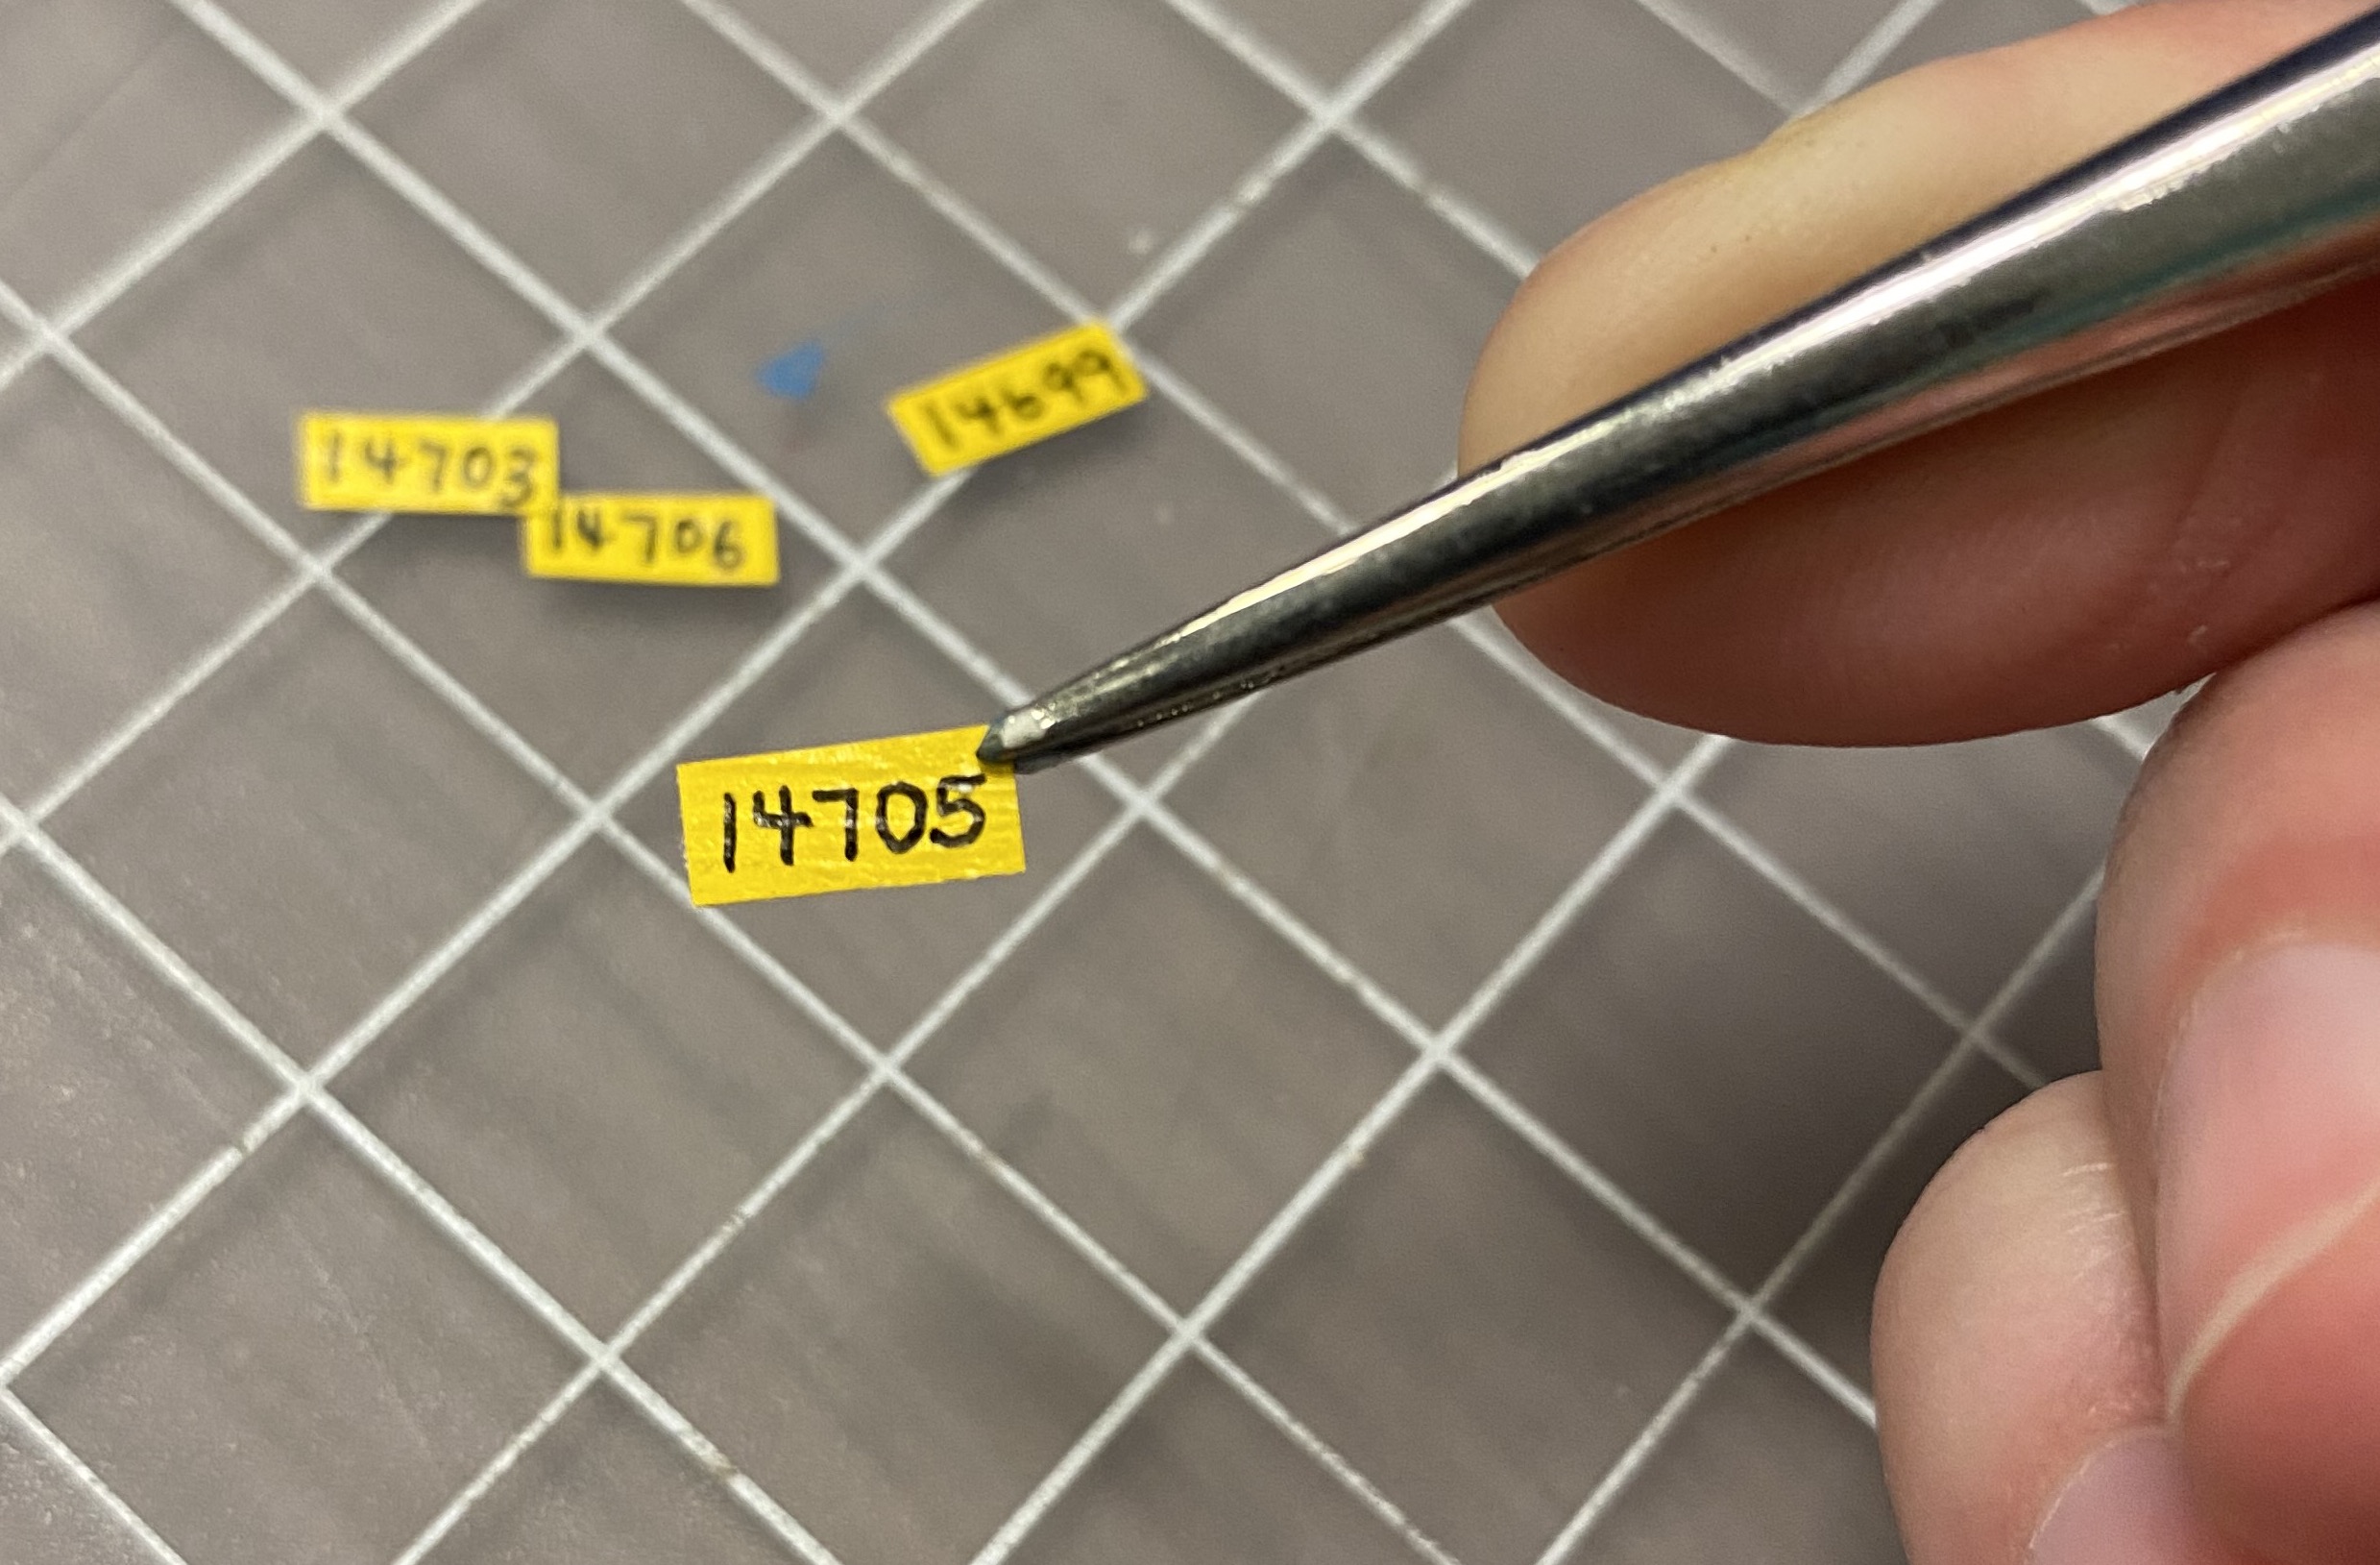 If the information is correct, trim the type number from the strip, carefully removing excess edges. Continue to avoid touching the ink with your hands and use forceps to pick up the number labels. If the information is correct, trim the type number from the strip, carefully removing excess edges. Continue to avoid touching the ink with your hands and use forceps to pick up the number labels. |
| B72 Undercoat | Using the thicker B72 available, swipe a coat of consolidant over the unpainted side of the number. |
| Position Number |
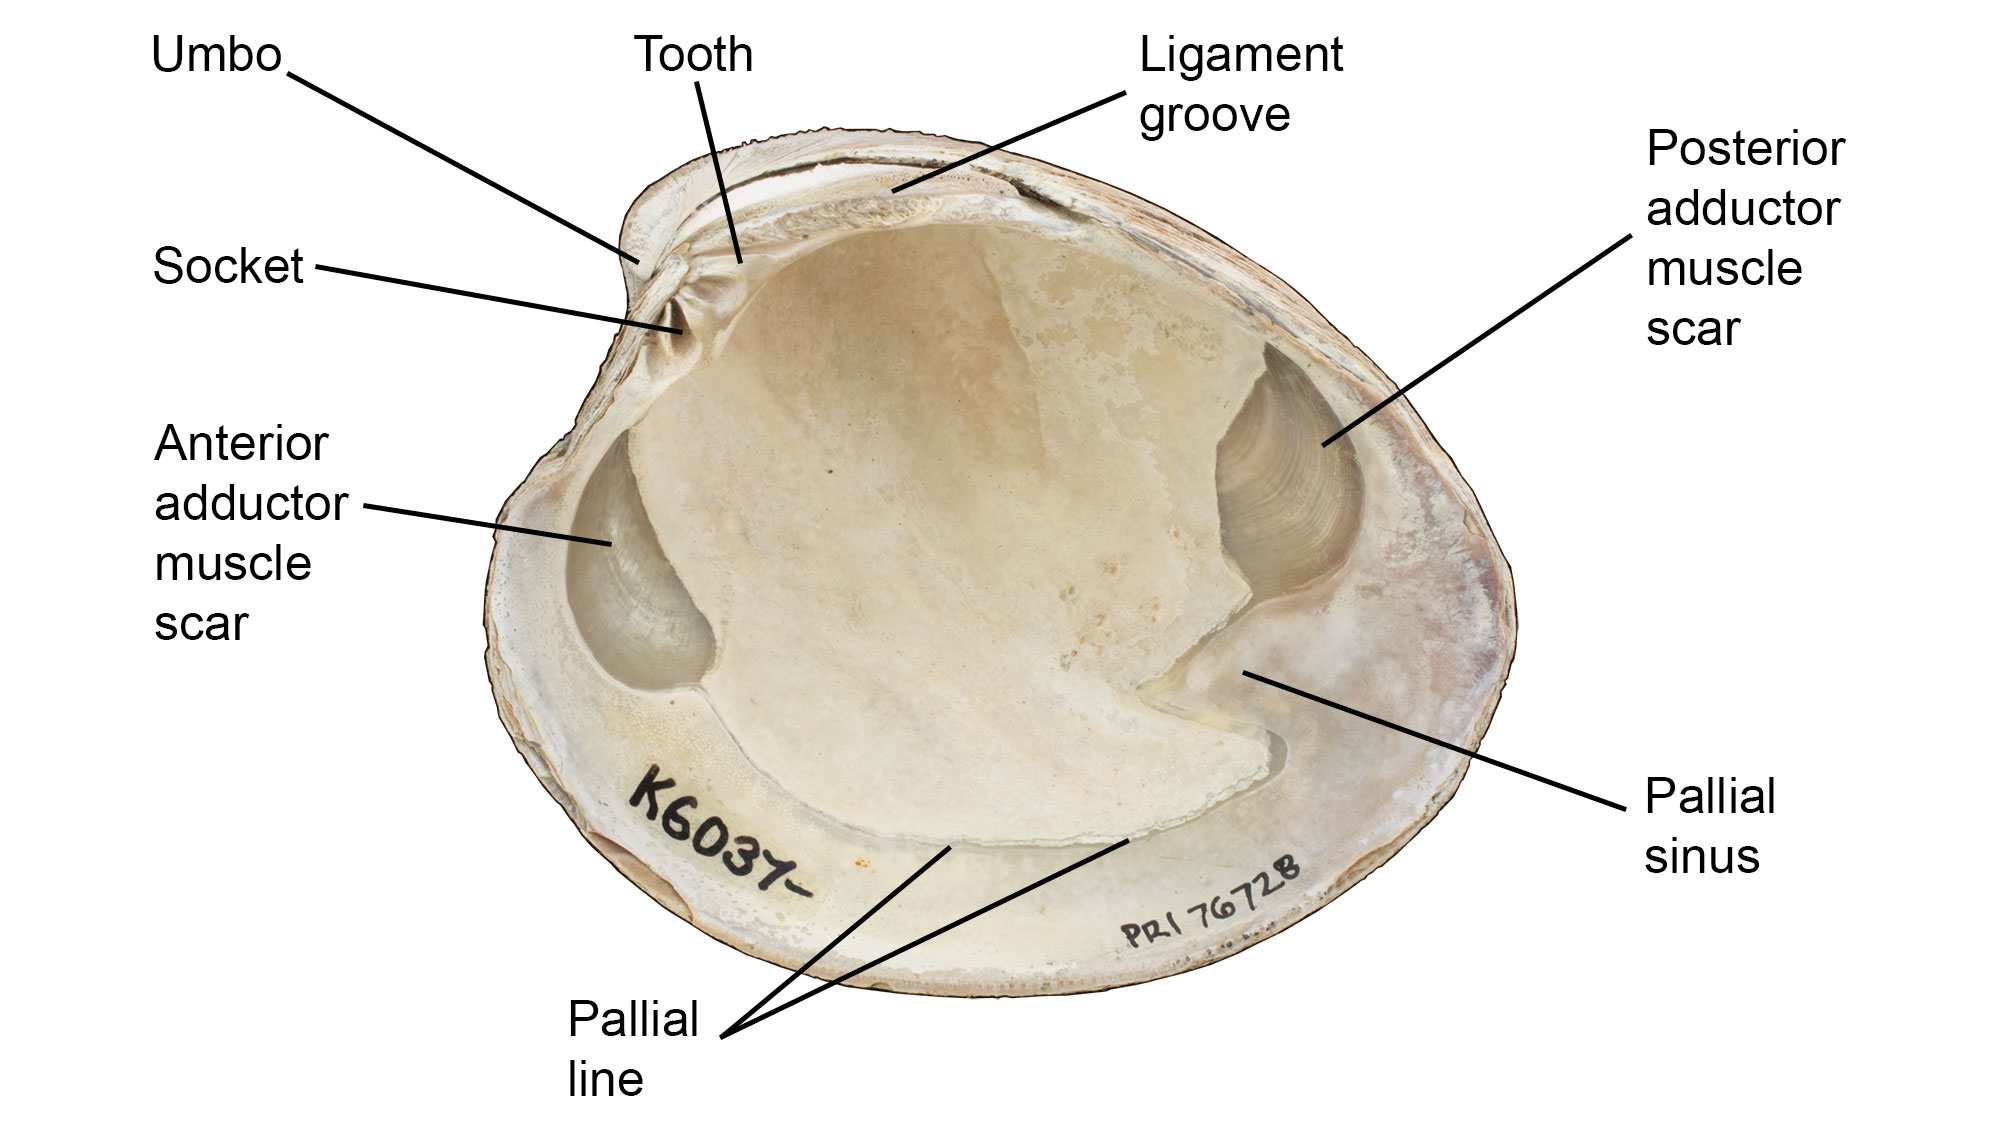
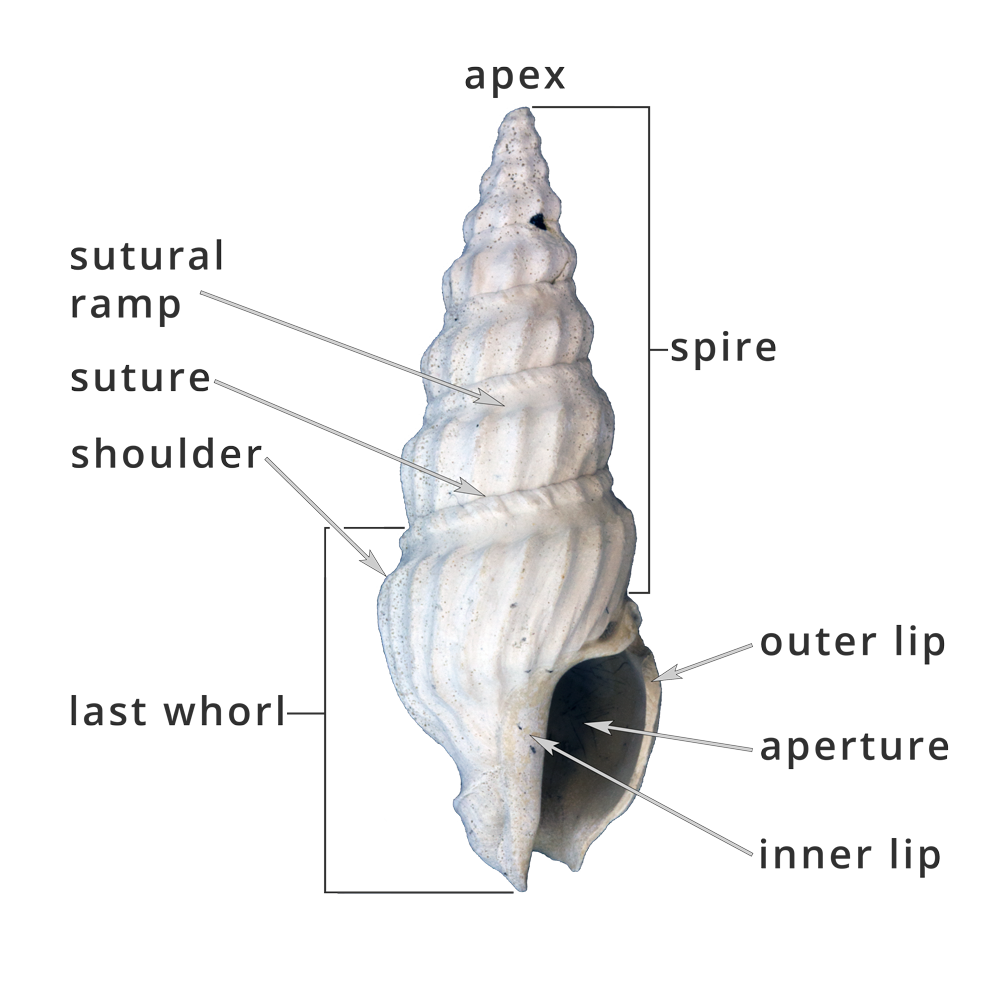
 Carefully place the number on the specimen. Placement should be generally inconspicuous: on bivalves, avoid covering any internal muscle scars or hinge morphology; on gastropods, avoid the apertural view. When possible, place the number on adjacent rock matrix, rather than the specimen itself. Ask for assistance if you’re unsure, such as when multiple type specimens are stuck together. Carefully place the number on the specimen. Placement should be generally inconspicuous: on bivalves, avoid covering any internal muscle scars or hinge morphology; on gastropods, avoid the apertural view. When possible, place the number on adjacent rock matrix, rather than the specimen itself. Ask for assistance if you’re unsure, such as when multiple type specimens are stuck together. |
| Press | After you have finished the tray, or are done for the day (whichever comes first), revisit the freshly adhered numbers. Gently press on them to ensure tight contact with the specimen. Use good judgement and don’t press so hard that you might damage the fossil. |
| B72 Topcoat | After you finish the tray, or are done for the day (whichever comes first), using the thinner B72, swipe a top coat of consolidant over the number. When you place the specimen back in its box, don’t let the wet B72 come in contact with the specimen labels or box. |
Other considerations:
- Try to finish a tray completely before you leave. If your shift ends in the middle of a tray, clearly note where you left off in the tray.
- If a lot contains multiple specimens (or pieces of the same specimen) that were legitimately published under the same type number, each piece should be numbered.
- If a specimen is too small to number, it must be placed in a vial. If it also fits in a gel capsule, it should be put in a gel cap and the catalog number should be written on the exterior of the gel cap. Place the loose type number in the gel cap with the specimen.
If a specimen is incorrectly numbered, the painted paper label can be removed. To remove an incorrect number: 1) Soak a Q-tip in acetone and gently roll it over the number label. Give the acetone a minute to penetrate the paper. 2) Gently peel back the top painted portion of the label with forceps, taking care not to scratch the specimen. 3) Reapply acetone as needed and continue peeling up reminants of the paper label until is completely removed.
Vials
- TBD!
- If a vial contains a specimen in a gel cap, the gel capsule should be neatly labelled with the catalog numbe using an 01 Pigma Micron pen.
Rehousing
Boxes
- Specimens should comfortably lie flat in boxes. The fit should not be tight.
- All original labels must be retained and placed below the newest printed label. Especially fragile labels can be secured in archival plastic sleeves.
Vials
- Specimens placed in vials should also be immobilized with tissue paper, especially if the specimens are very delicate or could be damaged by rolling in the vial. to do so: 1) Pack archival tissue paper into the end of the vial; 2) place the specimen in the vial; 3) insert a larger plug of tissue paper into the vial to hold the specimen in place (example). Do not pack the vial so tightly with tissue paper that it could crush the fossil, and, ideally, the fossil should be at least partially visible from the exterior of the vial. The goal is to completely and gently immobilize the specimen such that can be easily retrieved with minimal risk in the future.
- Specimens placed in vials should be accompanied by small stickers and small labels. If tissue paper is needed, these stickers and labels can be placed at the end of the vial for ease of viewing and to prevent loss (example).
- Do not cut or place larger labels in vials.
- Replace plastic vials with new glass vials & old cotton batting with archival tissue paper.
Gel capsules
- Never remove specimens from gel capsules unless directed to do so.
Appendices
Gathering literature
Find the publication
When searching for digital publications it can be useful to check the resources listed below. They are listed from more general purpose to more specific:
If you cannot readily find the publication you’re looking for, send the collections staff a request via Google Chat.
Number keys
Type numbers
Colorized numbers typically represent LACMIP Type Numbers:
| Type | Color | |
|---|---|---|
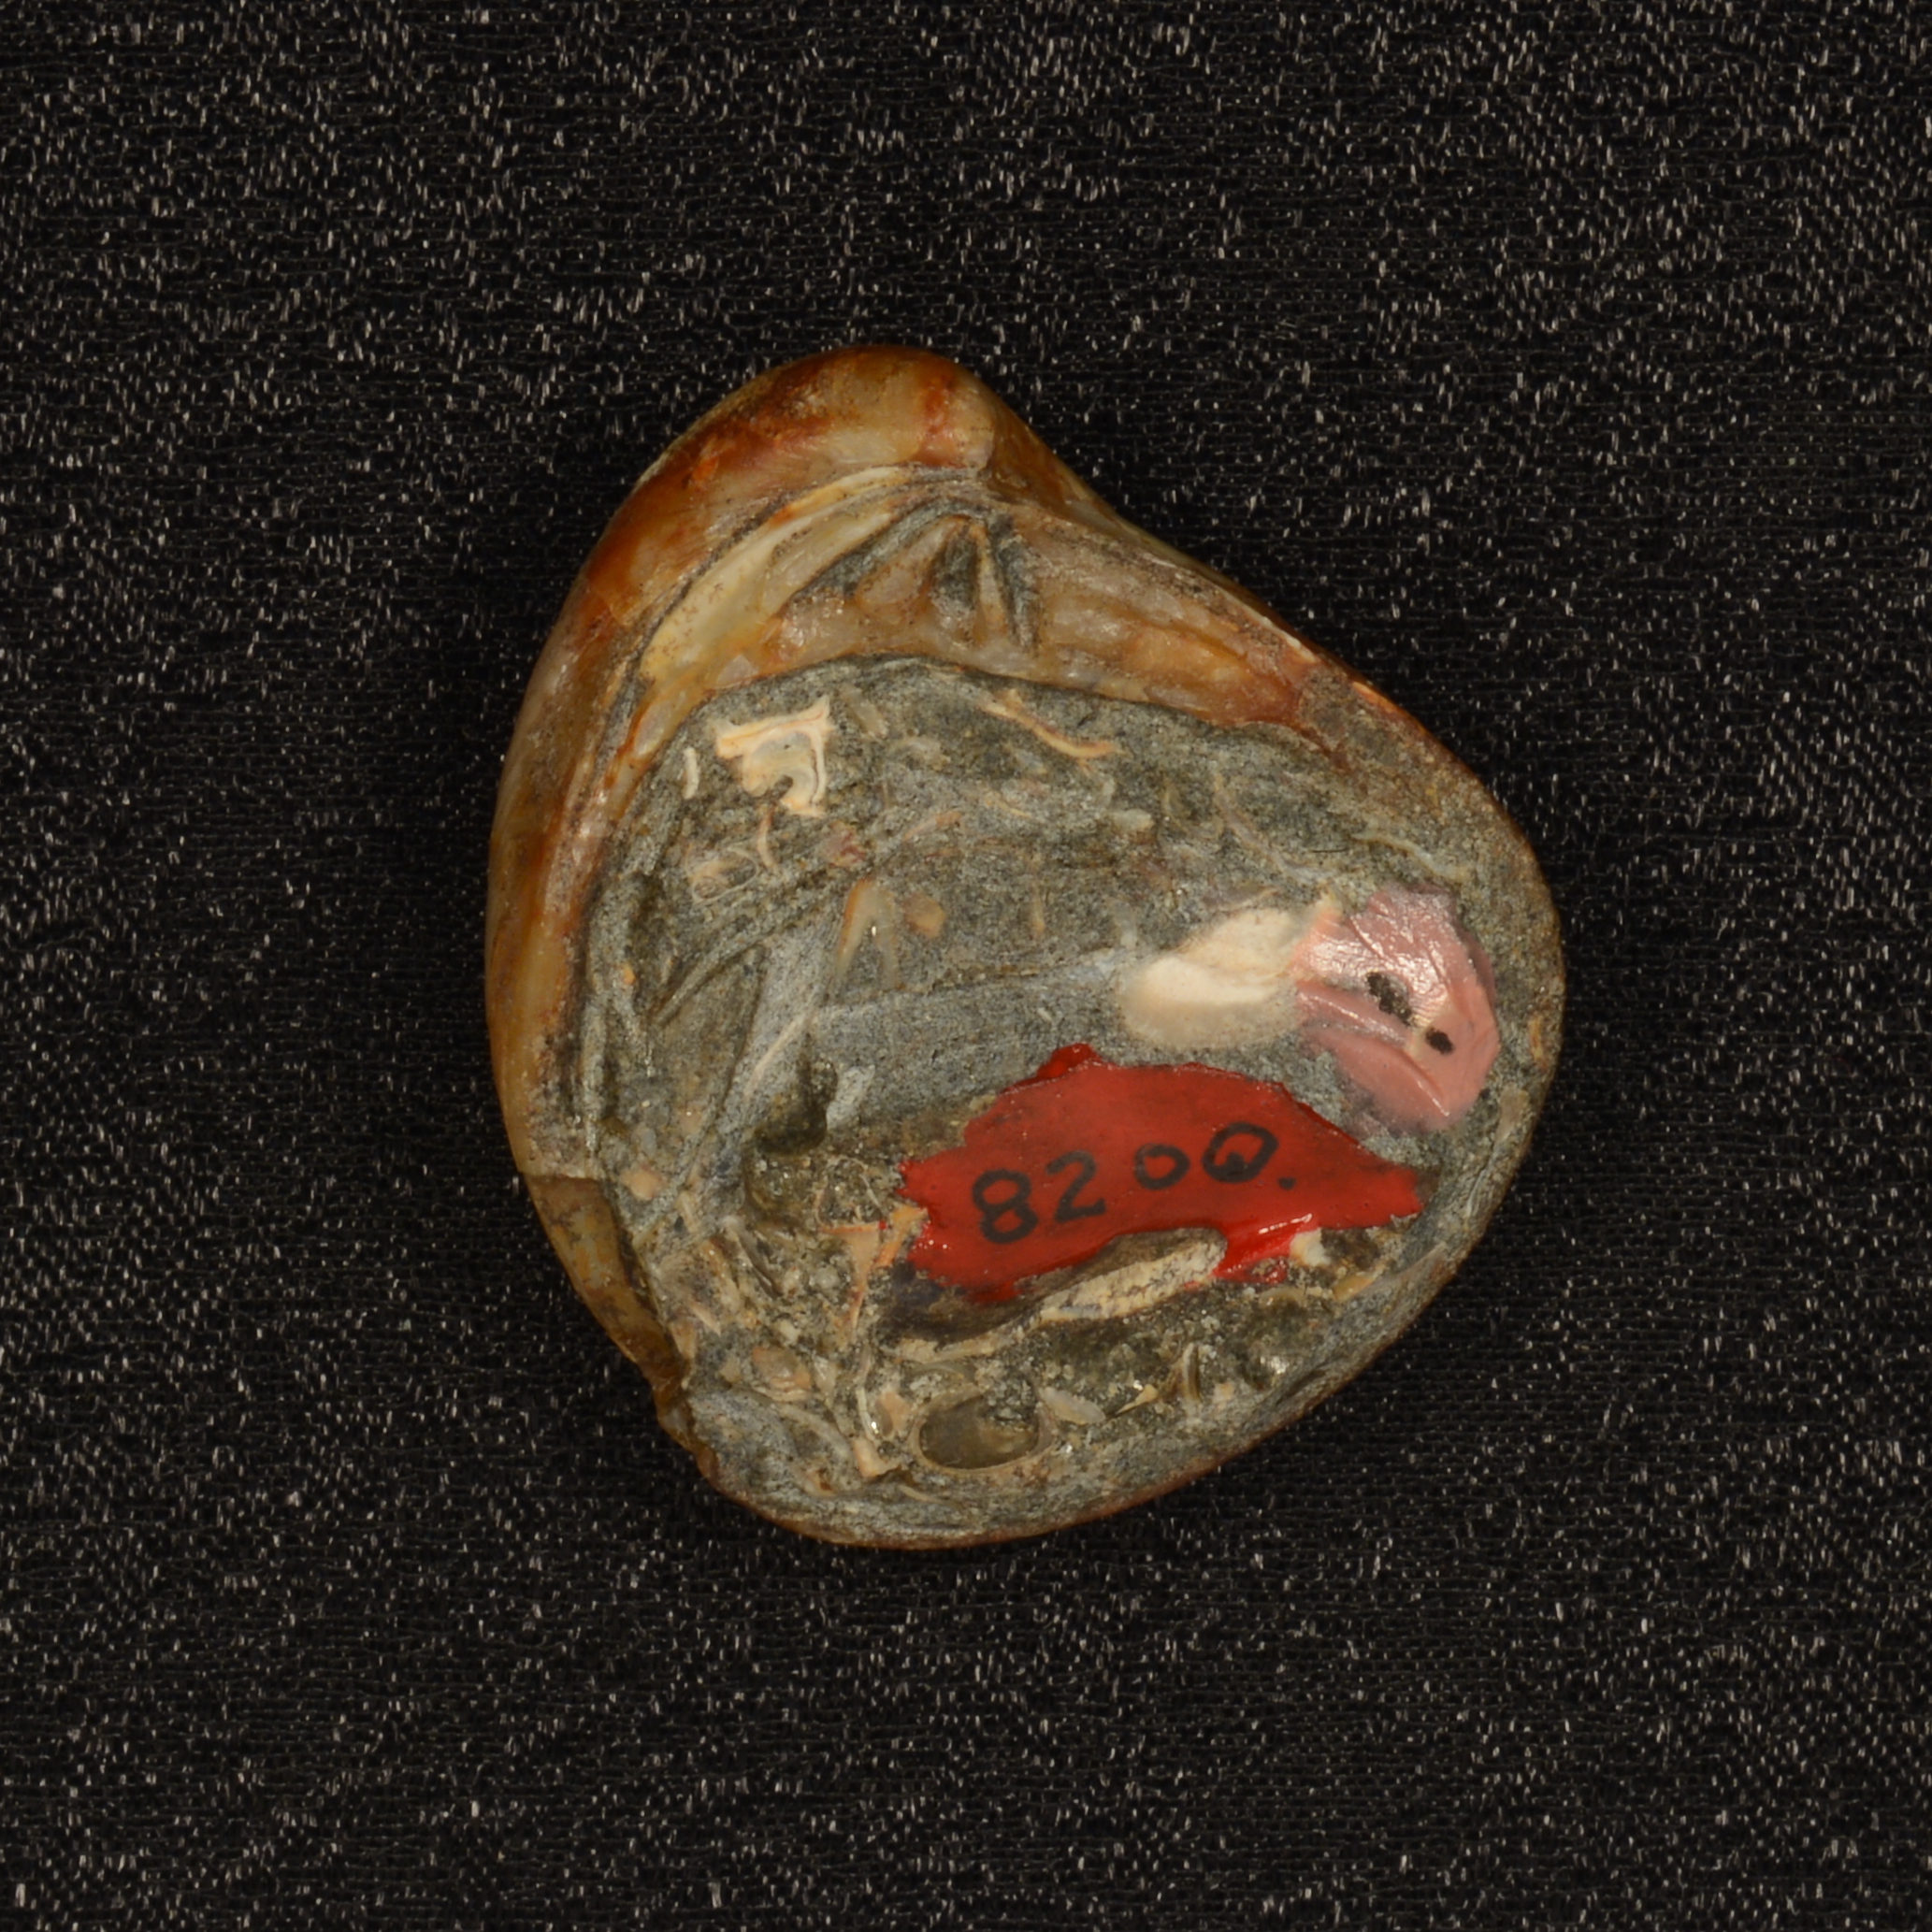
| Holotype/Syntype | Red | example |
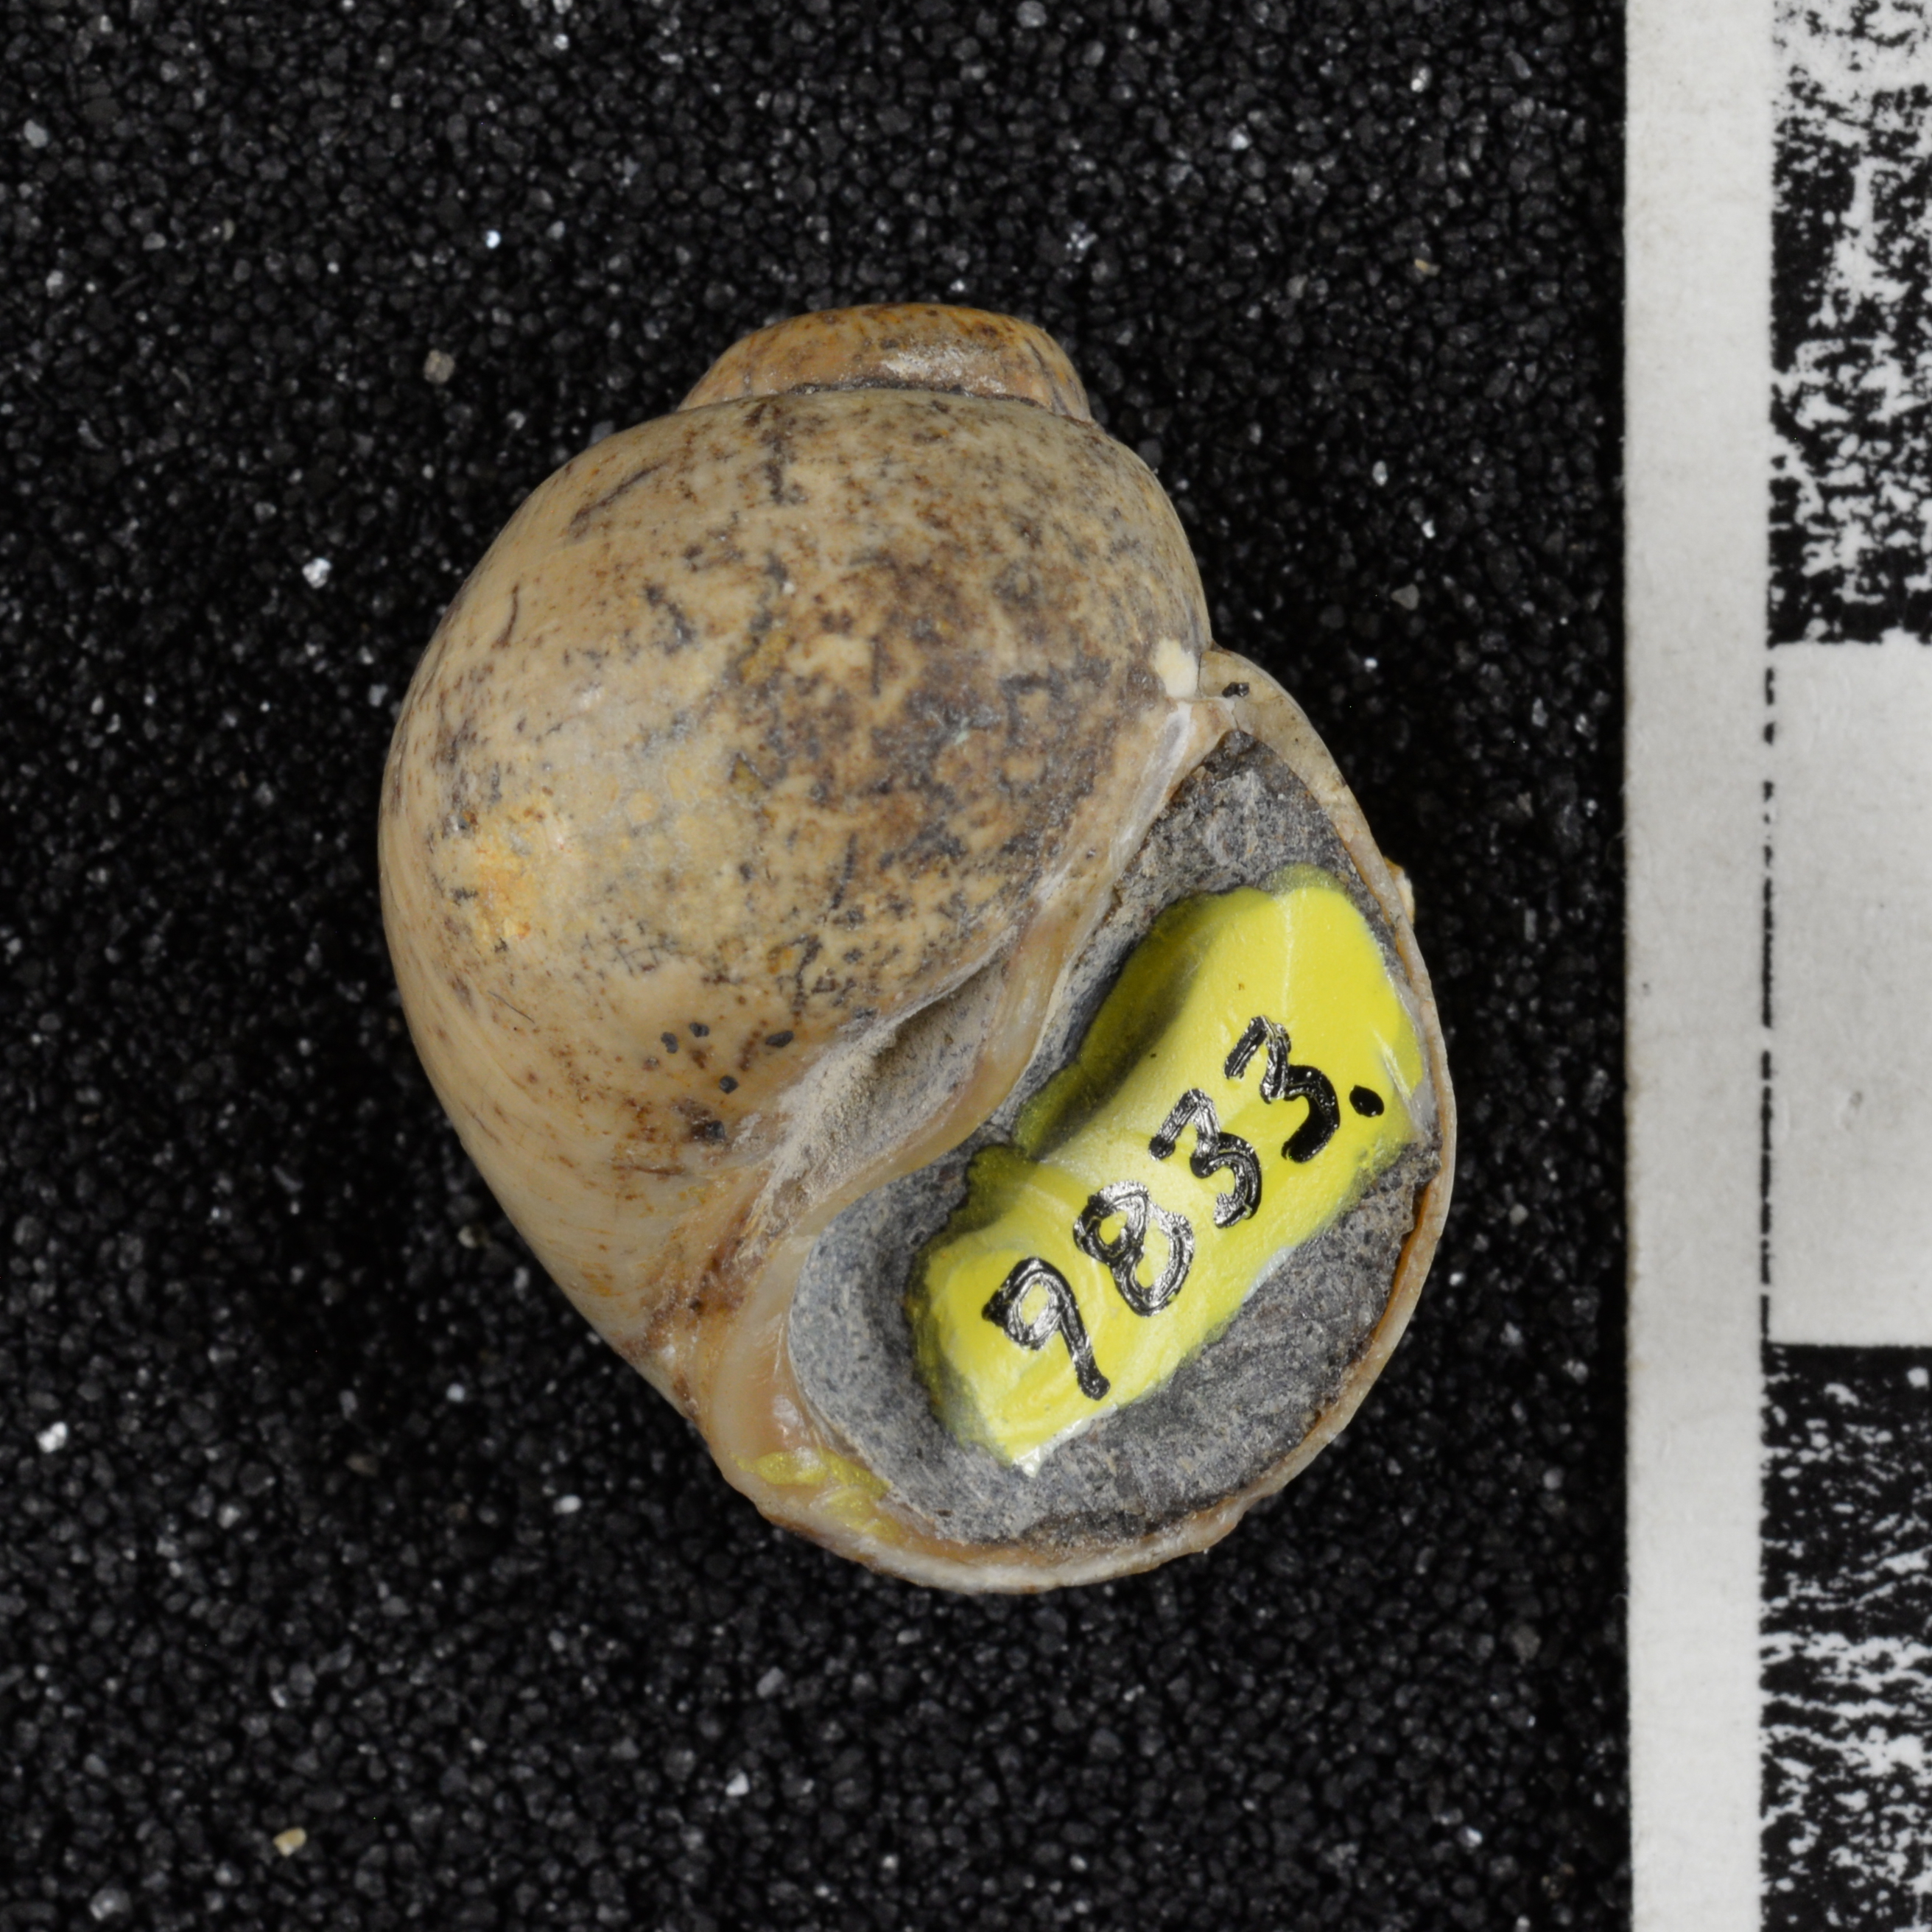
| Paratype | Yellow | example |
| Hypotype/Figured | Blue | example |
Alternative numbers
Identifiers used by institutions/collections that previously owned specimens in the LACMIP collections are recorded in the Alternative Numbers table. Only specimen numbers, not locality numbers, should be added to this table. (Old locality numbers are recorded elsewhere.) Use this guide to help you determine if a number should be added to this table.
| Inst. Code. | Number Style | Record in Alt. Numbers? | |
|---|---|---|---|
| UCLA | white rectangle | ✔️YES | example |
| CIT | check label/box | ✔️YES | example |
| collector number | various/unique | ✔️YES | example |
| CIT | gold dot | ⛔locality | example |
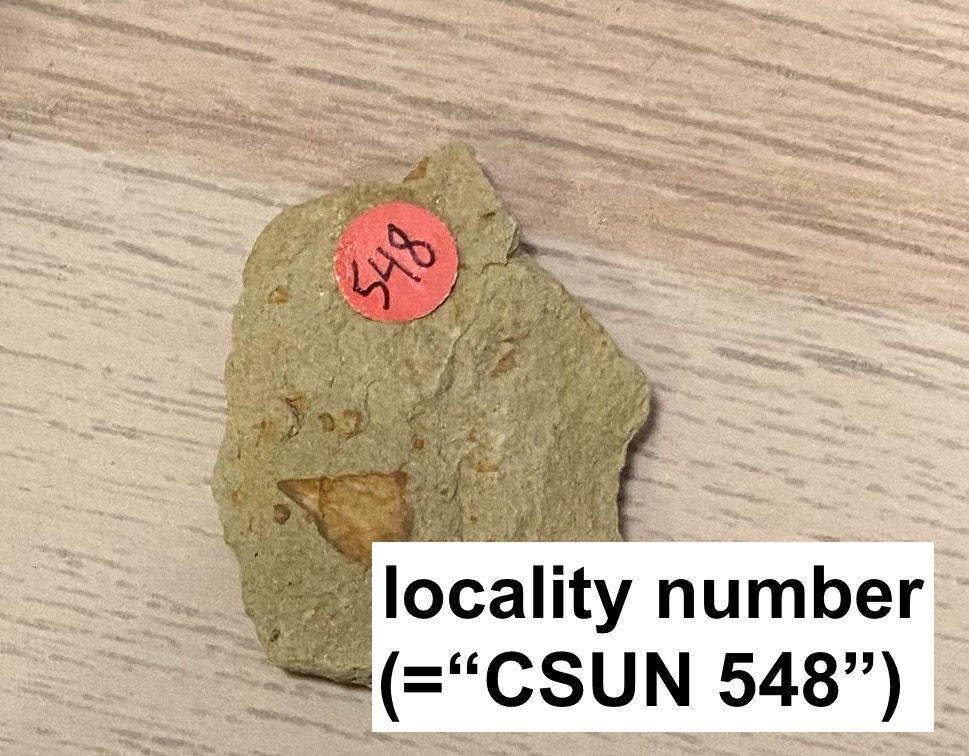
| CSUN | red dot | ⛔locality | example |
| LACMIP | white paint | ⛔locality | example |
| SDSU | red paint | ⛔locality, looks like type # | example |
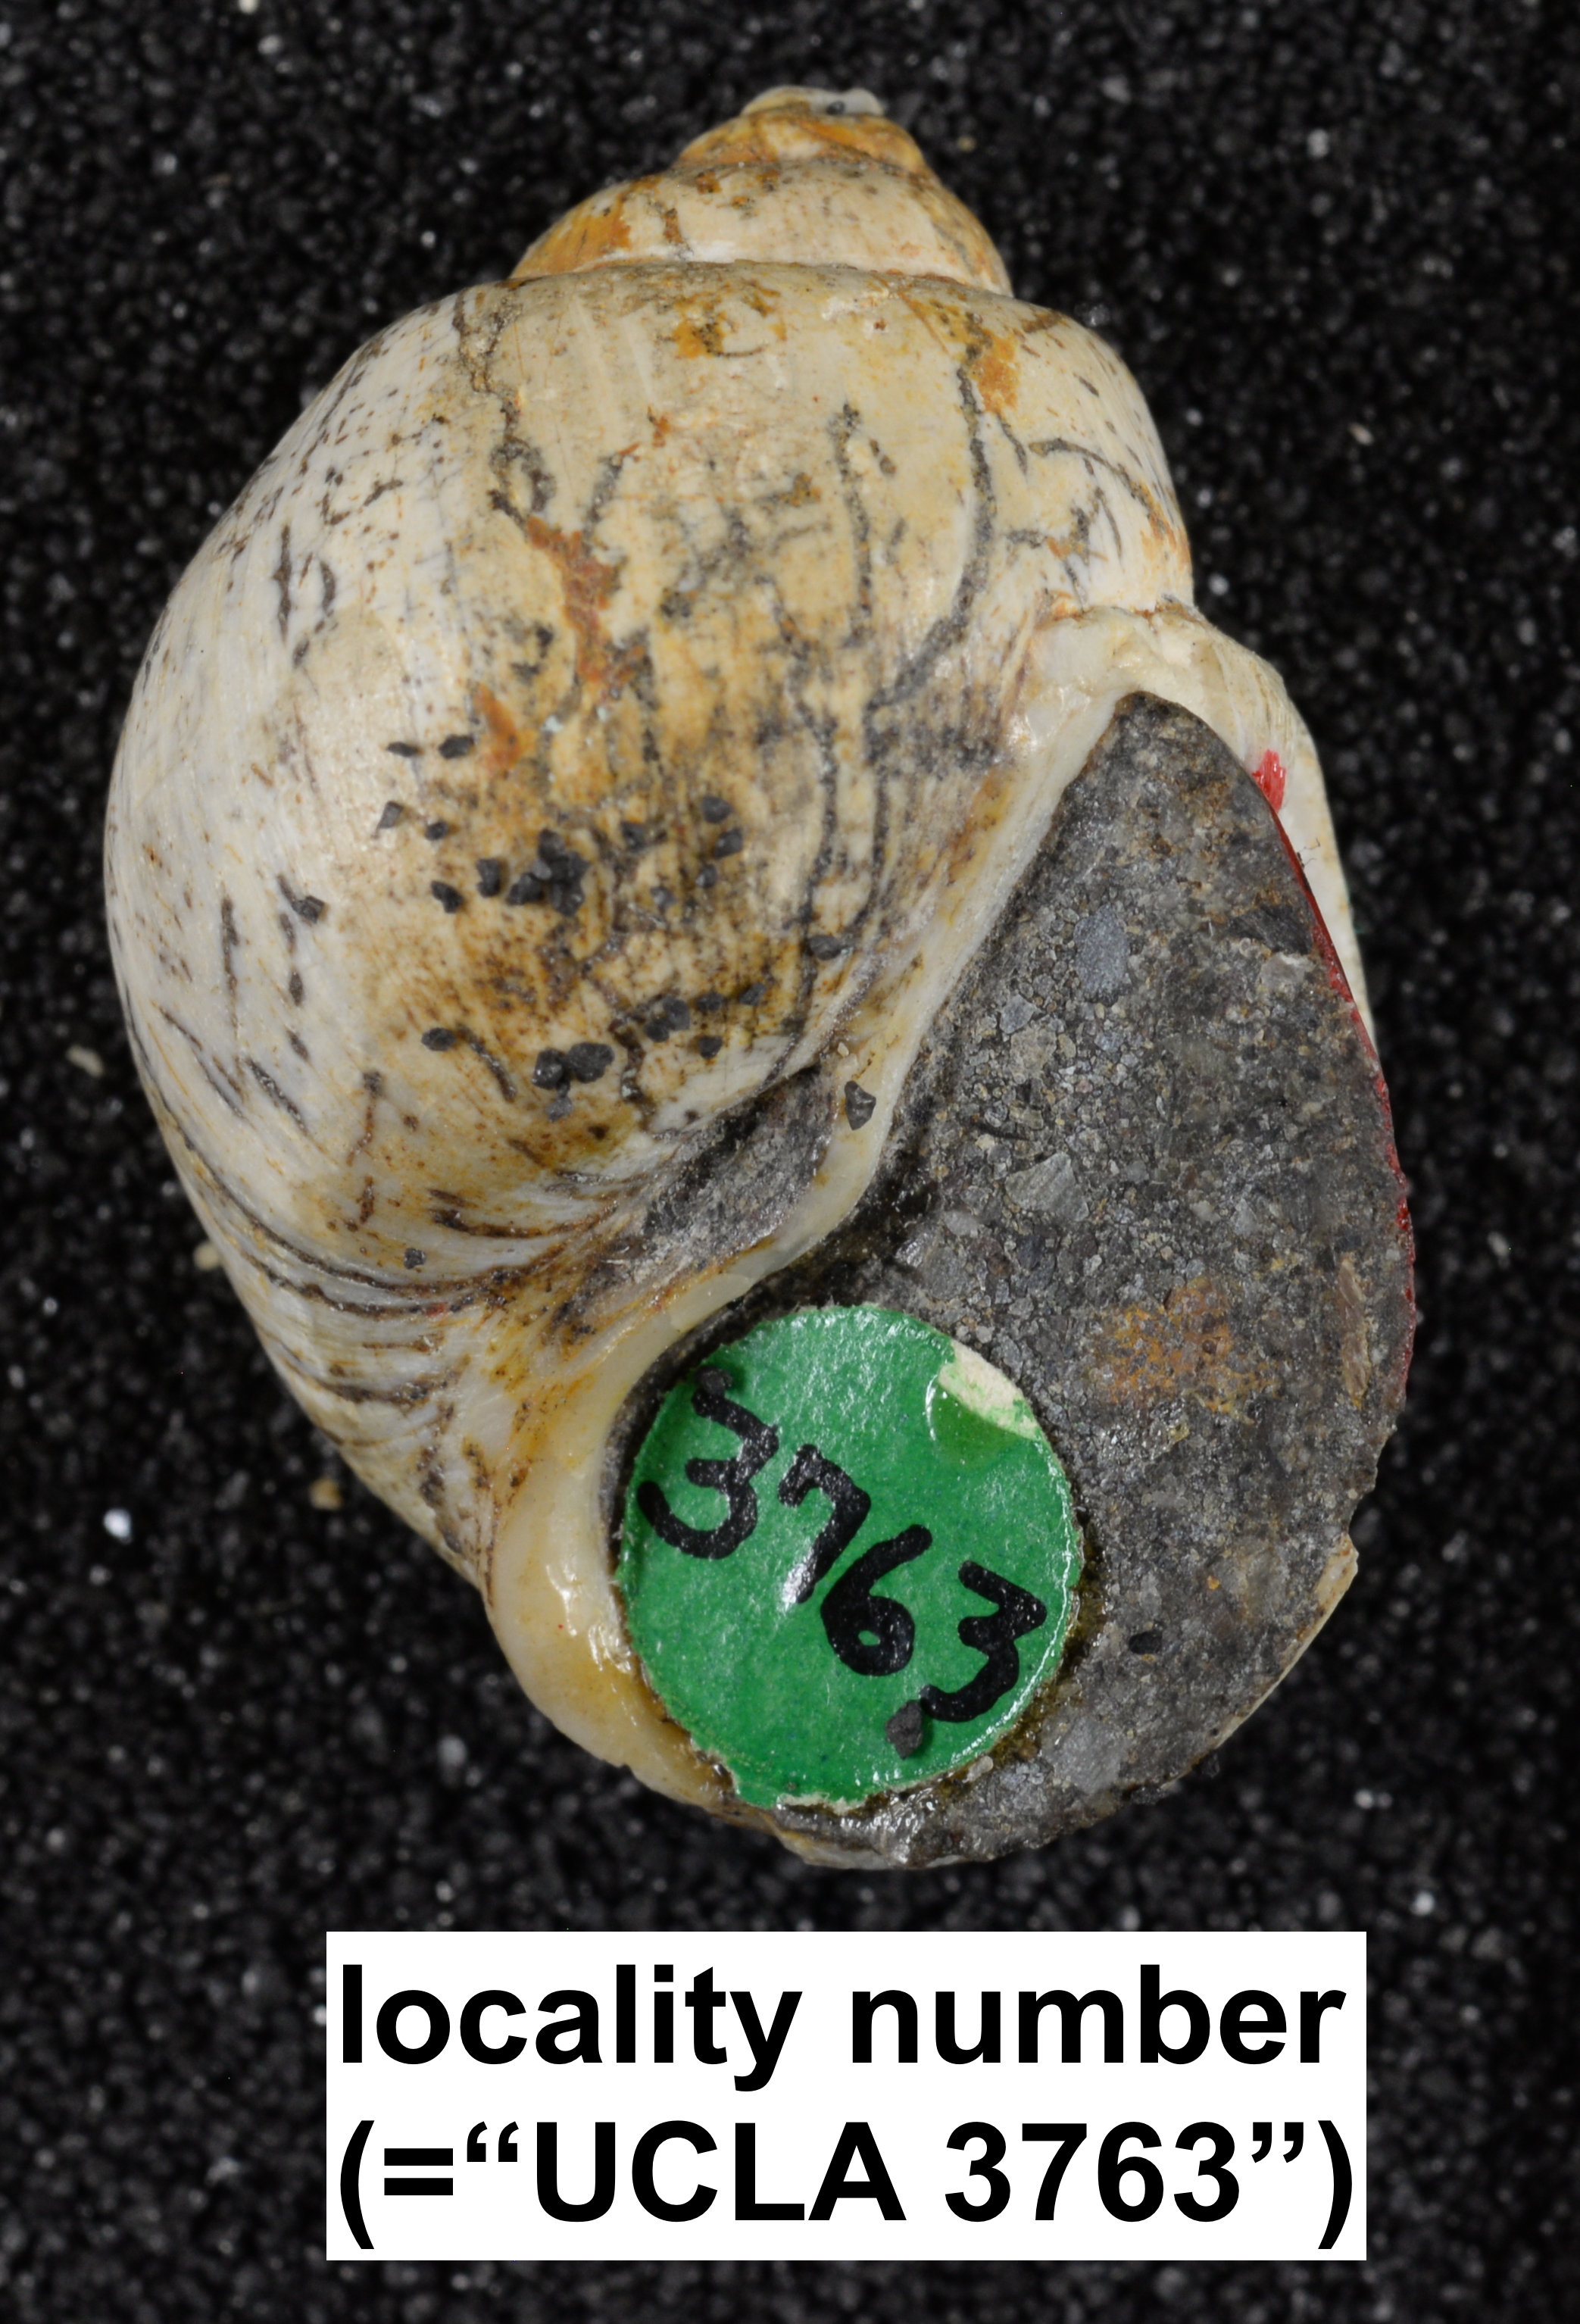
| UCLA | green dot | ⛔locality | example |
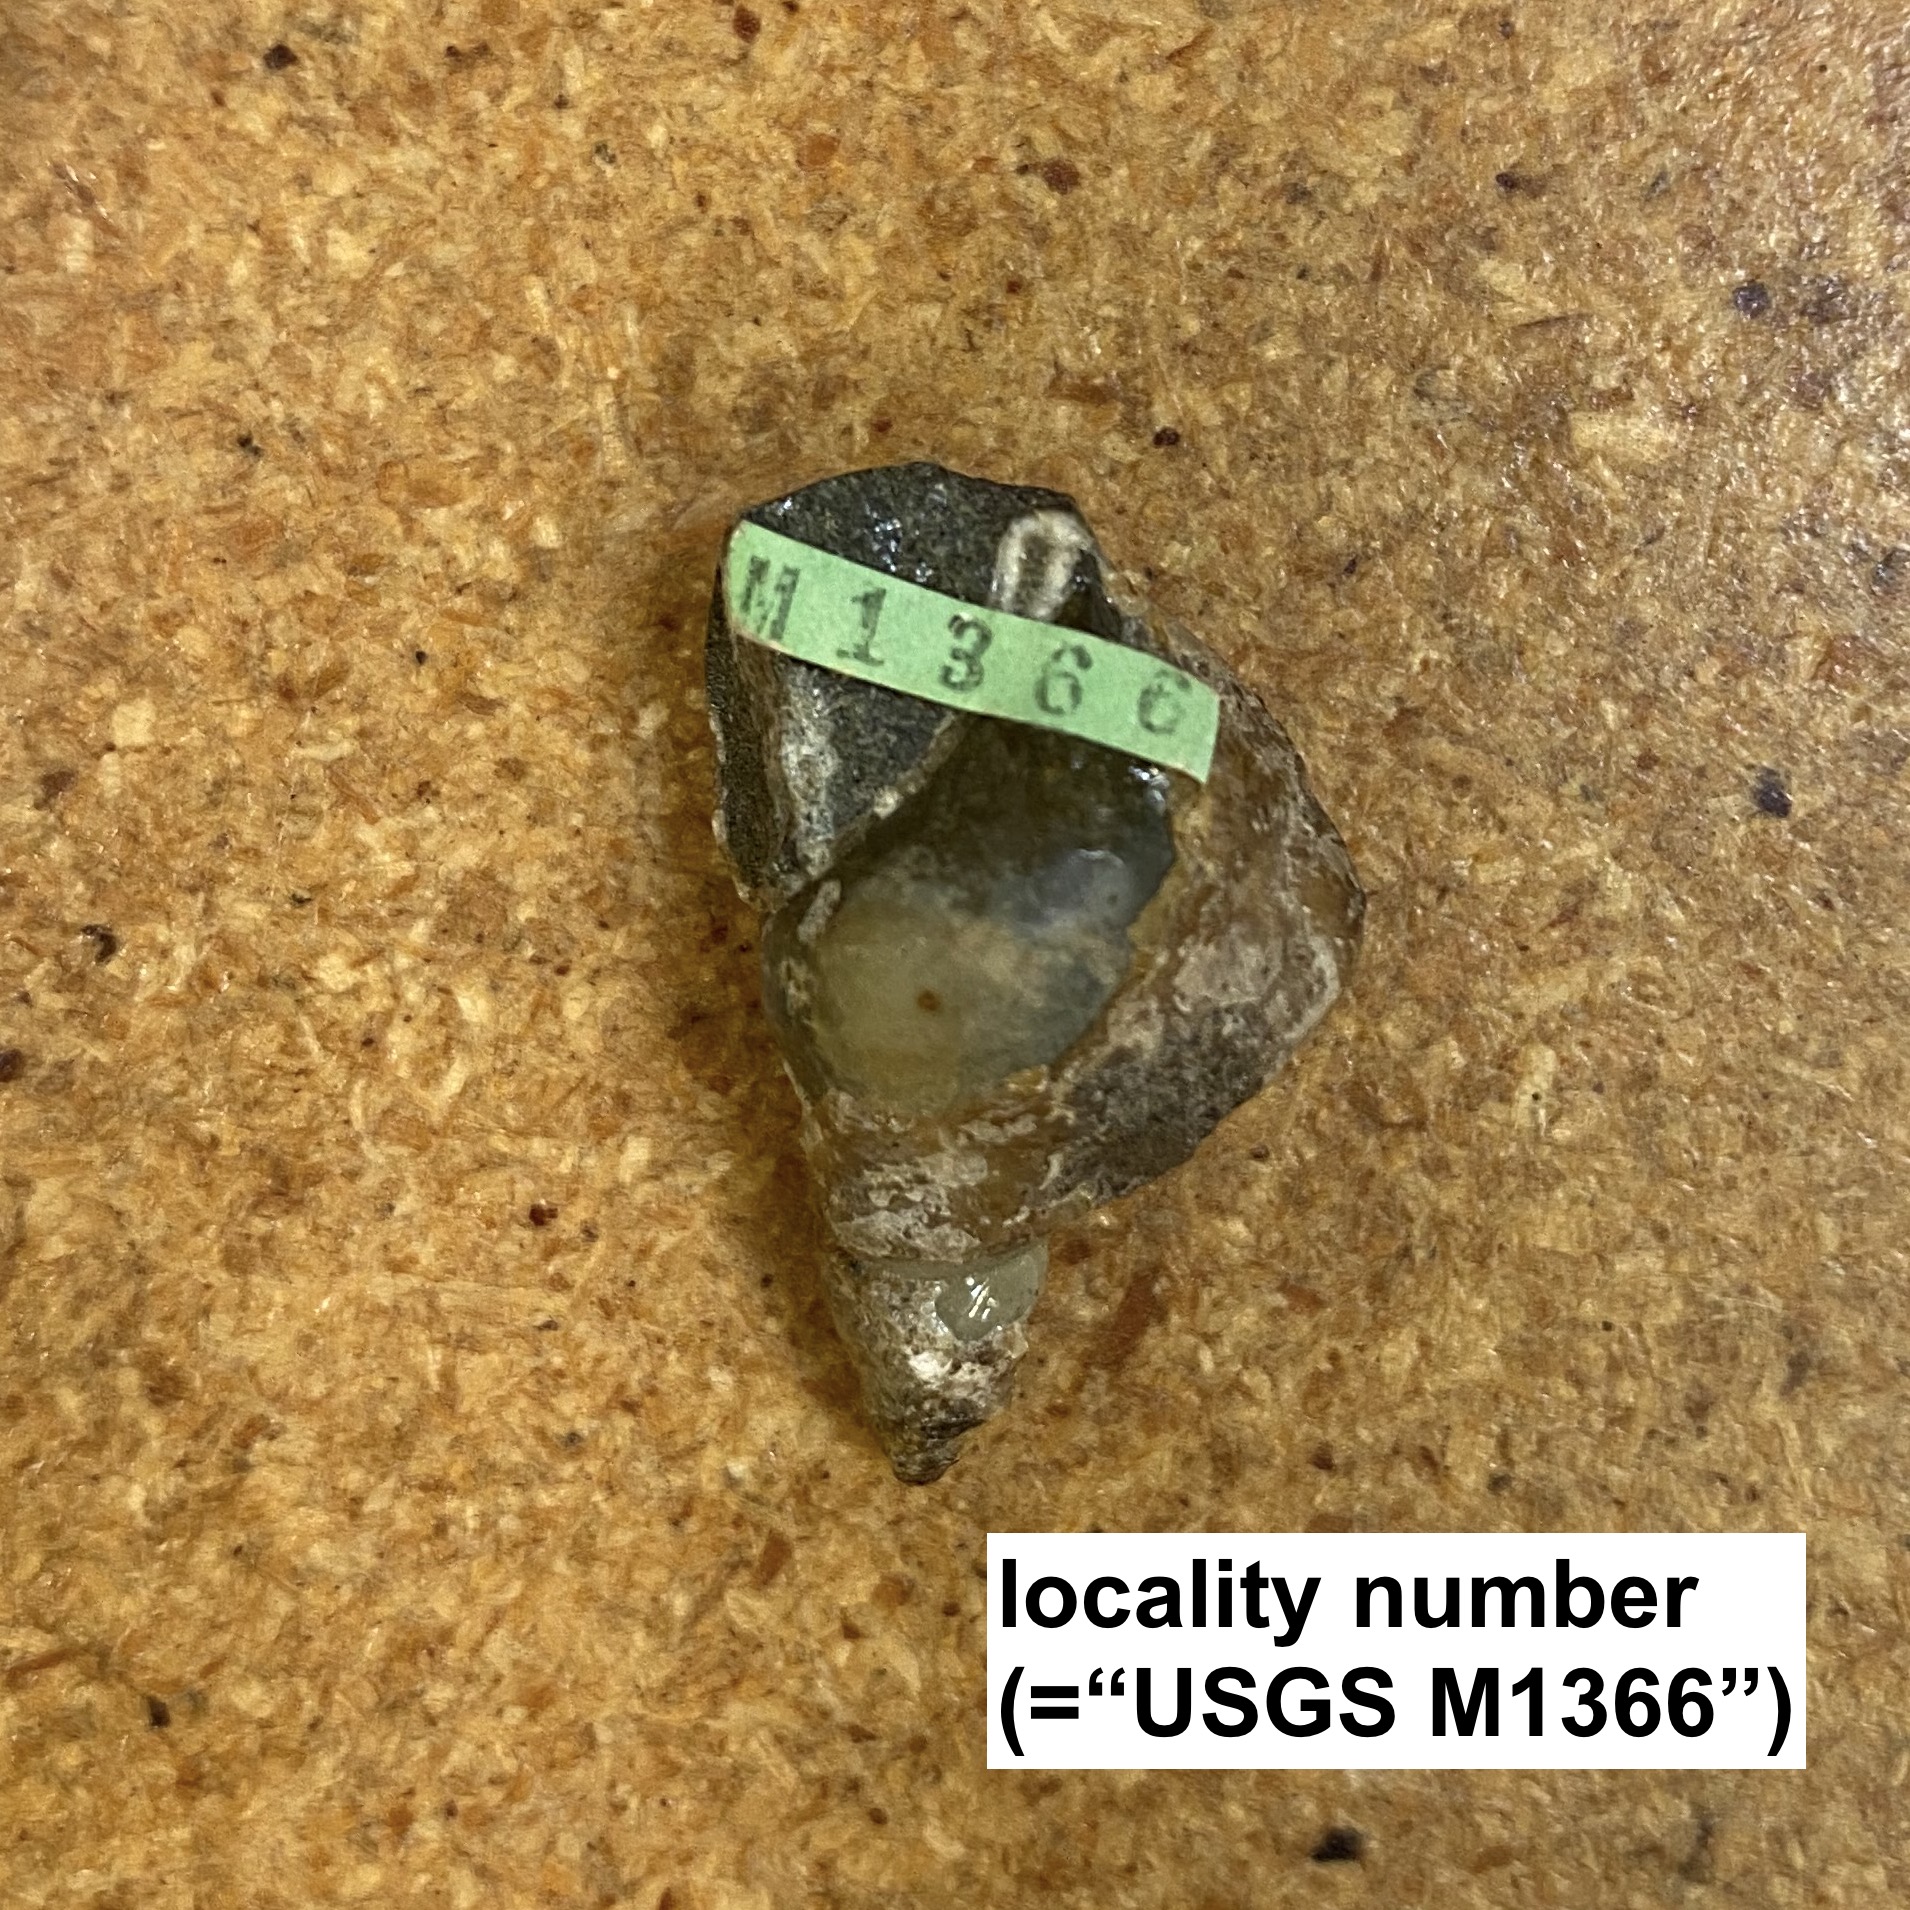
| USGS | various | ⛔locality | example |
One way to check whether a number is an old locality number is by clicking the blue arrow button next to the Locality. If your number appears in the Institution Number table, you have a locality number. In that case, do not record it in Alternative Numbers.
If you’re not sure what a number represents, take a photo of it and send it to collections staff in the Google Chat or via email.