Cataloging
Cataloging (a.k.a. databasing) is a critical step in digitization, and the creation of accurate digital catalog records facilitates collection management and access to specimen data for research. Over the past two decades, LACMIP has used several different databases to enter and manage specimen catalog records, most recently Microsoft Access and currently Axiell EMu. Cataloging in EMu offers several key benefits over Access, including more consistent and efficient data entry.
Introduction
If you are new to LACMIP’s cataloging workflow, review this section before creating new catalog records, as well as the comprehensive documentation for the Catalogue module.
ID tag “anatomy”
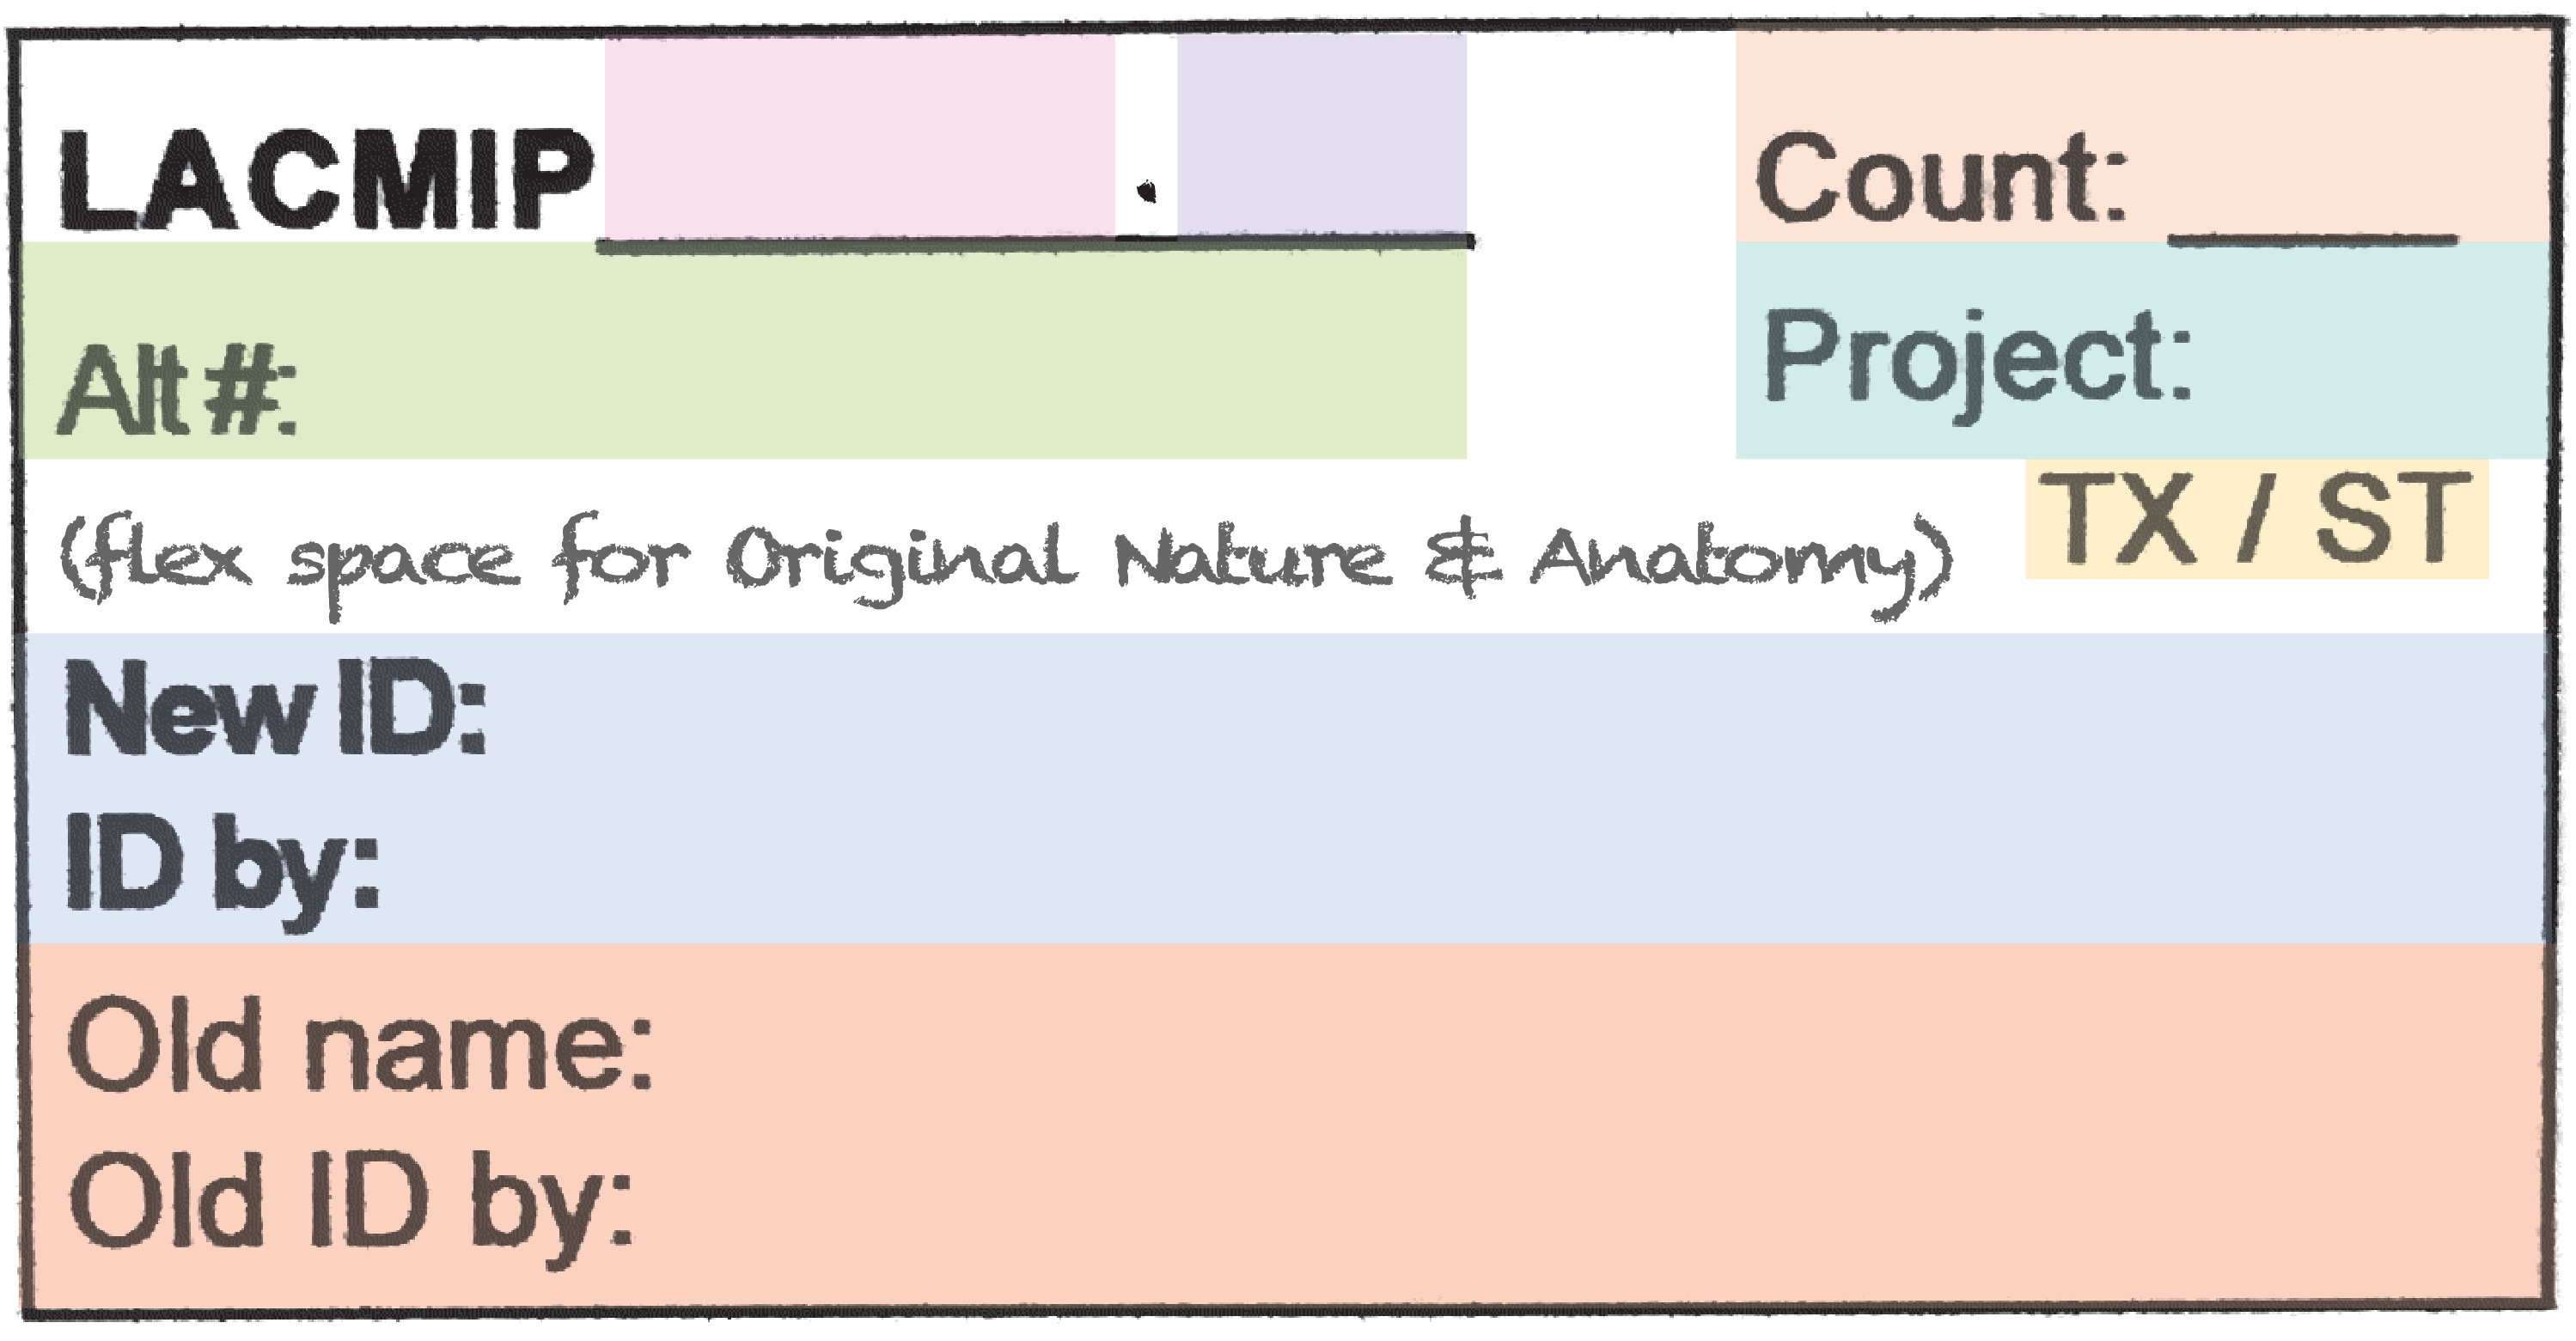
Cataloging begins with identification tags. As IP staff sort through the collection, they identify specimens and record this information for transcription into the database. It is important that you familiarize yourself with these tags before proceeding:
| ID Tag Field | Explanation |
|---|---|
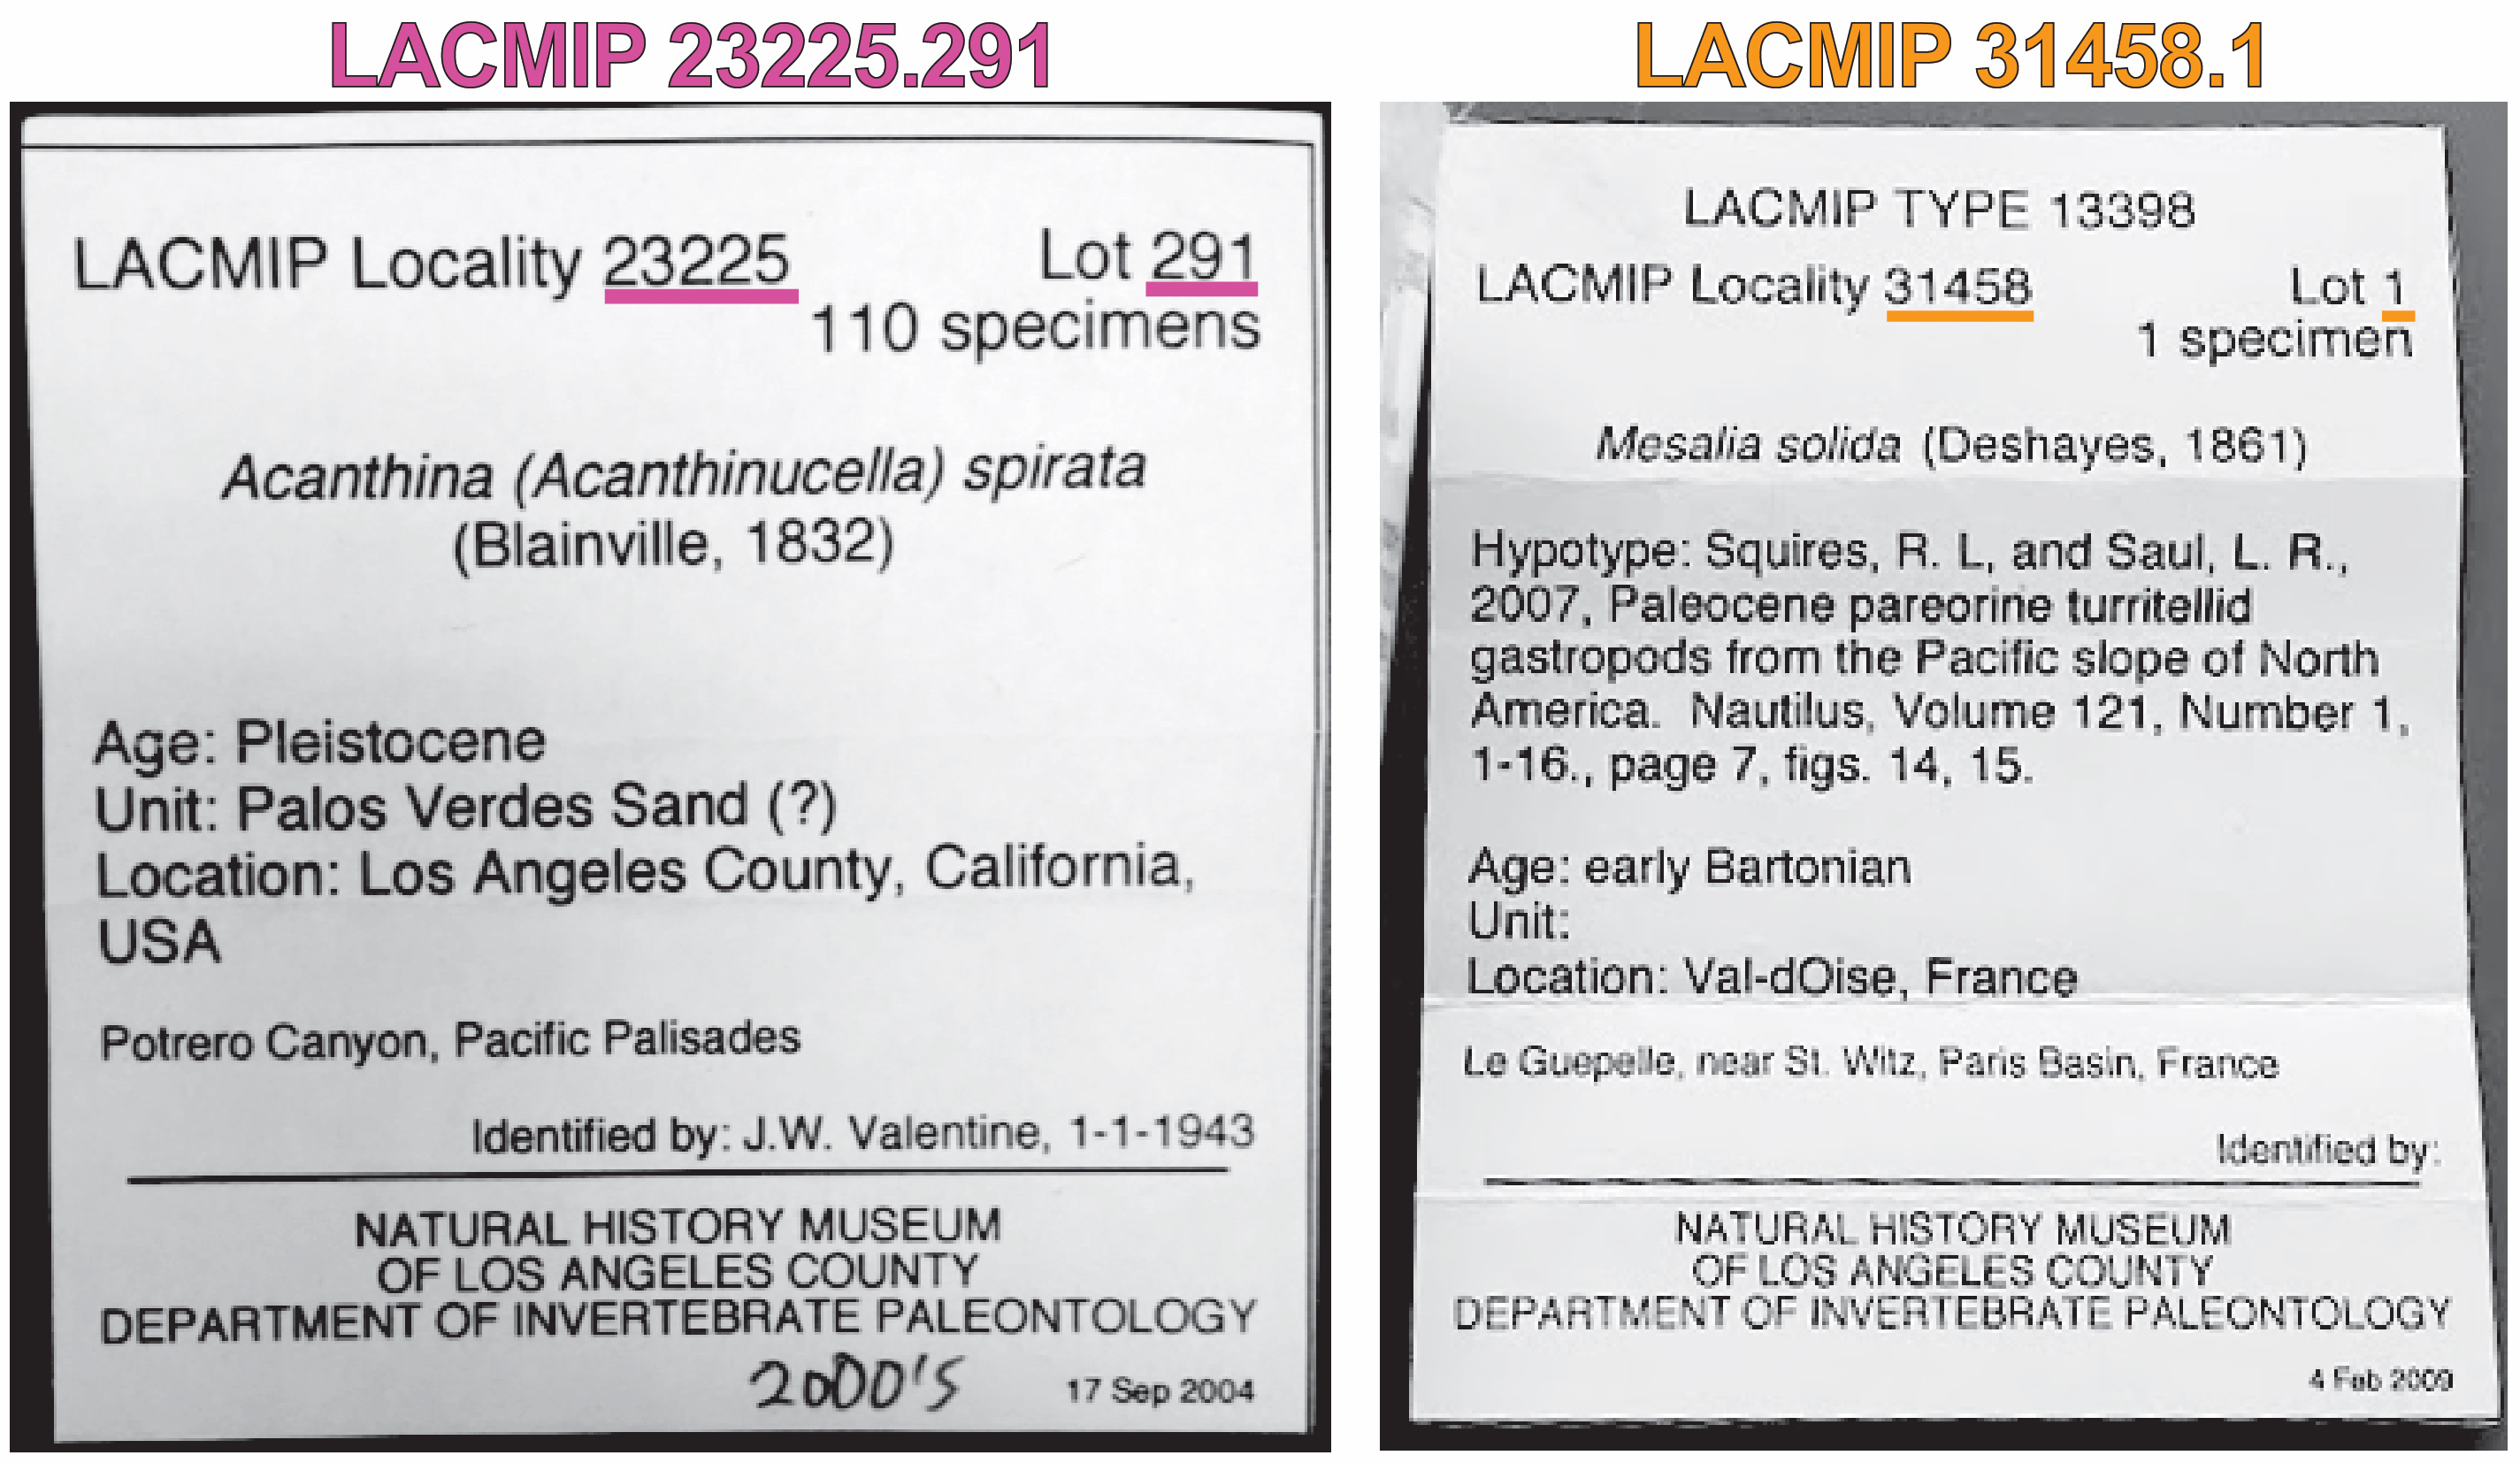
| LACMIP loc#.lot# | Reserved for the catalog number, which represents a combination of two numbers: a locality number and lot number. For example, the catalog number “LACMIP 2533.1” translates to the 1st lot cataloged from LACMIP locality 2533. Likewise, the catalog numbers for the 2nd and 3rd lots cataloged from this same locality would be LACMIP 2533.2, LACMIP 2533.3, and so on. The lot number is the only thing you will write on the tag during cataloging. |
| Alt # | Reserved for catalog numbers that were previously assigned to the specimen lot by another institution, e.g. “UCLA 53347”. |
| Count | Reserved for the number of individual specimens in the lot to which a given identification applies, e.g. “3”, if 3 Turritella snails are identified. (See documentation for counting). |
| Project | Refers to the relevant project, typically funding-related, e.g. “FIC” or “WIS”; this value may be pre-printed on the tag. |
| TX/ST | Refers to the collection in which the specimen lot is to be stored, whereby “ST” = the stratigraphic collection and “TX” = the taxonomic collection. |
| New ID | Reserved for the specimen lot’s identification as assigned by current LACMIP staff. |
| ID by | Reserved for the name of the person who wrote out the ID tag; this name is often pre-printed on the label and includes the date of identification. |
| Old name | If applicable, this space is reserved for old identifications that were previously assigned to the specimen lot; sometimes this ID is the same as the New ID. |
| Old ID by | If applicable, this space is reserved for the name of the person who made the old identification. If known, it will also include the date. |
Above New ID, blank space is provided to accomodate Original Nature (the fossil’s mode of preservation or preparation) and Anatomy (anatomical elements). This space is only used when the values for these categories deviate from their default values, “body fossil” and “shell(s)”. Likewise, additional comments about the taxonomic identification may be written on the back of the specimen tag, to be transcribed into Comments for the New ID.
To catalog or edit?
There are two possible cataloging scenarios, and looking at the ID tag will tell you which. If the specimen needs a catalog number, only a locality number will be present (e.g., “LACMIP 2533.”); the lot number will be blank. In this case, proceed with “creating a new catalog record”.
Less commonly, if the specimen was previously cataloged and the existing record needs updating, the ID tag will already include both a locality and lot number (e.g. “LACMIP 2533.1”). If this is the case, you will follow the instructions for “editing a catalogue record”. Consult the Collections Manager the first time you think you’ve encountered this scenario.
Taxonomy 101
If you are new to taxonomy and binomial nomenclature, please watch the following video and review this article to familiarize yourself with these concepts before proceeding.
Reminders
Here are a few more important things to keep in mind:
- Work with one specimen lot (box) at a time, and do not move specimens or labels between boxes.
- Do not reorganize the boxes within their trays during cataloging.
- Some boxes contain multiple ID tags; catalog them in order, starting with the ID tag on top.
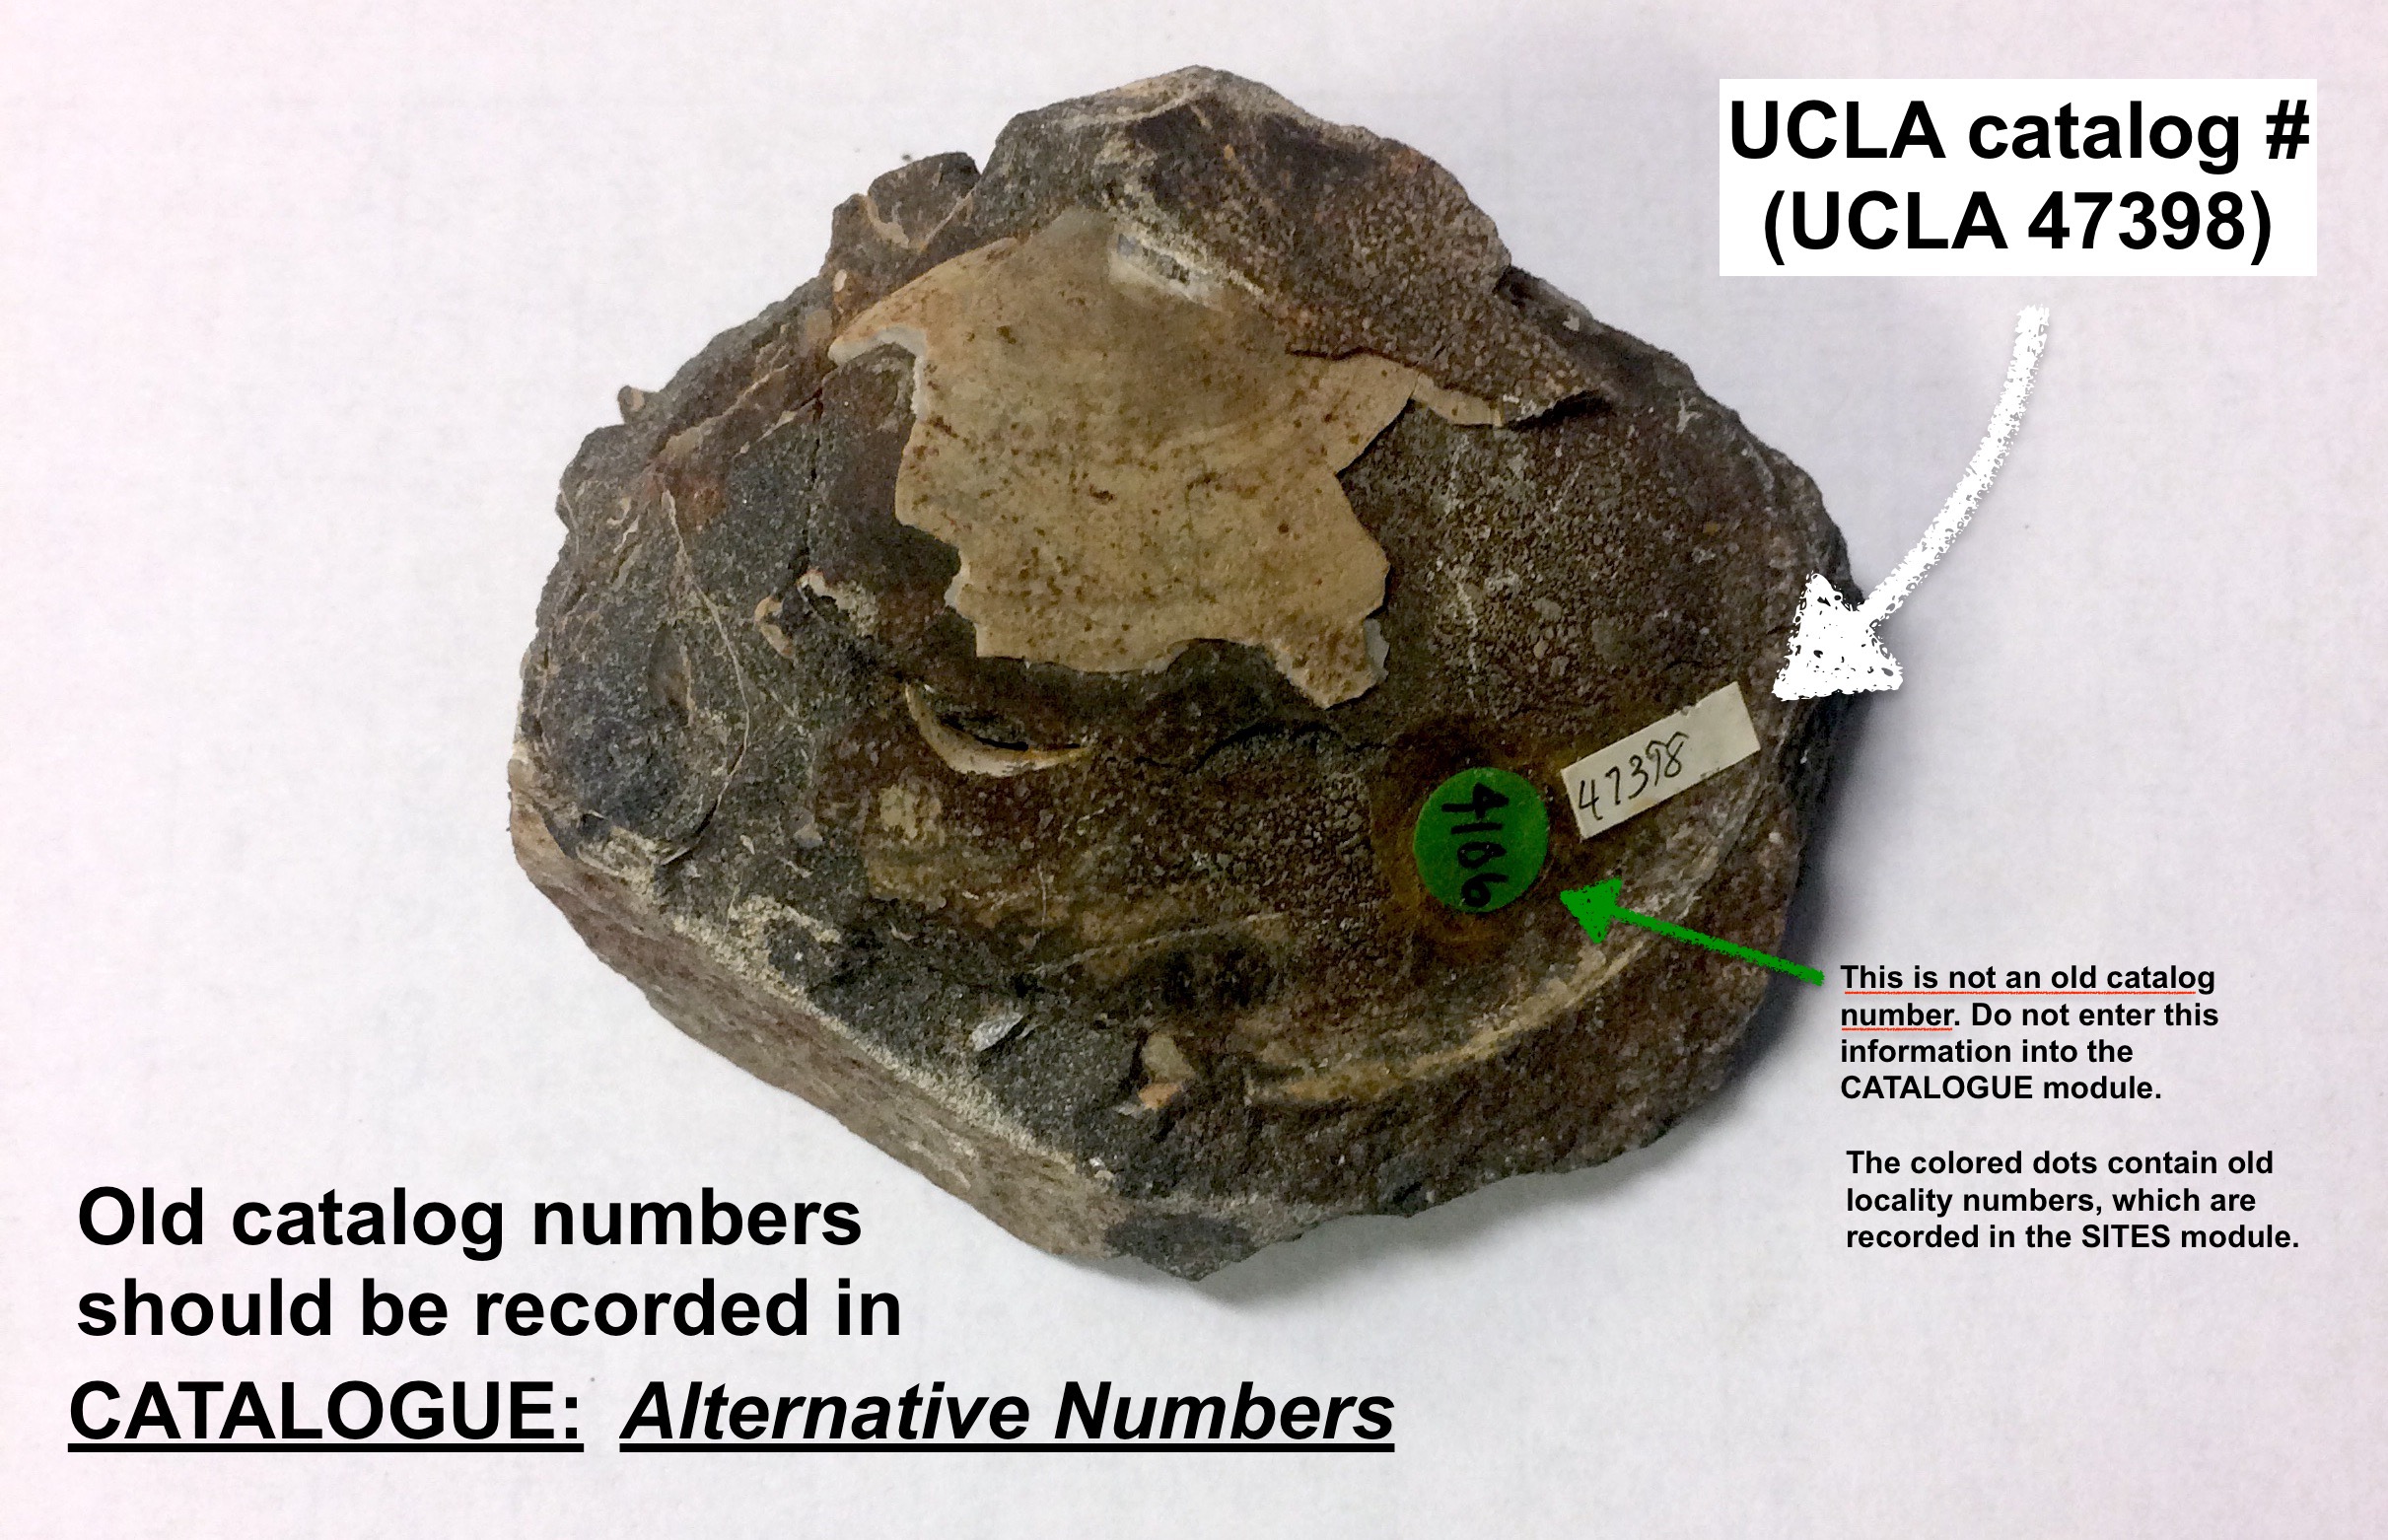
- Look for old catalog numbers that may not be on the ID tag.
- If you’re not sure about something, please ask questions!
Cataloging
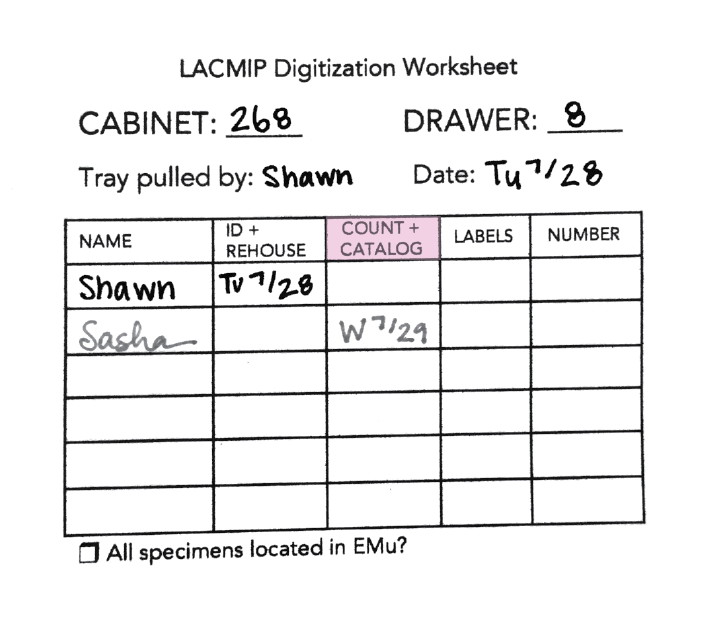
Before you begin cataloging, add your name and the date to the Count+Catalog field on the tray’s digitization worksheet:
Creating a new catalogue record
Creating a new catalogue record is the most common kind of cataloging you will do when working with the LACMIP collection, which is enormous and will take many years of concerted effort to completely catalog.
Entering the ID tag data
Begin by creating a new catalogue record (File > New Record) and following the step-by-step instructions below. Please note that these are general instructions and you should always feel free to ask questions when you are unsure! Also, remember that the documentation for the Catalogue module provides more detailed information about specific fields and possible values that you should also review.
Invert. Paleo. tab…
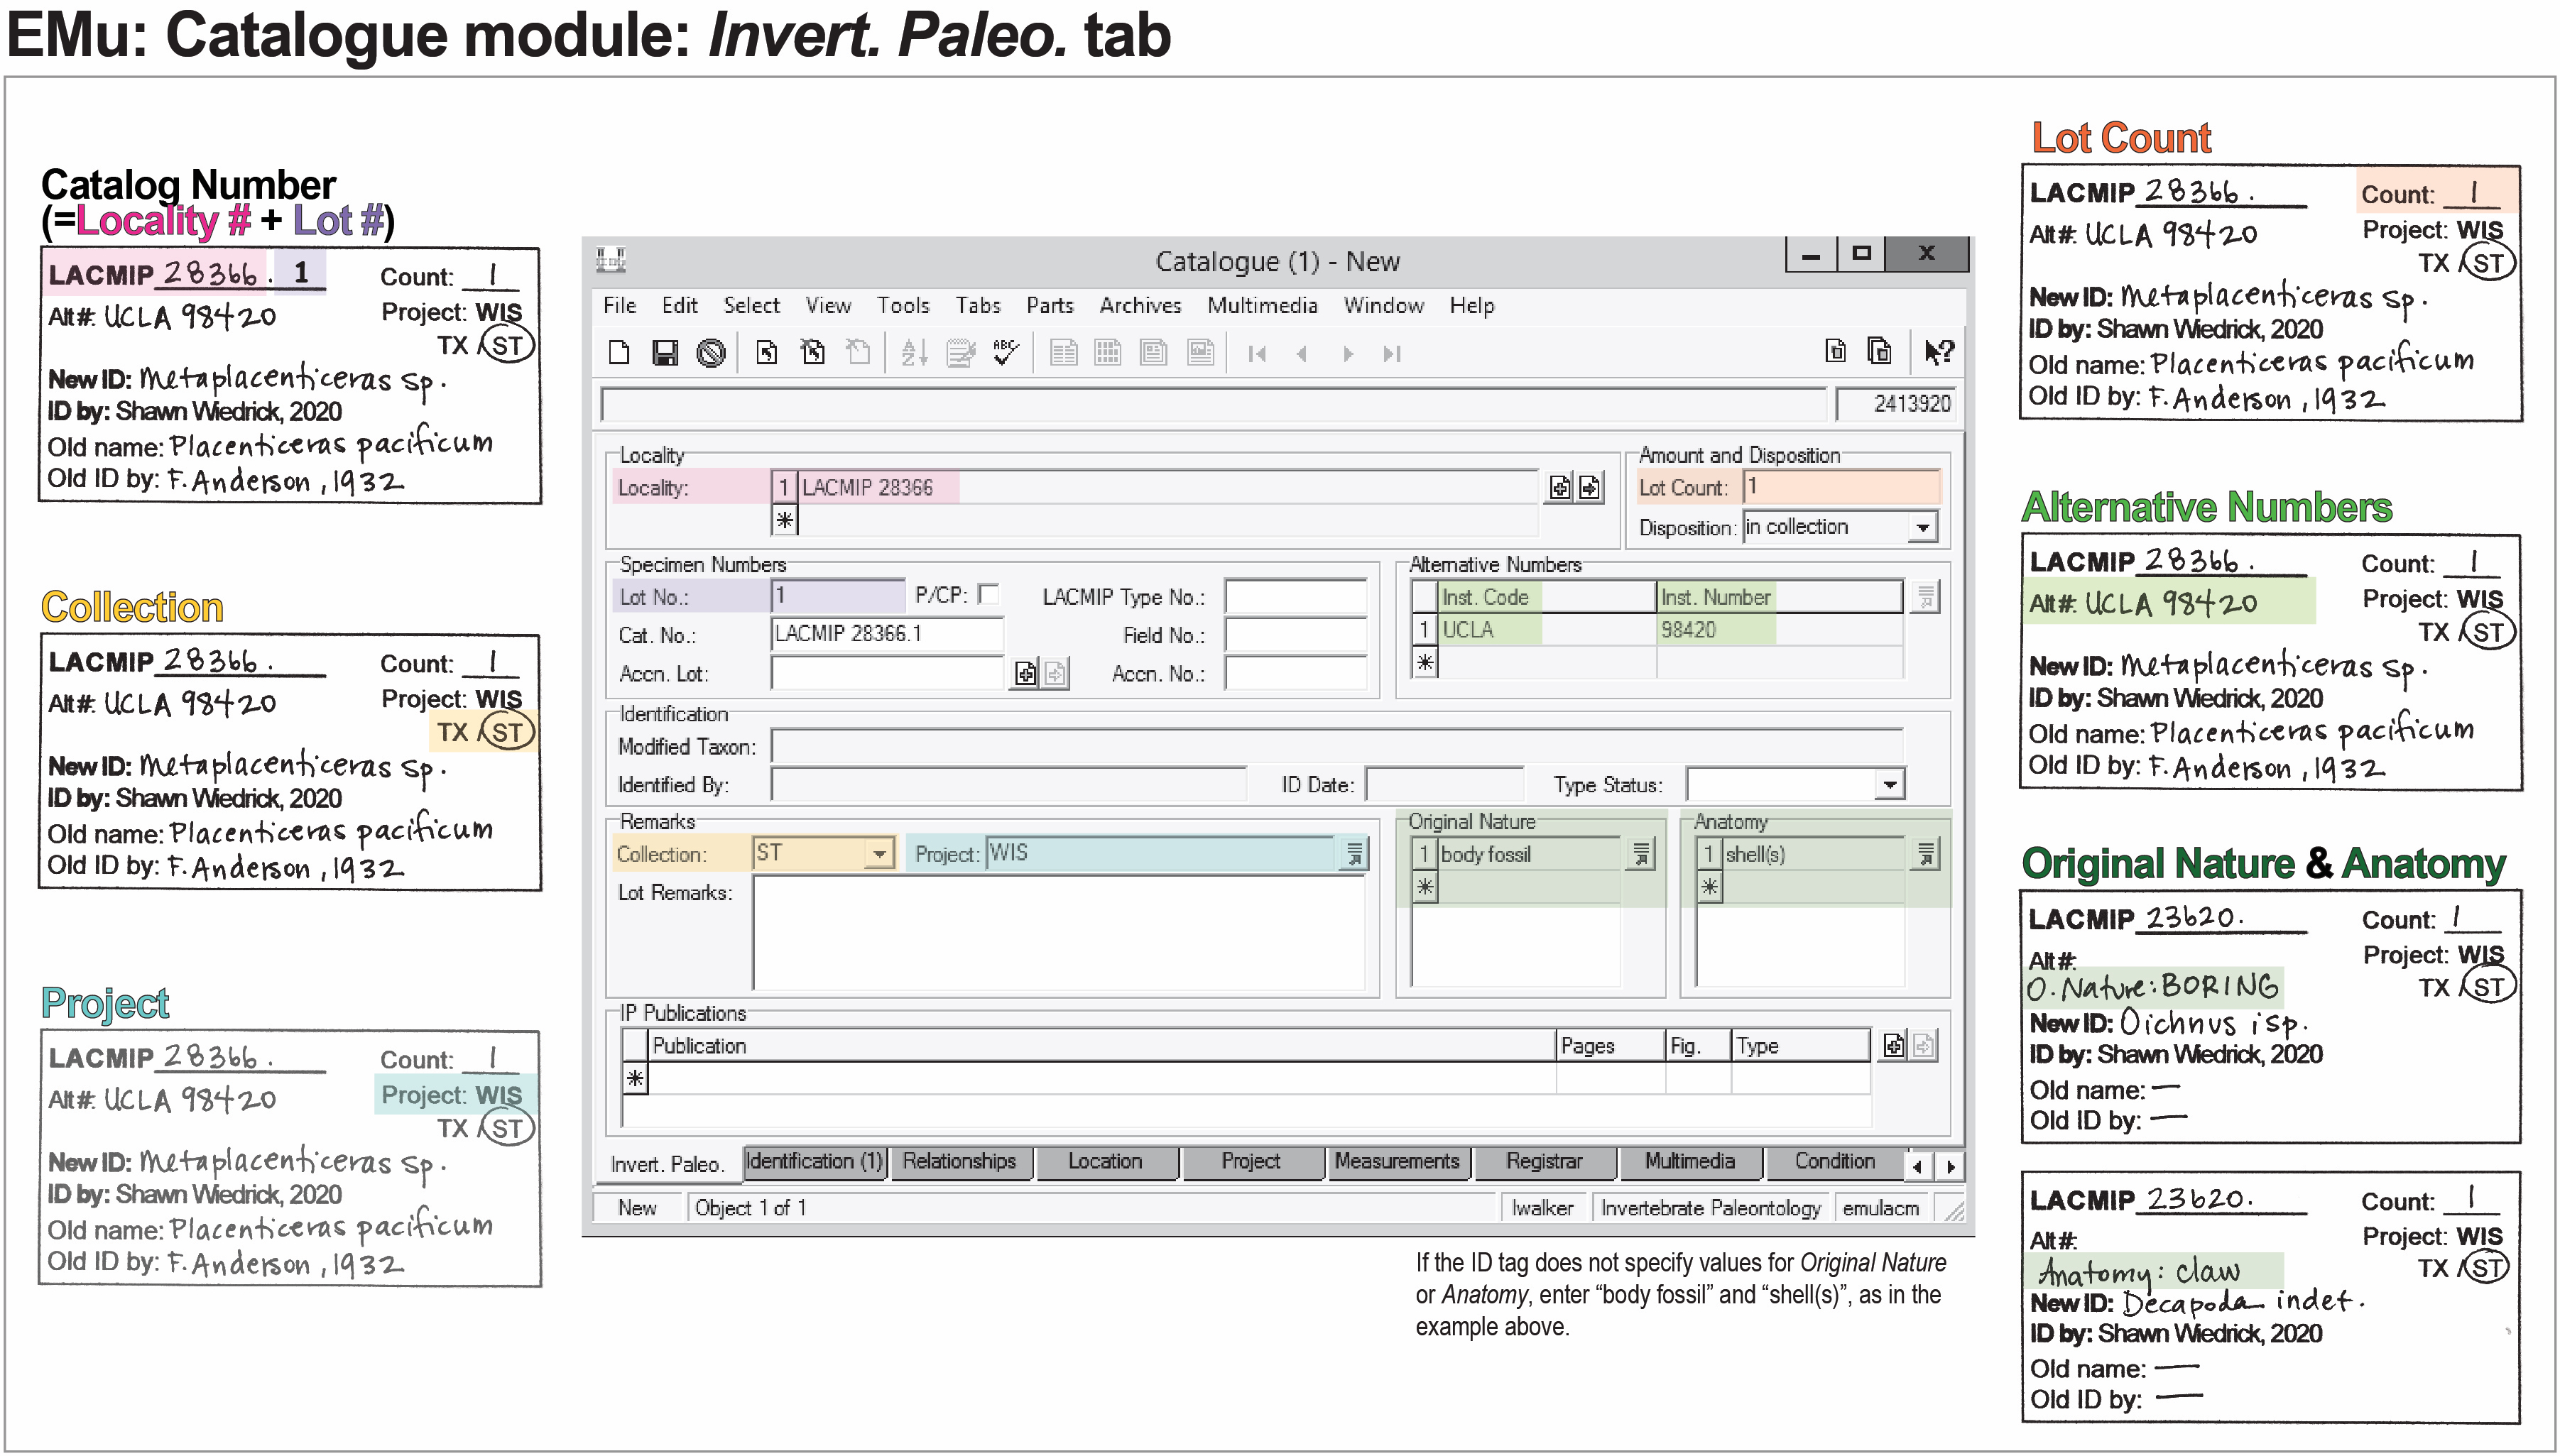
| Step | On the Invert. Paleo. tab… |
|---|---|
| 1 | Type the LACMIP locality number into the Locality field in EMu. You only need to enter the numerals and immediately hit “tab”. Pause before moving on; EMu will attach the corresponding site record. Check that the information in this field looks correct, e.g. if you are cataloging material from the Chico Formation and the site record data says “Ladd Formation”, that would suggest you mis-typed the locality number. |
| 2 | Write the auto-generated lot number in the Lot No. field on the paper ID tag. |
Immediately notify an IP staff member if EMu does not generate a lot number, or if you believe it was generated incorrectly. Lot numbers should always increase sequentially.
| 3 | Enter the Count from the paper ID tag into the EMu Lot Count field. If Count is blank, follow these instructions to fill it out. The record will not save if you leave this field blank. |
| 4 | Check that the Disposition in EMu is “in collection”. |
| 5 | Enter any information next to Alt # on the ID tag into the Inst. Code and Inst. Number fields in EMu. |
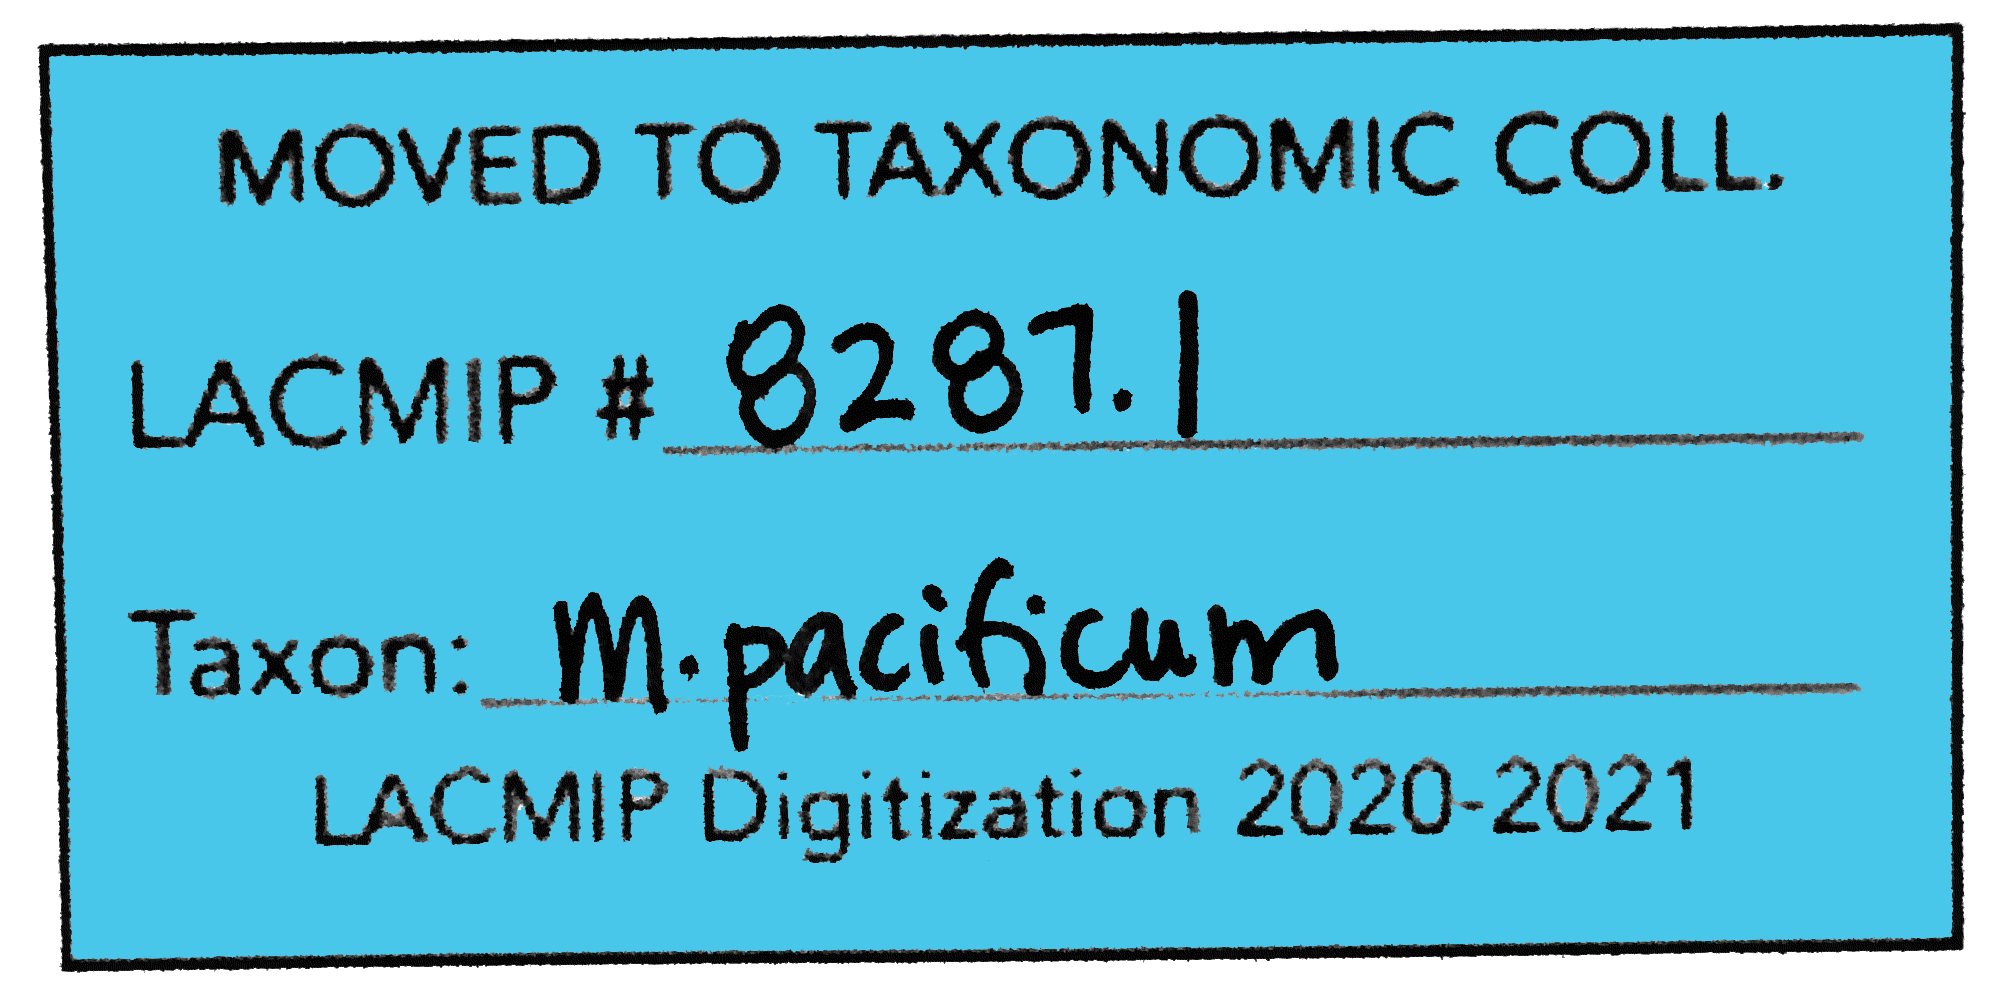
| 6 | Check that the Collection field matches what’s on paper ID tag. The default value is “ST”, so you only need to change it if “TX” is circled. TX (taxonomic) specimens should also have a blue “Moved to Taxonomic Coll.” tag in addition to the standard white ID tag. Add lot numbers to these tags as are you are cataloging. |
| 7 | Project depends on the specimens you are cataloging, e.g. “WIS”. This value may be pre-printed on the ID tag. |
| 8 | For Original Nature, select “body fossil” unless something else is stated on the ID tag. |
| 9 | For Anatomy, select “shell(s)” unless something else is stated on the ID tag. |
Identifications (1) tab…
| Step | On the Identifications (1) tab… |
|---|---|
| 10 | Begin with the New ID. Type the name into the Taxon field in EMu, e.g. “Turritella encina”, and press tab. If only one name in the database exists with this exact genus and species combination, the corresponding taxonomy record will automatically be attached after you press tab. If multiple names in the database include this combination (e.g. “Turritella chicoensis”), all possible options in the Taxonomy module will appear, presenting you with choices. The first time this happens, or whenever you are unsure of which name to choose, consult the Collections Manager. |
If the identification written on the tag ends in “sp.” or “isp.”, you are entering a genus-level ID (e.g. “Turritella sp.”). In this case, only type in the genus name followed by the word “genus”, e.g. “Turritella genus” (EMu will not understand “Turritella sp.”).
If the identification written on the tag ends in “indet.”, you are entering a name that ranks above genus, such as family or order. Family names typically end in “-idae” (e.g. “Turritellidae”). In this case, only type in the name before “indet” followed by the taxon’s rank, e.g. “Turritellidae family” (EMu will not understand “Turritellidae indet.”). Please ask if you are not sure of the correct rank to use.
| 11 | If the New ID includes a modifier (cf., aff.) record it in the EMu Modifer field and record the appropriate rank in the Modifier Rank field (typically, Modifier Rank=”genus” or “species”). For more details on modifiers, see the documentation for this field on the Catalogue module page. |
| 12 | Record ID by from the paper ID tag in Identified By. Names should be formatted “Firstname Lastname,” e.g. “Shawn Wiedrick”. This field is a lookup list in EMu, so you can just enter the first name (e.g. “Shawn”) and click on the lookup list icon, and “Shawn Wiedrick” should autofill. |
| 13 | Record the date in Date Identified by selecting the calendar icon or typing it in. Dates do not need to include a day or month, i.e. they may be just a year. |
| 14 | If additional notes are written on the back of the ID tag, record them verbatim in Comments. |
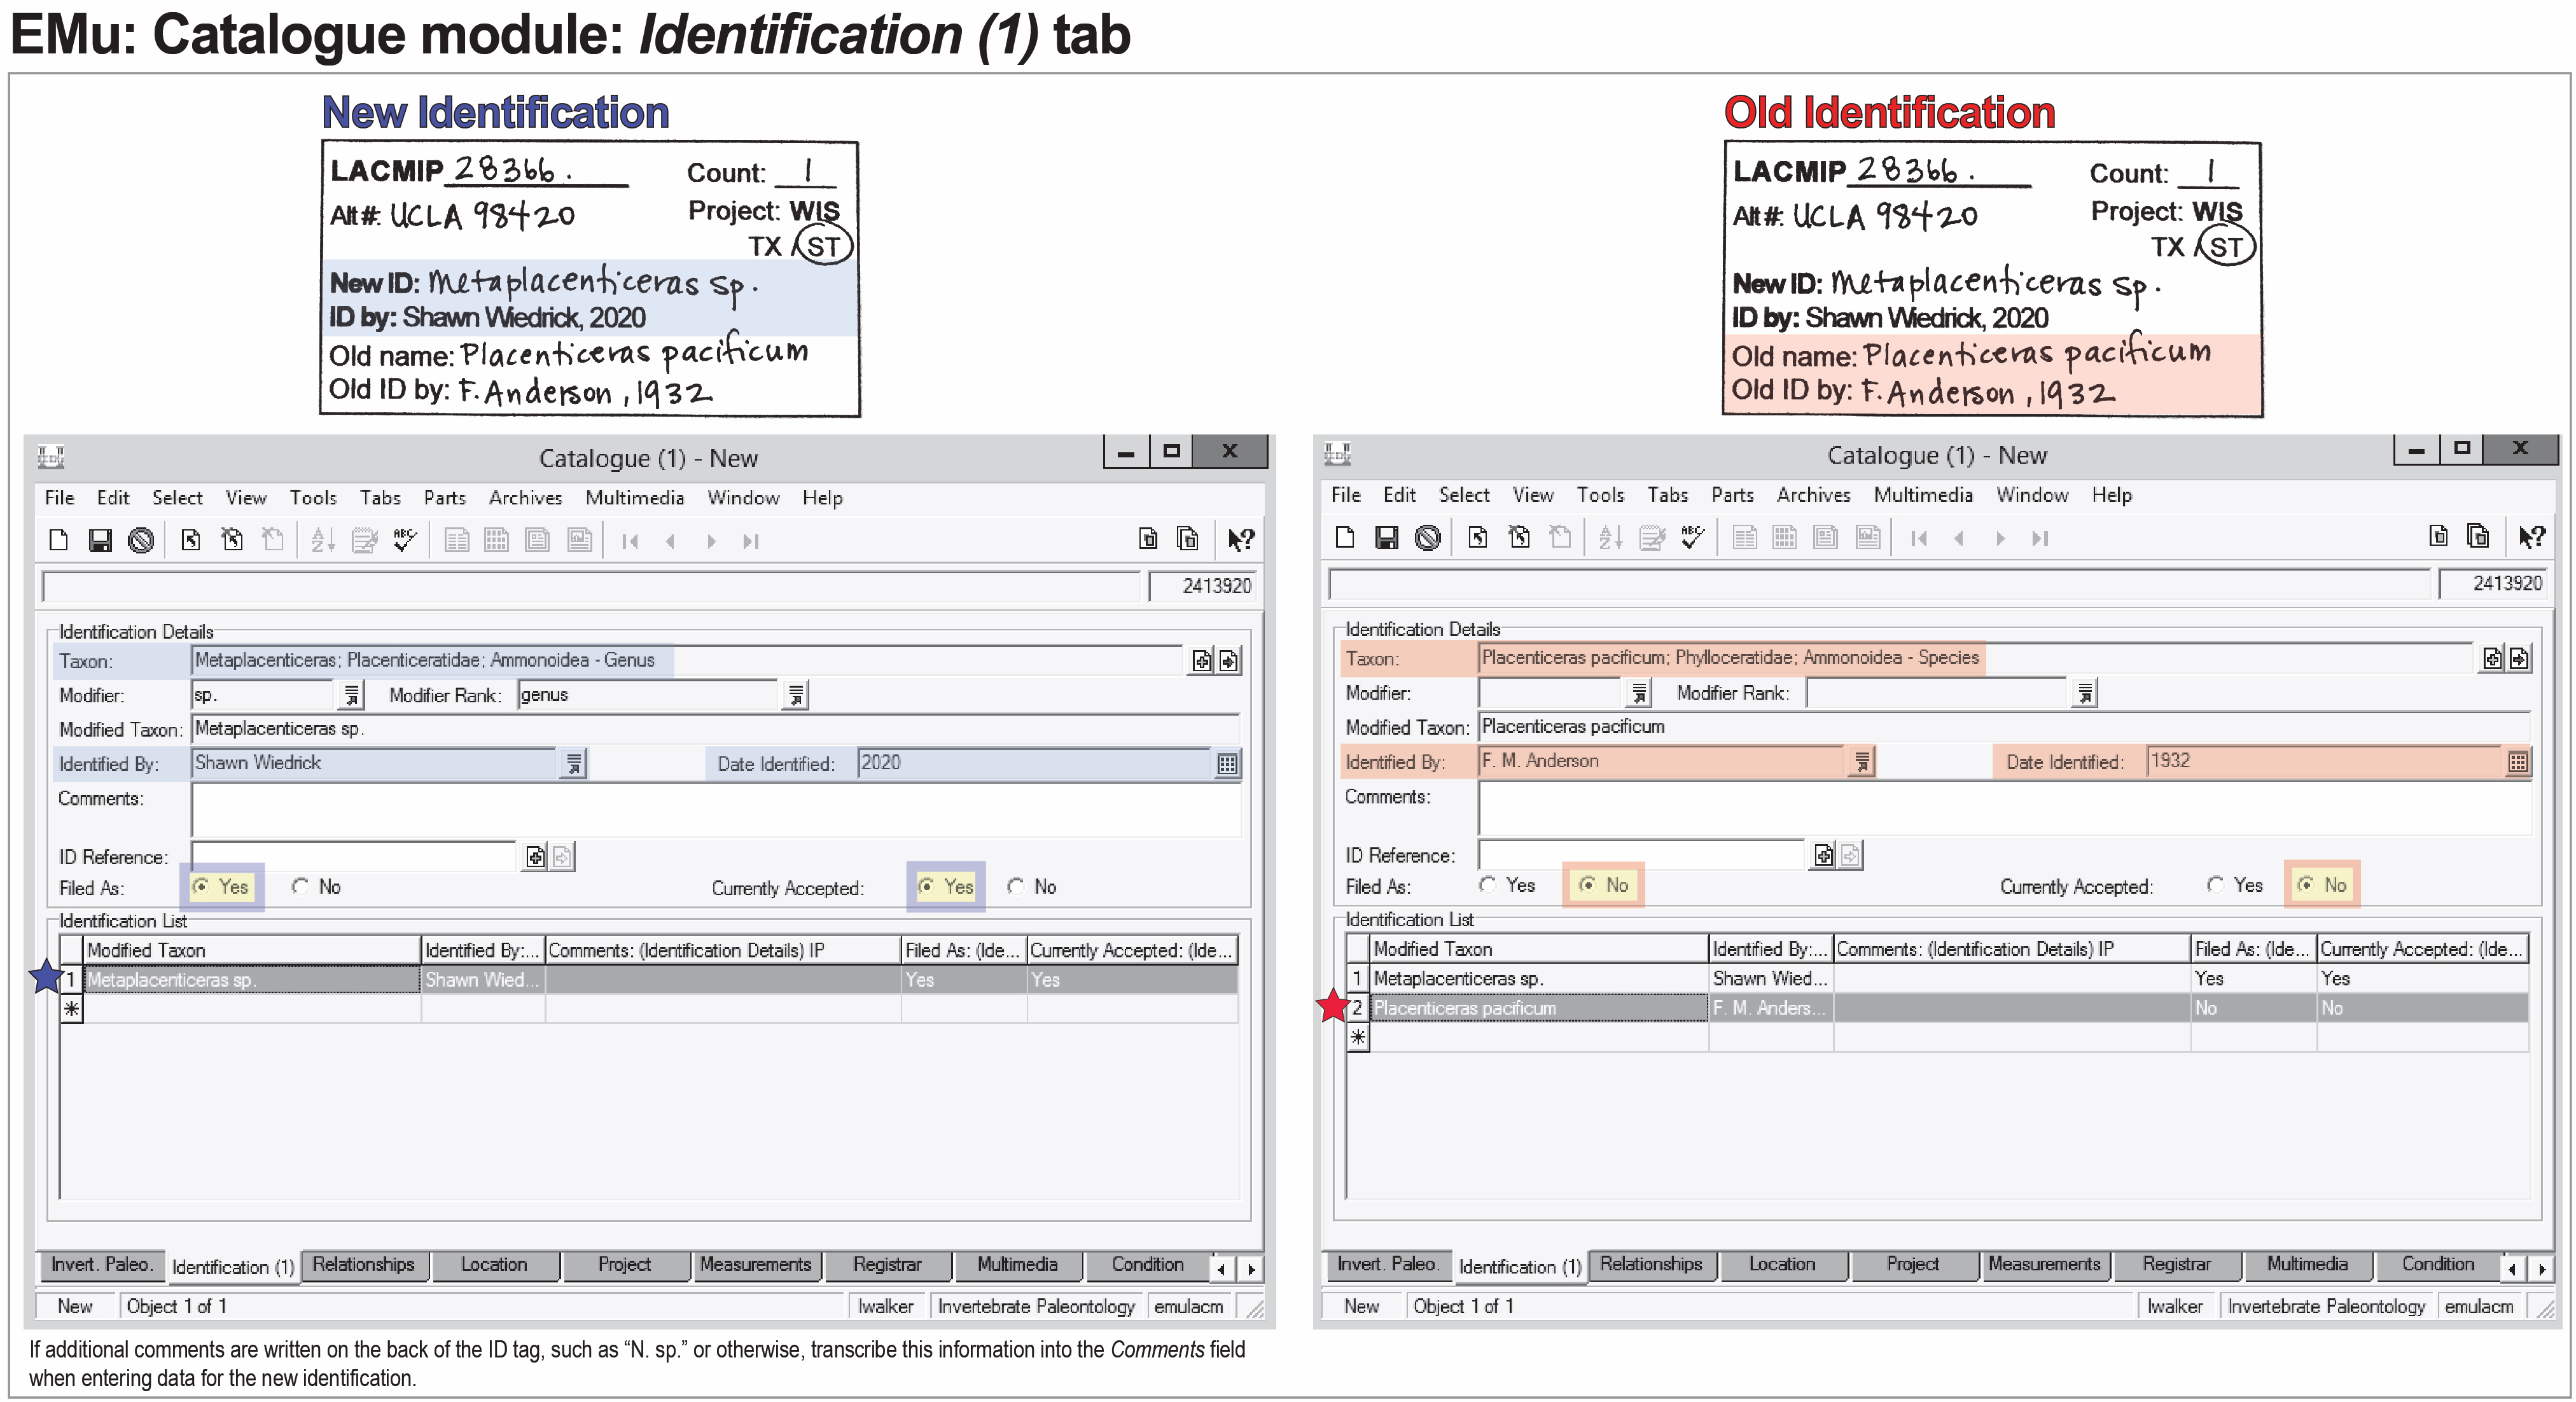
| 15 | Select “Yes” for both Filed As and Currently Accepted. |
Every specimen ID tag will have a New ID to be entered into the database; only some will also have an Old name to enter.
| 16 | If an Old name has been provided, create another identification by clicking in the second row of the Identification List table. You should see new, empty fields above. As with the first (new) identification, type the taxonomic name into the Taxon field in EMu and enter any modifier data into Modifier and Modifier Rank. If the taxon doesn’t appear–for Old name only–you may enter “Old name” into the Taxon field in EMu and then type out that name into the Comments field. |
| 17 | If Old ID by is provided, enter the name (formatted “Firstname Lastname”); enter “unknown” if this field is blank on the ID tag. |
| 18 | If a date is provided for the Old ID by value, enter this information into Date Identified in EMu. |
| 19 | Select “No” for both Filed As and Currently Accepted. |

If you cannot read the handwriting on the ID tag, or no name is returned when you hit tab, ask for assistance. If no one is immediately available to help: 1) if you are trying to enter a New ID into EMu, leave the Taxon field blank and enter “TAXONOMY NOT FOUND:” followed by the New ID in EMu’s Comments field (e.g. “TAXONOMY NOT FOUND: Bittscala sp.”; 2) if you are trying to enter an Old name, type “Old name” in the Taxon field and transcribe whatever is written on the ID tag for Old name in EMu’s Comments field (e.g. “Pecten sp.”). IP staff can generate lists of acceptable names to for cataloging (vs. old names) if you are having trouble deciphering handwriting!
Tutorials for entering identifications into EMu:
Relationships tab…
If a box contains more than one ID tag, it’s probably because there are specimens that are physically stuck together but represent different taxa (e.g., when a bivalve and gastropod are preserved on the same rock, or when a trace fossil is found on a body fossil). While each lot must be cataloged separately, they must also be associated using the Relationships tab in the Catalogue module.
There are multiple ways to accomplish this task, but here is one possible workflow:
| Step | To associate Catalogue records… |
|---|---|
| 1 | After cataloging all specimens to be associated, open a second instance of the Catalogue module. |
| 2 | In the new instance of the Catalogue module, search for all records to be associated. |
| 3 | In the original instance of the Catalogue module, open one of the specimen records and navigate to the Relationships tab. |
| 4 | Select all records to be associated in the second instance of the Catalogue module. Drag them into the Related Records table in the original instance of the Catalogue module. If you are trying to associate more than three records, enlarge the active window so more row are visible in the Related Records table. |
| 5 | Circular relationships should be avoided. Therefore, delete the row in the Related Records table that references the specimen record you are actively working on (right-click on the row and select “Delete”). |
| 6 | Save these changes and repeat steps 3-5 for all other specimen records that need to be associated. |
This same workflow is also demonstrated in this video:
That’s it! Save the catalogue record, make sure you remembered to record the lot number on the paper ID tag, and move on to the next specimen.
It’s a good idea to periodically check your work after creating a series of new records.
Editing a catalogue record
The most common reason that catalogue records need to be edited is to update the lot count and/or identification of a specimen that was cataloged circa 2002-2013. These specimens are frequently interspersed with previously uncataloged specimens in a single tray. Some boxes contain multiple ID tags, i.e. for some specimens you may be editing multiple catalogue records. If you need to edit catalog records, retain these labels; they must stay with the specimens, even after editing.
| Step | Edit |
|---|---|
| 1 | In order to edit a catalogue record you first need to find it. Search for the catalogue number (e.g. “26376”) in the Cat. No. field of the EMu Catalogue module in search mode. |
| 2 | View the record in edit mode and systematically check that the information on the new ID tag is accurate in EMu. |
| 3 | Lot Count: Check that the count is correct and update it if it’s wrong. |
| 4 | Amount & Disposition: If “unknown”, change to “in collection” as the lot’s whereabouts are now known. |
| 5 | Project: Update the value to reflect the project you’re currently working on. |
| 6 | Identification (1) tab: Add the new identification information to the record according to the ID tag. |
Tips
EMu can facilitate very efficient cataloging if you take a few minutes to set up your workflow. Default values and ditto-ing are two tools to help you do just that.
Ditto-ing values
Using EMu’s ditto function can help you quickly copy over information from one catalog record to the next. For example…
- You have a tray of specimen lots to catalog and all belong to the same locality. Ditto the Invert. Paleo. tab.
- You have five specimen lots with the same identification, all identified by the same person on the same date. Ditto the Identifications (1) tab.
To use the ditto function:
| Step | To Ditto… |
|---|---|
| 1 | Create a new catalogue record and fill out the fields you want to ditto. A good selection of fields to start with is: Project, Original Nature, and Anatomy. |
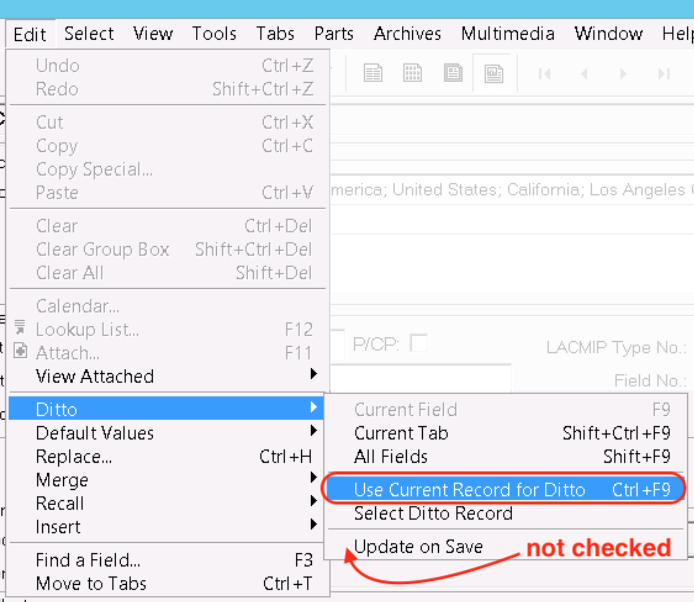
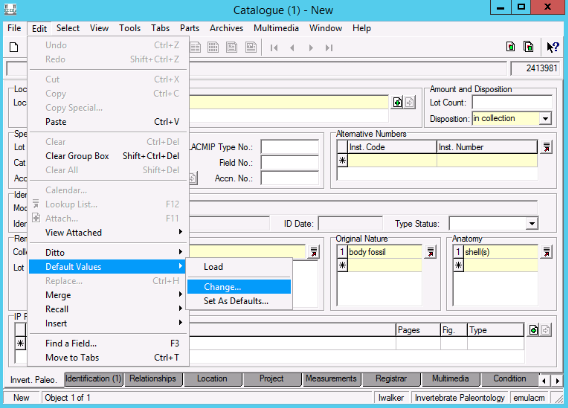
| 2 | Save this record and set it as your ditto record by going to Edit > Ditto > Use Current Record for Ditto. Make sure that Update on Save is not checked (as shown in the image above); if it is, the last record you save will always be the record that is being ditto-ed. |
| 3 | Finish entering this catalogue record and save. |
| 4 | When you begin the next record, as per usual, fill out Locality and Lot Count and immediately save before dittoing any information onto this new record. (If you do not create and save the new catalog number first, EMu may glitch.) |
| 5 | You can now select Edit > Ditto > Current Tab. This will automatically fill in the fields you entered values in your ditto record. Work tab-by-tab to ensure all information carried forward is correct. |
The keyboard shortcut for Edit > Ditto > All Fields is Shift + F9, or Shift + Fn + F9. Using this key command will save you a significant amount of time.
Setting default values
We recommend that new catalogers stick to using ditto (above) at least until they are more comfortable with EMu!
Every EMu user has a base set of default values determined by the Museum’s database manager to help us enter data efficiently and consistently. You can add to these base values depending on the specimens you are cataloging. LACMIP base defaults are:
| Tab | Field | Value |
|---|---|---|
| Invert. Paleo | Collection | “ST” |
| Invert. Paleo | Disposition | “in collection” |
| Identification (1) | Filed As | “Yes” |
| Identification (1) | Currently Accepted | “Yes” |
| Security | Publish on Internet | checked (“yes”) |
Setting your own defaults is more complicated than using the ditto tool, but it can be helpful for circumstances where you are always entering the same information, e.g. if you are always cataloging EPICC specimens you could set a default Project value of “EPICC.” To set your own defaults:
| Step | To set your own defaults… |
|---|---|
| 1 | Select the New Record icon or go to File > New Record (you won’t actually be creating a new record). |
| 2 | Enter the information you want to include by default. |
| 3 | Navigate to Edit > Default Values > Set As Defaults…. |
| 4 | Enter a short descriptive name for your new default in the top field, e.g. “EPICC Base Defaults” You can ignore the two boxes (Fields and Defaults) and click OK to save. |
Now when you create a new record, EMu will autofill the fields you just set as defaults. EMu will also remember your defaults whenever you log back in, so it may be a good idea to switch back to the base defaults at the end of your cataloging session to avoid accidentally carrying over data from your last cataloging session. To do so, navigate to Edit > Default Values > Change… and select “Base Defaults.” Never select “No Defaults”.
For more on this topic, see Axiell’s documentation for setting defaults in EMu.
Using key commands
The effective use of key commands will make cataloging both easier and faster. See Axiell’s Keyboard Shortcuts & Quick Reference Guide in addition to the quick tips below. Keep in mind that not all key commands work on a Mac and/or via the VPN remote access.
Must-have key commands for cataloging include:
| Action | Key Command |
|---|---|
| Move to another tab | use Ctrl + Shift + [the leading letter of the tab label], e.g. Ctrl + Shift + i in the Catalogue module will take you to the Identification (1) tab |
| Ditto current tab | Shift + Ctrl + F9, or Shift + Ctrl + Fn + F9 (on a Mac) |
| Ditto all tabs | Shift + F9, or Shift + Fn + F9 on a Mac (use judiciously) |
| Save | Ctrl + s |
| Create new record | Crtl + n |
Check your work
An easy way to check your work during cataloging is to view your new records in list view. To do so:
| Step | To check your work… |
|---|---|
| 1 | Recall the Catalogue module’s search form and navigate to the Admin tab. |
| 2 | Search for your name and the current date in Inserted By and Insertion Date. |
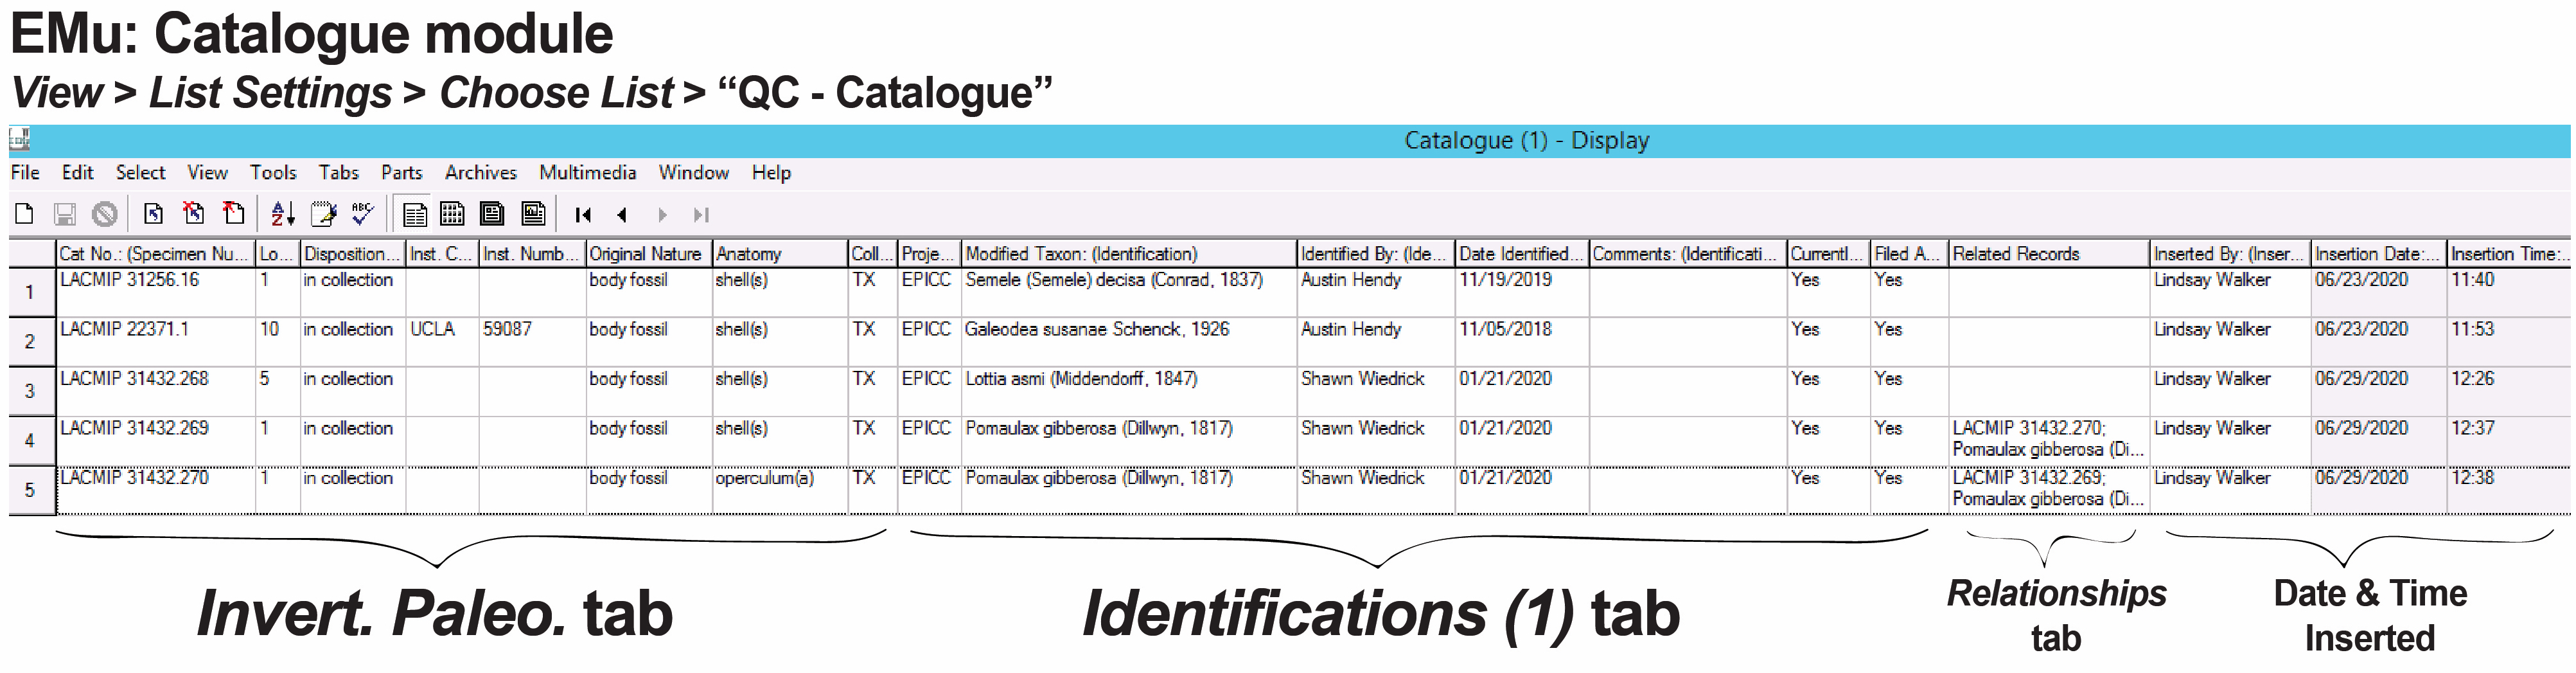
| 3 | Navigate to View > List Settings > Choose List > Select “QC - Catalogue” > OK |
| 4 | Sort your records by the order in which they were created: Tools > Sort Results… > Inserted Date-Time > OK |
| 5 | Maximize the size of the window. Scroll through your records, visually scanning for gaps or incorrect information, including non-sequential lot numbers. |
Flagging records to print
Any time you create or edit a catalogue record, it also needs to be printed and physically placed with the specimen. Printing labels is usually done by LACMIP staff on a regular basis, but you will need to mark what records require printing. The best way to do this is to finish your cataloging session and then:
- Do a new search to find all records where Inserted By is you and Insertion Date is today (find these fields on the Admin tab).
- View your search results as a list in order to visually scan through and confirm that these records look like what you did today. This is the perfect time to check your work! Do this by changing the view to View > List Settings > Choose List and select the “QC- Catalogue” option. Sort your records by Inserted Date-Time and scan through your entries to check them.
- Add the search results to a group by navigating to Tools > Group > All Records in Results… and creating a new group called “PRINT - [your name] - [trayID]” or, if you see the option to, adding your records to an existing group called “PRINT - [your name].”
- If you created a new group, you’ll need to share this group with whomever will be printing labels. Add access to the group by adding “swiedrick” (or whoever will be printing your labels) on the Security tab of the group’s properties.