Digitizing
Digitization initiatives at LACMIP are primarily supported by the National Science Foundatoin. “Digitization” itself is a broad term and includes the variety of workflows outlined here. For a more thorough review of digitization workflows, see Nelson et al. 2012.
Pre-digitization
Workflow overview
Pre-digitization is completed by LACMIP staff.
| Step | Pre-digitization task… |
|---|---|
| 1 |
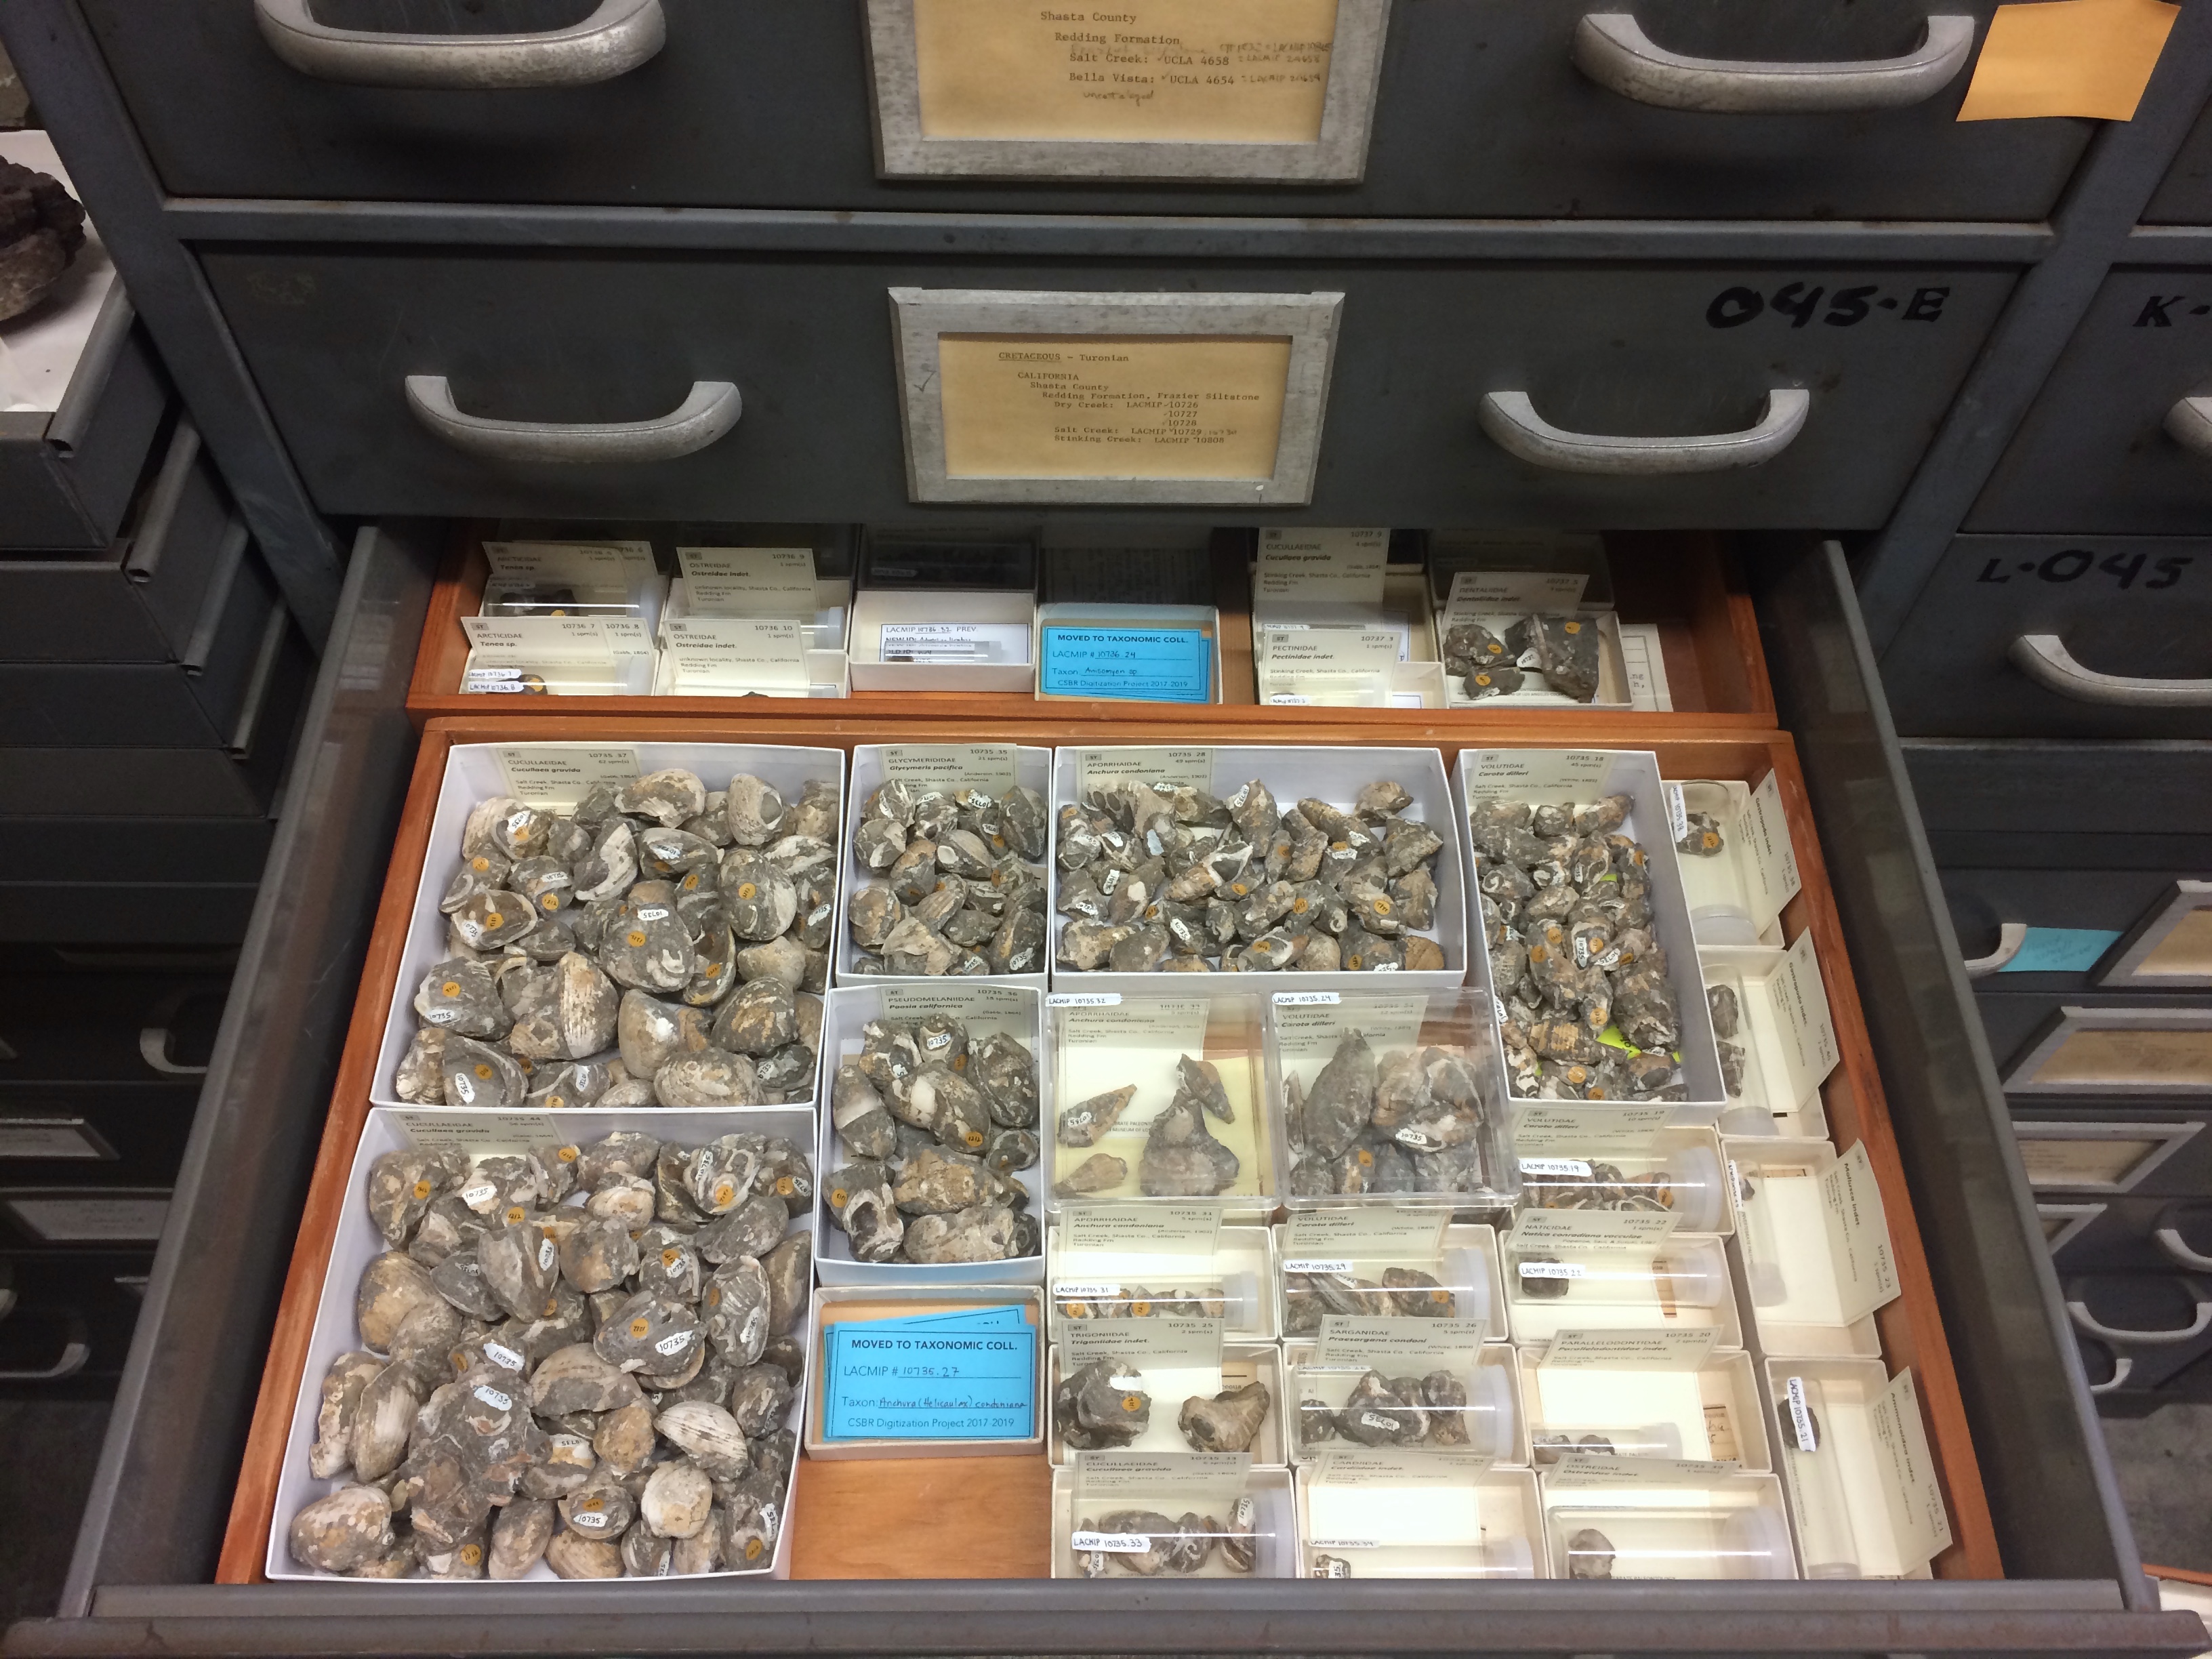
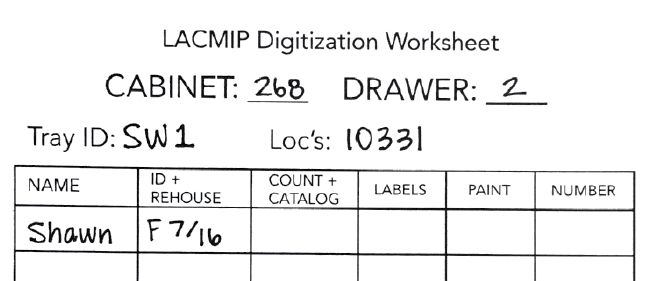 Select specimens. Using the stratigraphic collections inventory, select a tray from the collection to be digitized and immediately begin a new digitization worksheet. Immediately record the cabinet and drawer number the tray came from. Likewise, Tray ID is a combination of your initials and a consecutive number unique to you; Loc’s refers to localities represented in the tray. These worksheets are to remain with their trays throughout the digitization process. Select specimens. Using the stratigraphic collections inventory, select a tray from the collection to be digitized and immediately begin a new digitization worksheet. Immediately record the cabinet and drawer number the tray came from. Likewise, Tray ID is a combination of your initials and a consecutive number unique to you; Loc’s refers to localities represented in the tray. These worksheets are to remain with their trays throughout the digitization process.
|
| 2 | Verify localities. Before identifying and rehousing any specimens, check that all associated locality information in EMu is complete and accurate. The fields that will most likely require attention are the Geographic Details and Collectors. Filling out these fields will ensure labels will be complete upon printing. Refer to the instructions on entering new geographic data and the IP Locality (1) tab if City/Town or Nearest Place are blank. If the Collectors Names or Start Date/End Date fields are blank, look for this information on the Notes tab in the Sites module, as well as on old locality cards in the tray. Fill in this information using the “Firstinitial Lastname” format (consult the lookup list - the name(s) may already be recorded as an option). If the collector is truly unknown, fill in this field with “unknown” in EMu. Collecting dates may be left blank if they are unknown. |
| 3 |
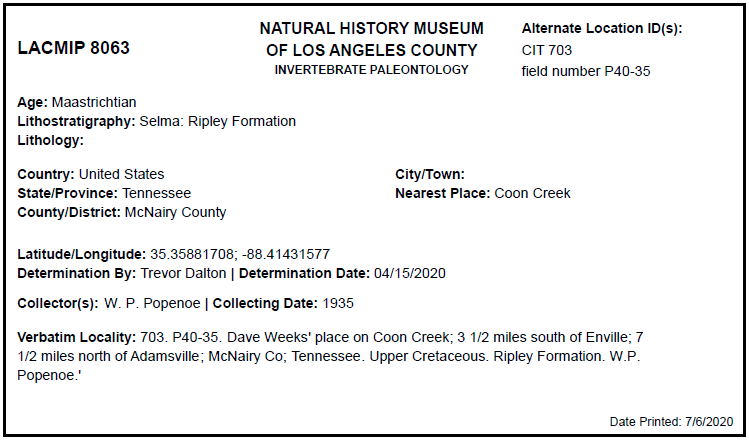 Generate new IP Locality Cards. Once vetted, run the “IP Locality Cards” report in EMu’s Sites module for all localities in the tray. Print the card(s) on archival paper, plasticize and seal them, and then neatly tuck the card(s) under the specimen boxes in the tray. If the tray also contains older locality cards, they should be plasticized (one sleeve per label) and stored with any new cards. Generate new IP Locality Cards. Once vetted, run the “IP Locality Cards” report in EMu’s Sites module for all localities in the tray. Print the card(s) on archival paper, plasticize and seal them, and then neatly tuck the card(s) under the specimen boxes in the tray. If the tray also contains older locality cards, they should be plasticized (one sleeve per label) and stored with any new cards. |
| 4 | Sort, identify, and rehouse specimens. Identifications should be made using the most current taxonomic dictionary available for that fauna. Refer to the identification and rehousing guidelines below. |
| 5 | Return uncataloged tray to the collection. Follow these instructions. |
Identification guidelines
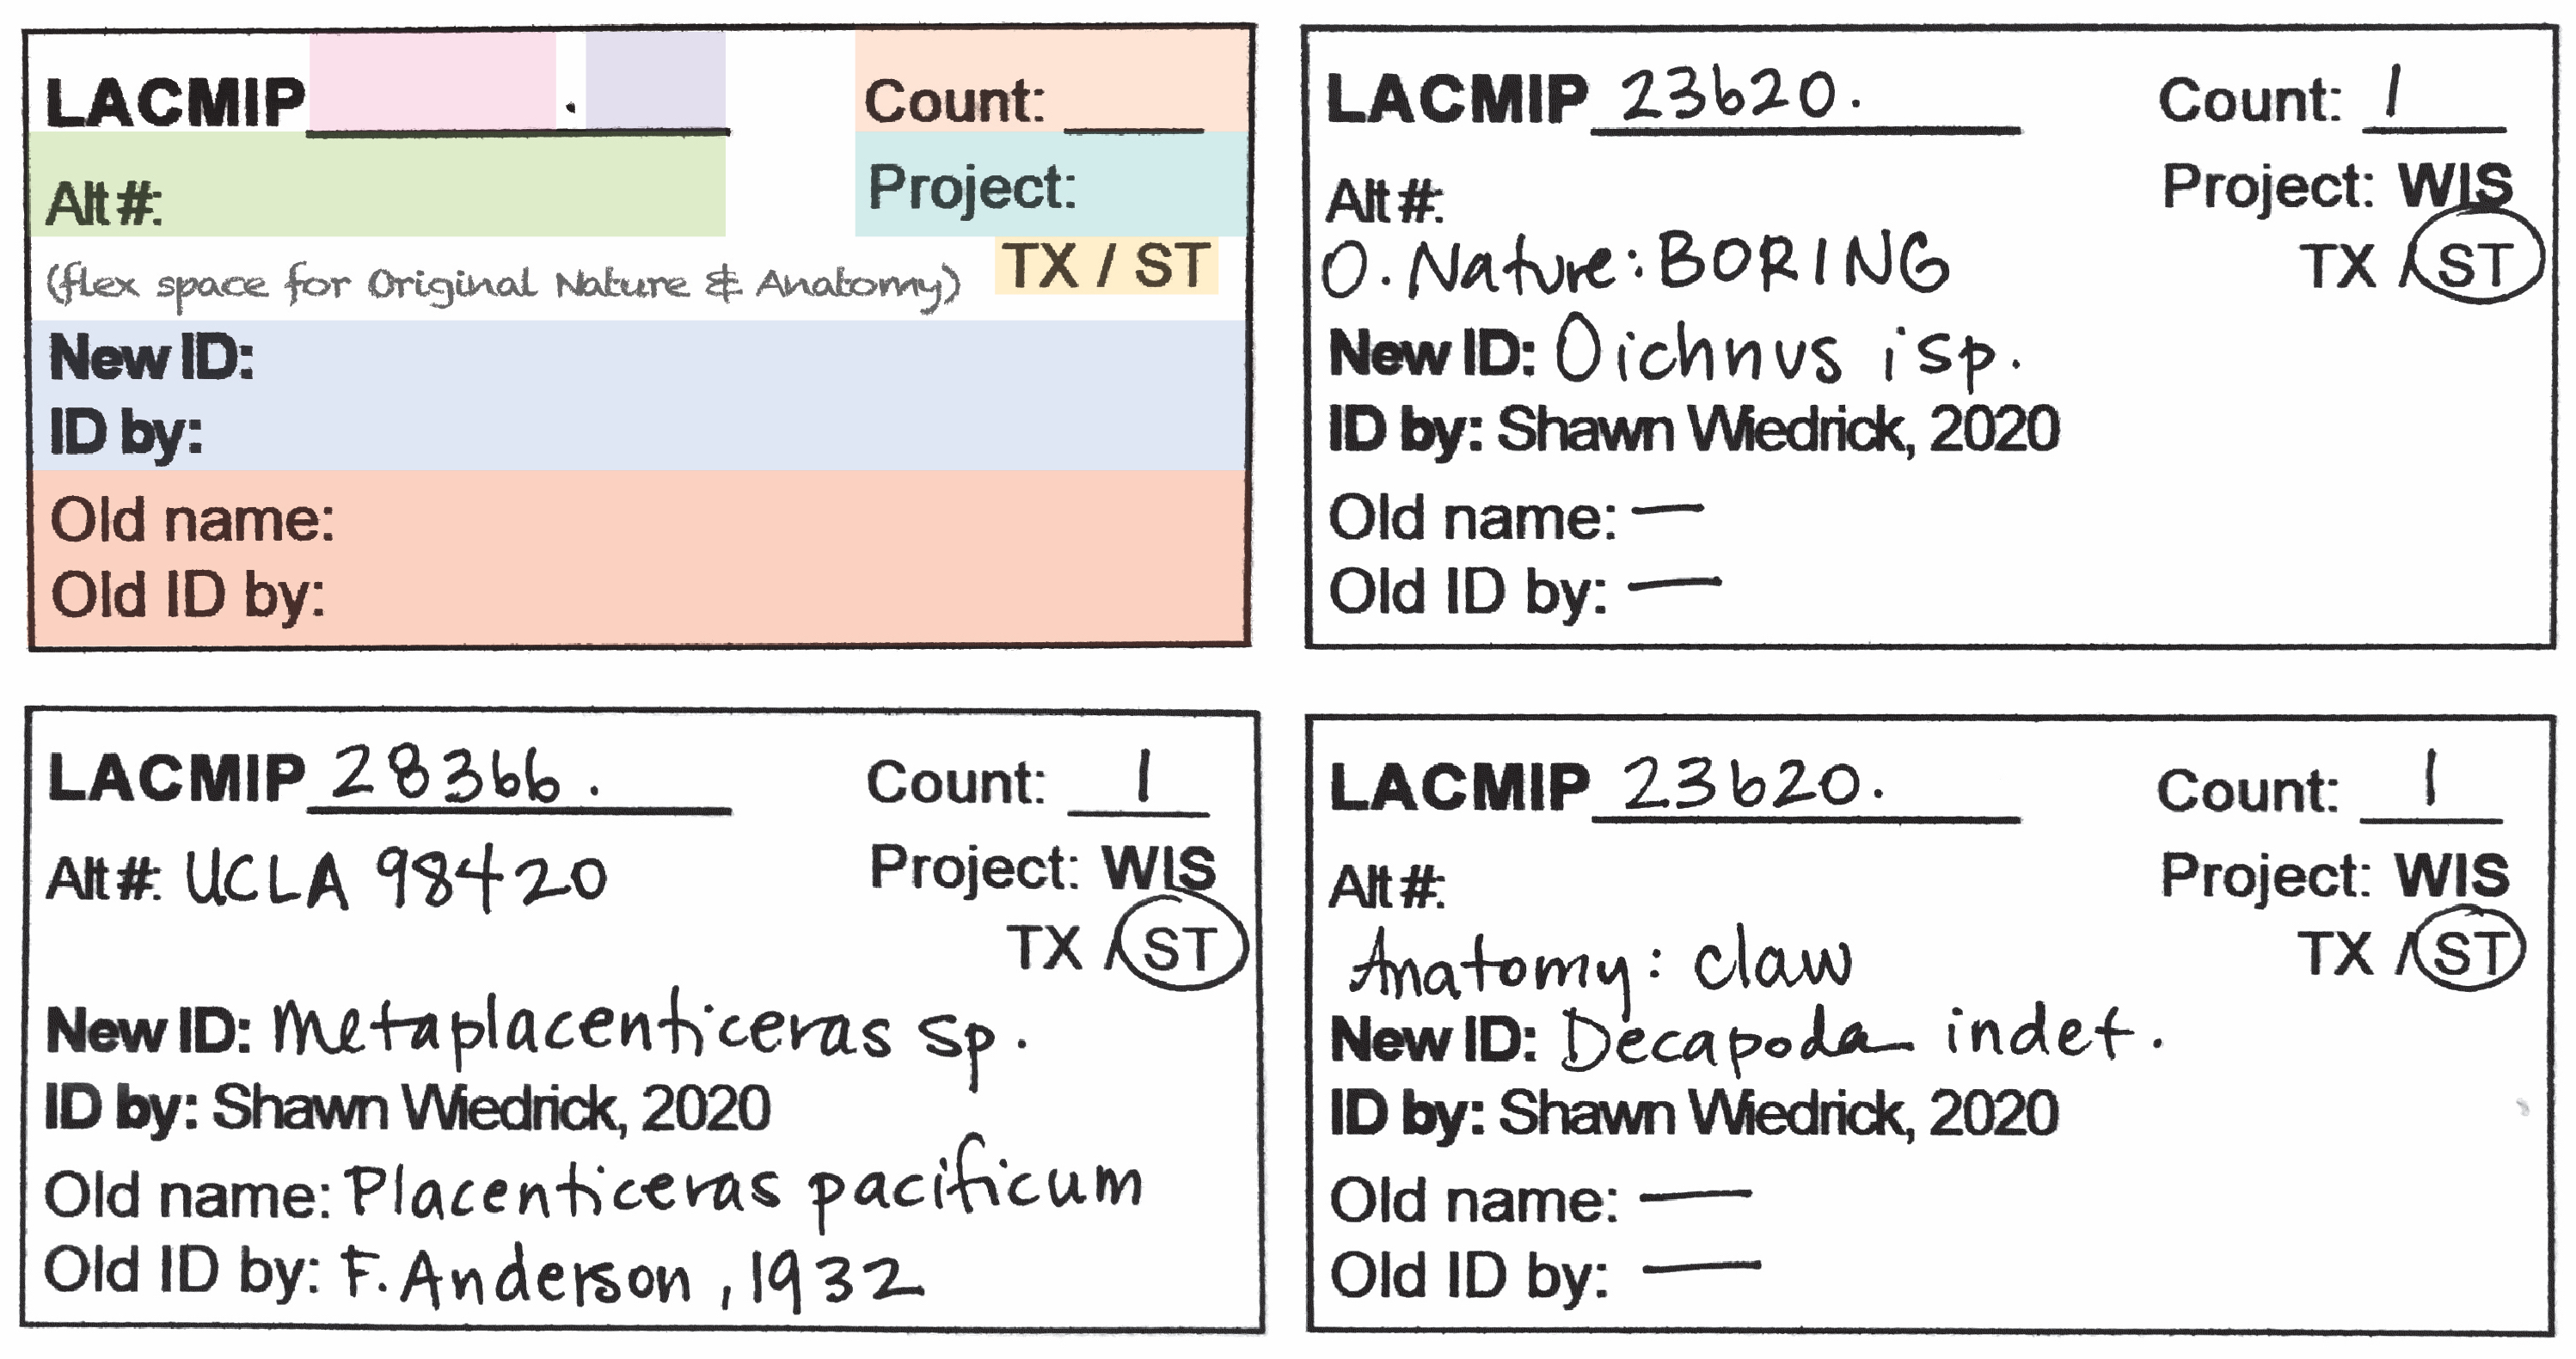
- Every distinct taxon that can be identified will receive its own specimen ID tag. For older (non-Plio-Pleistocene) collections, specimens are commonly lithified together, meaning multiple tags may be necessary per box. Stack the tags in the order that you would like the specimens cataloged (i.e., first tag on top will be cataloged first).
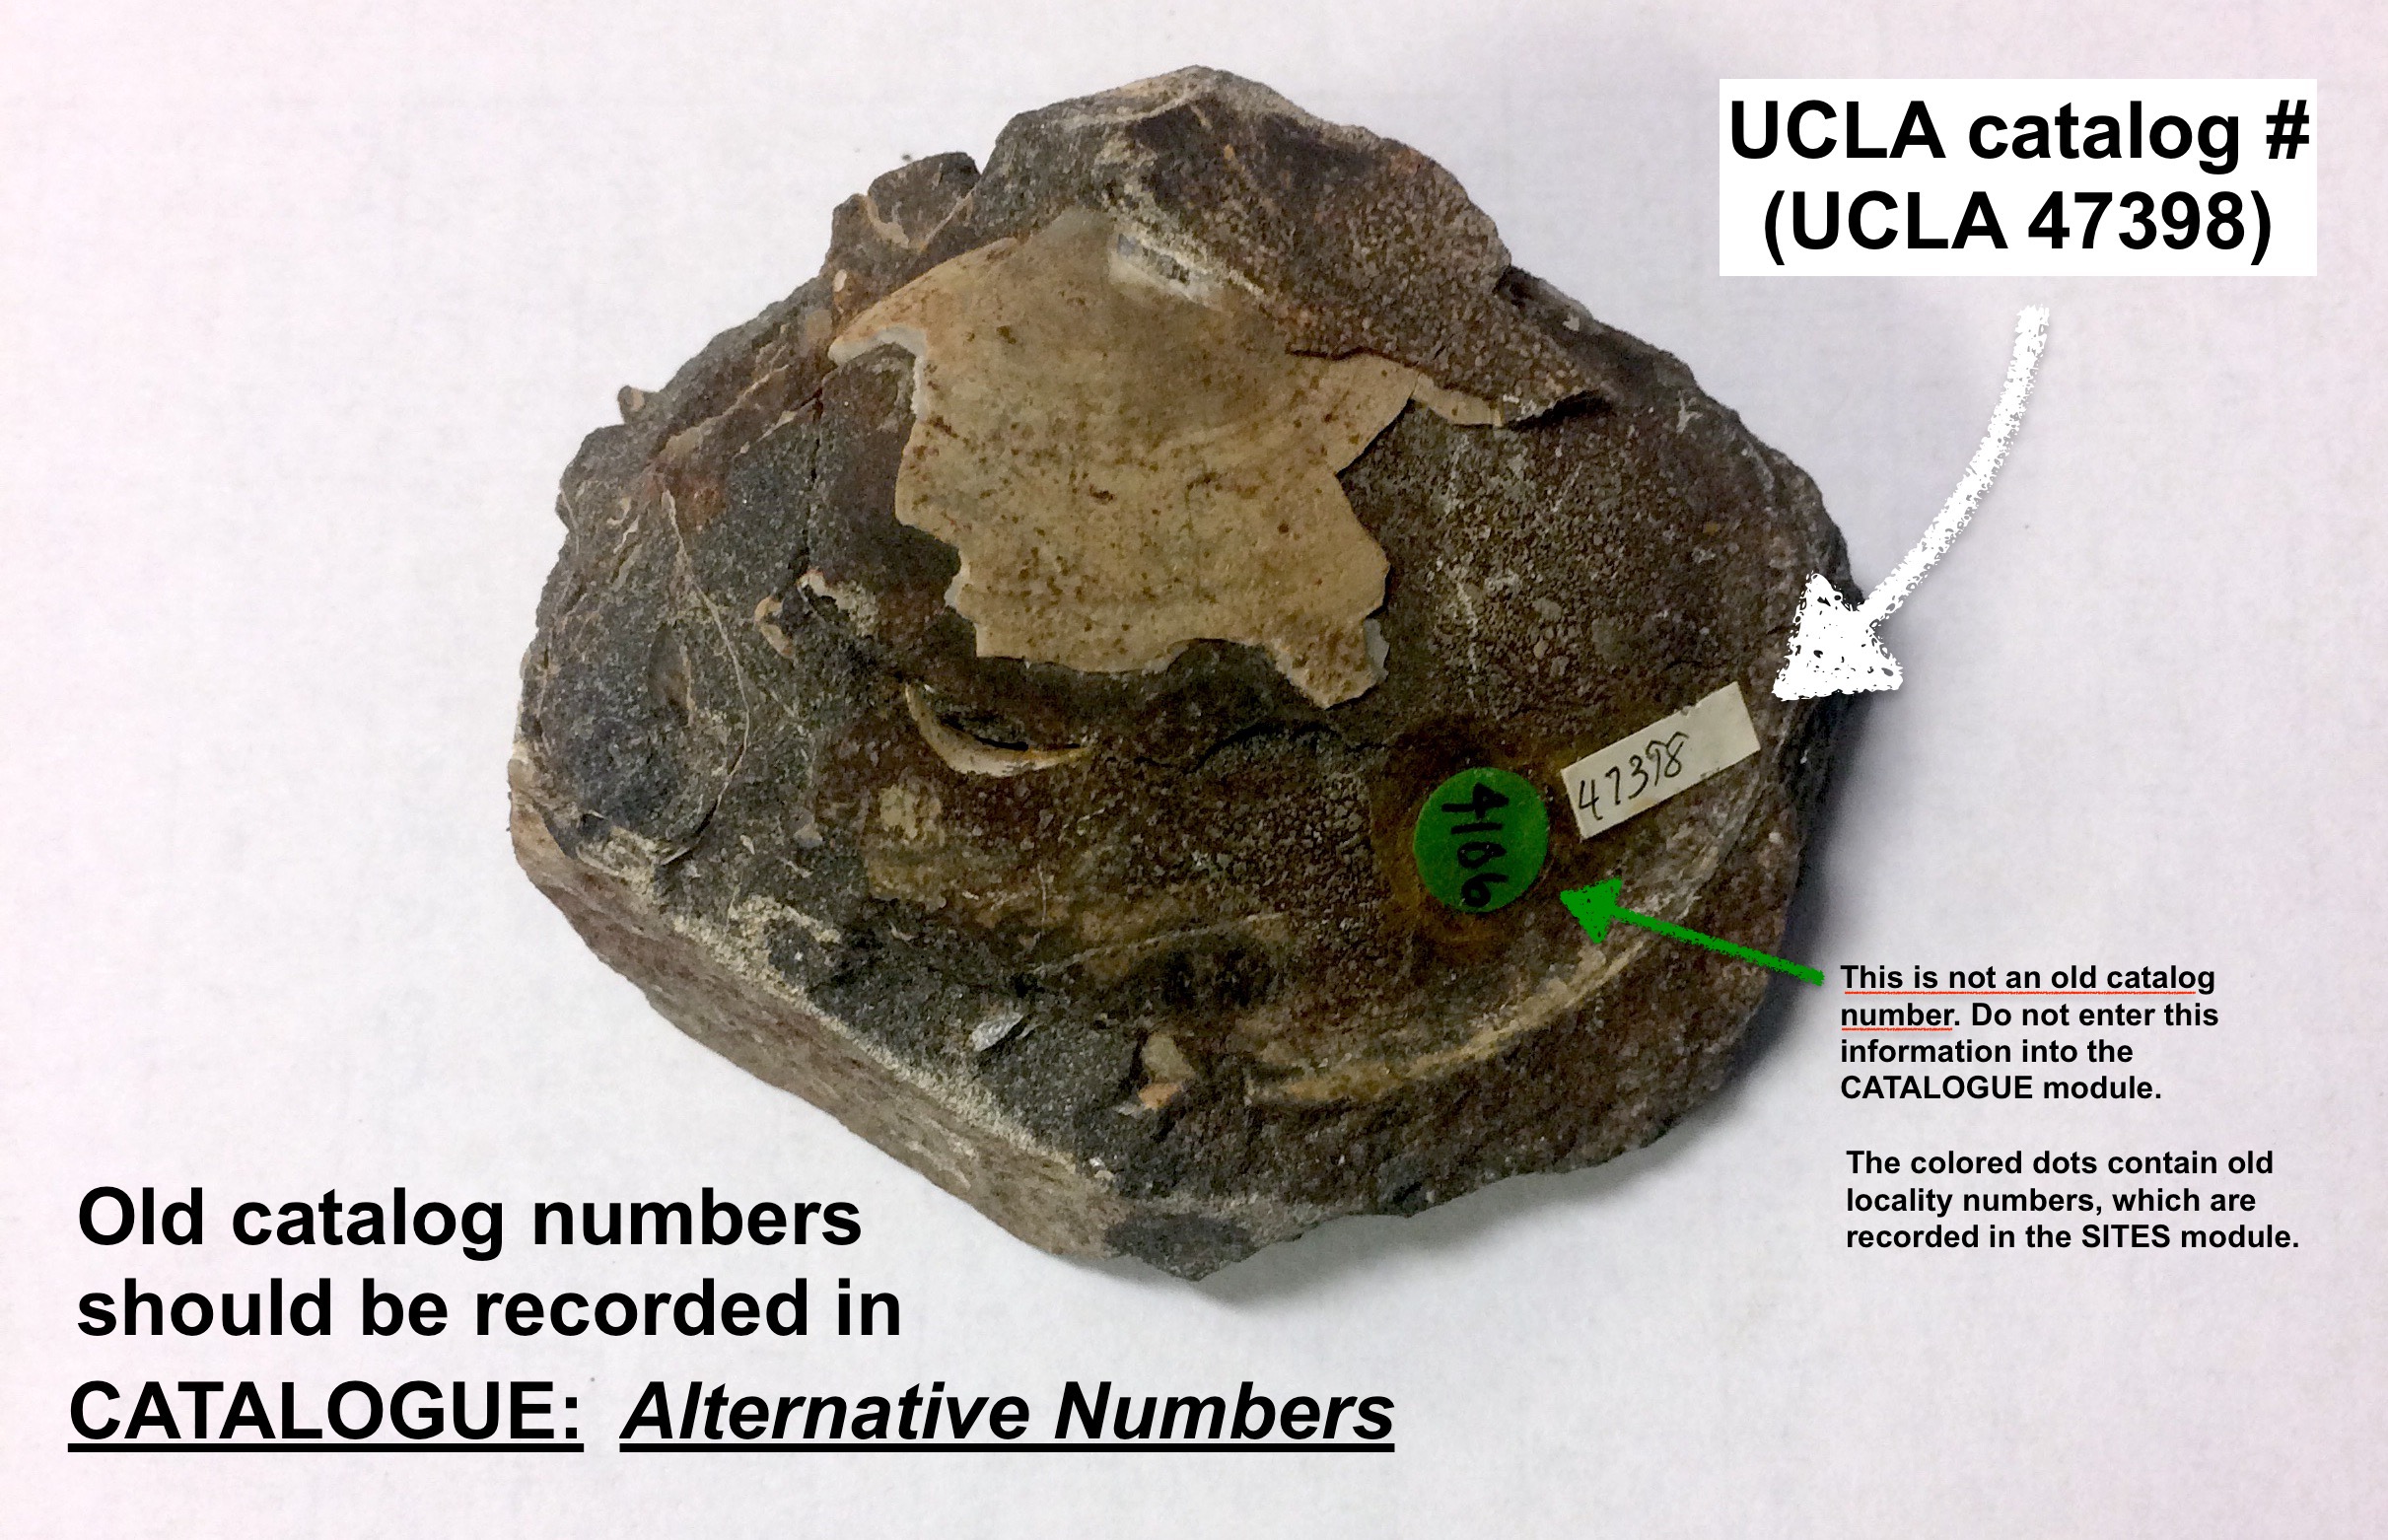
- Take care to record old (“alt”) catalog numbers from UCLA, CIT, etc. (Ask if you’re unsure whether a number is an old catalog or locality number.)
- Assume you will not be available if the cataloger has questions. Therefore, clearly indicate what fields additional information should be entered into, e.g. ID Comments, if extensive remarks are made on the back of an ID tag.
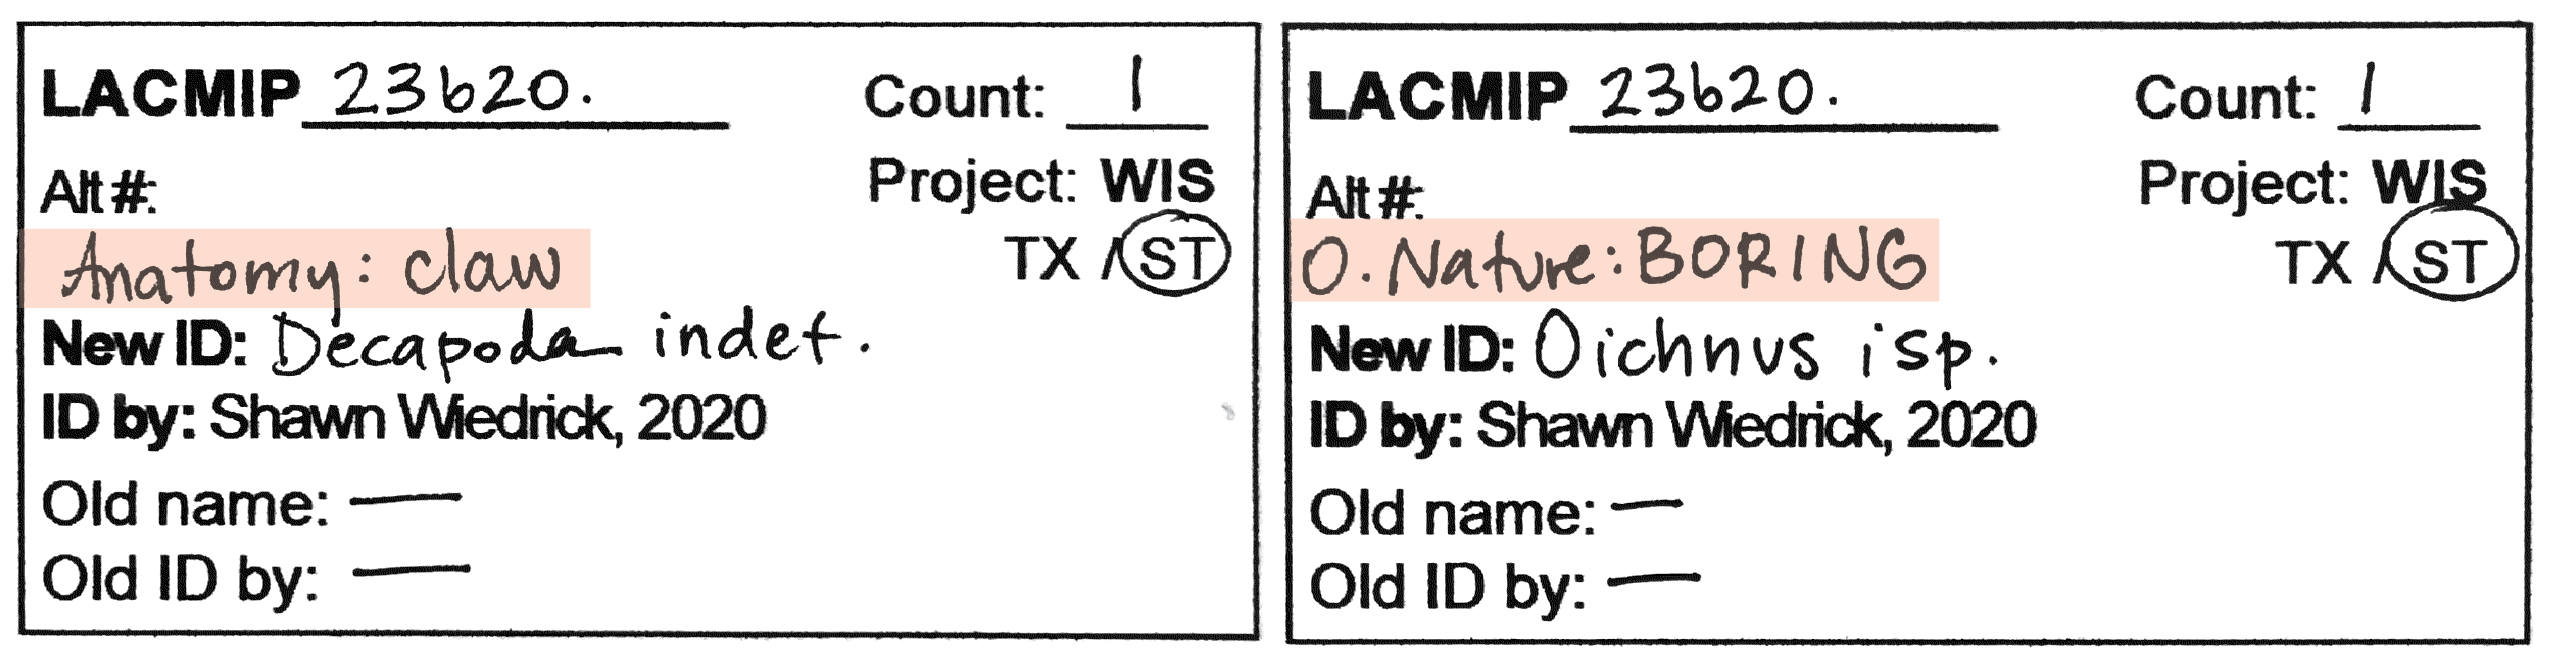
- If the specimen’s Original Nature is not “body fossil” and/or the Anatomy is not “shell(s)”, write this information in the space above “New ID”.
- In addition to ID tags, blue “TX” tags should also be completed for all lots destined for the taxonomic collection. Further, if associated lots are to be sent to the taxonomic collection in the same box (e.g., a bivalve with an associated boring), include both catalog numbers on the tag.
- If a specimen is separated from a larger lot for cataloging in the TX collection, the original/historic labels should reminain with the original ST lot.
Rehousing guidelines
- Rehouse all lots destined for the ST collection in short-sided boxes. Occasionally, exceptions are made for large lots that might easily spill out of short-sided boxes.
- Rehouse all lots destined for the TX collection in tall-sided boxes.
- Smaller specimens and lots that comfortably fit in vials should be rehoused as such.
- Avoid needlessly splitting lots to keep specimens from expanding into neighboring trays (and especially drawers) when possible. Consider designating a few additional specimens as “TX” if that will ultimately mitigate tray overflow into another drawer.
When all specimen sorting, identification, and rehousing is complete, arrange all boxes in this order:
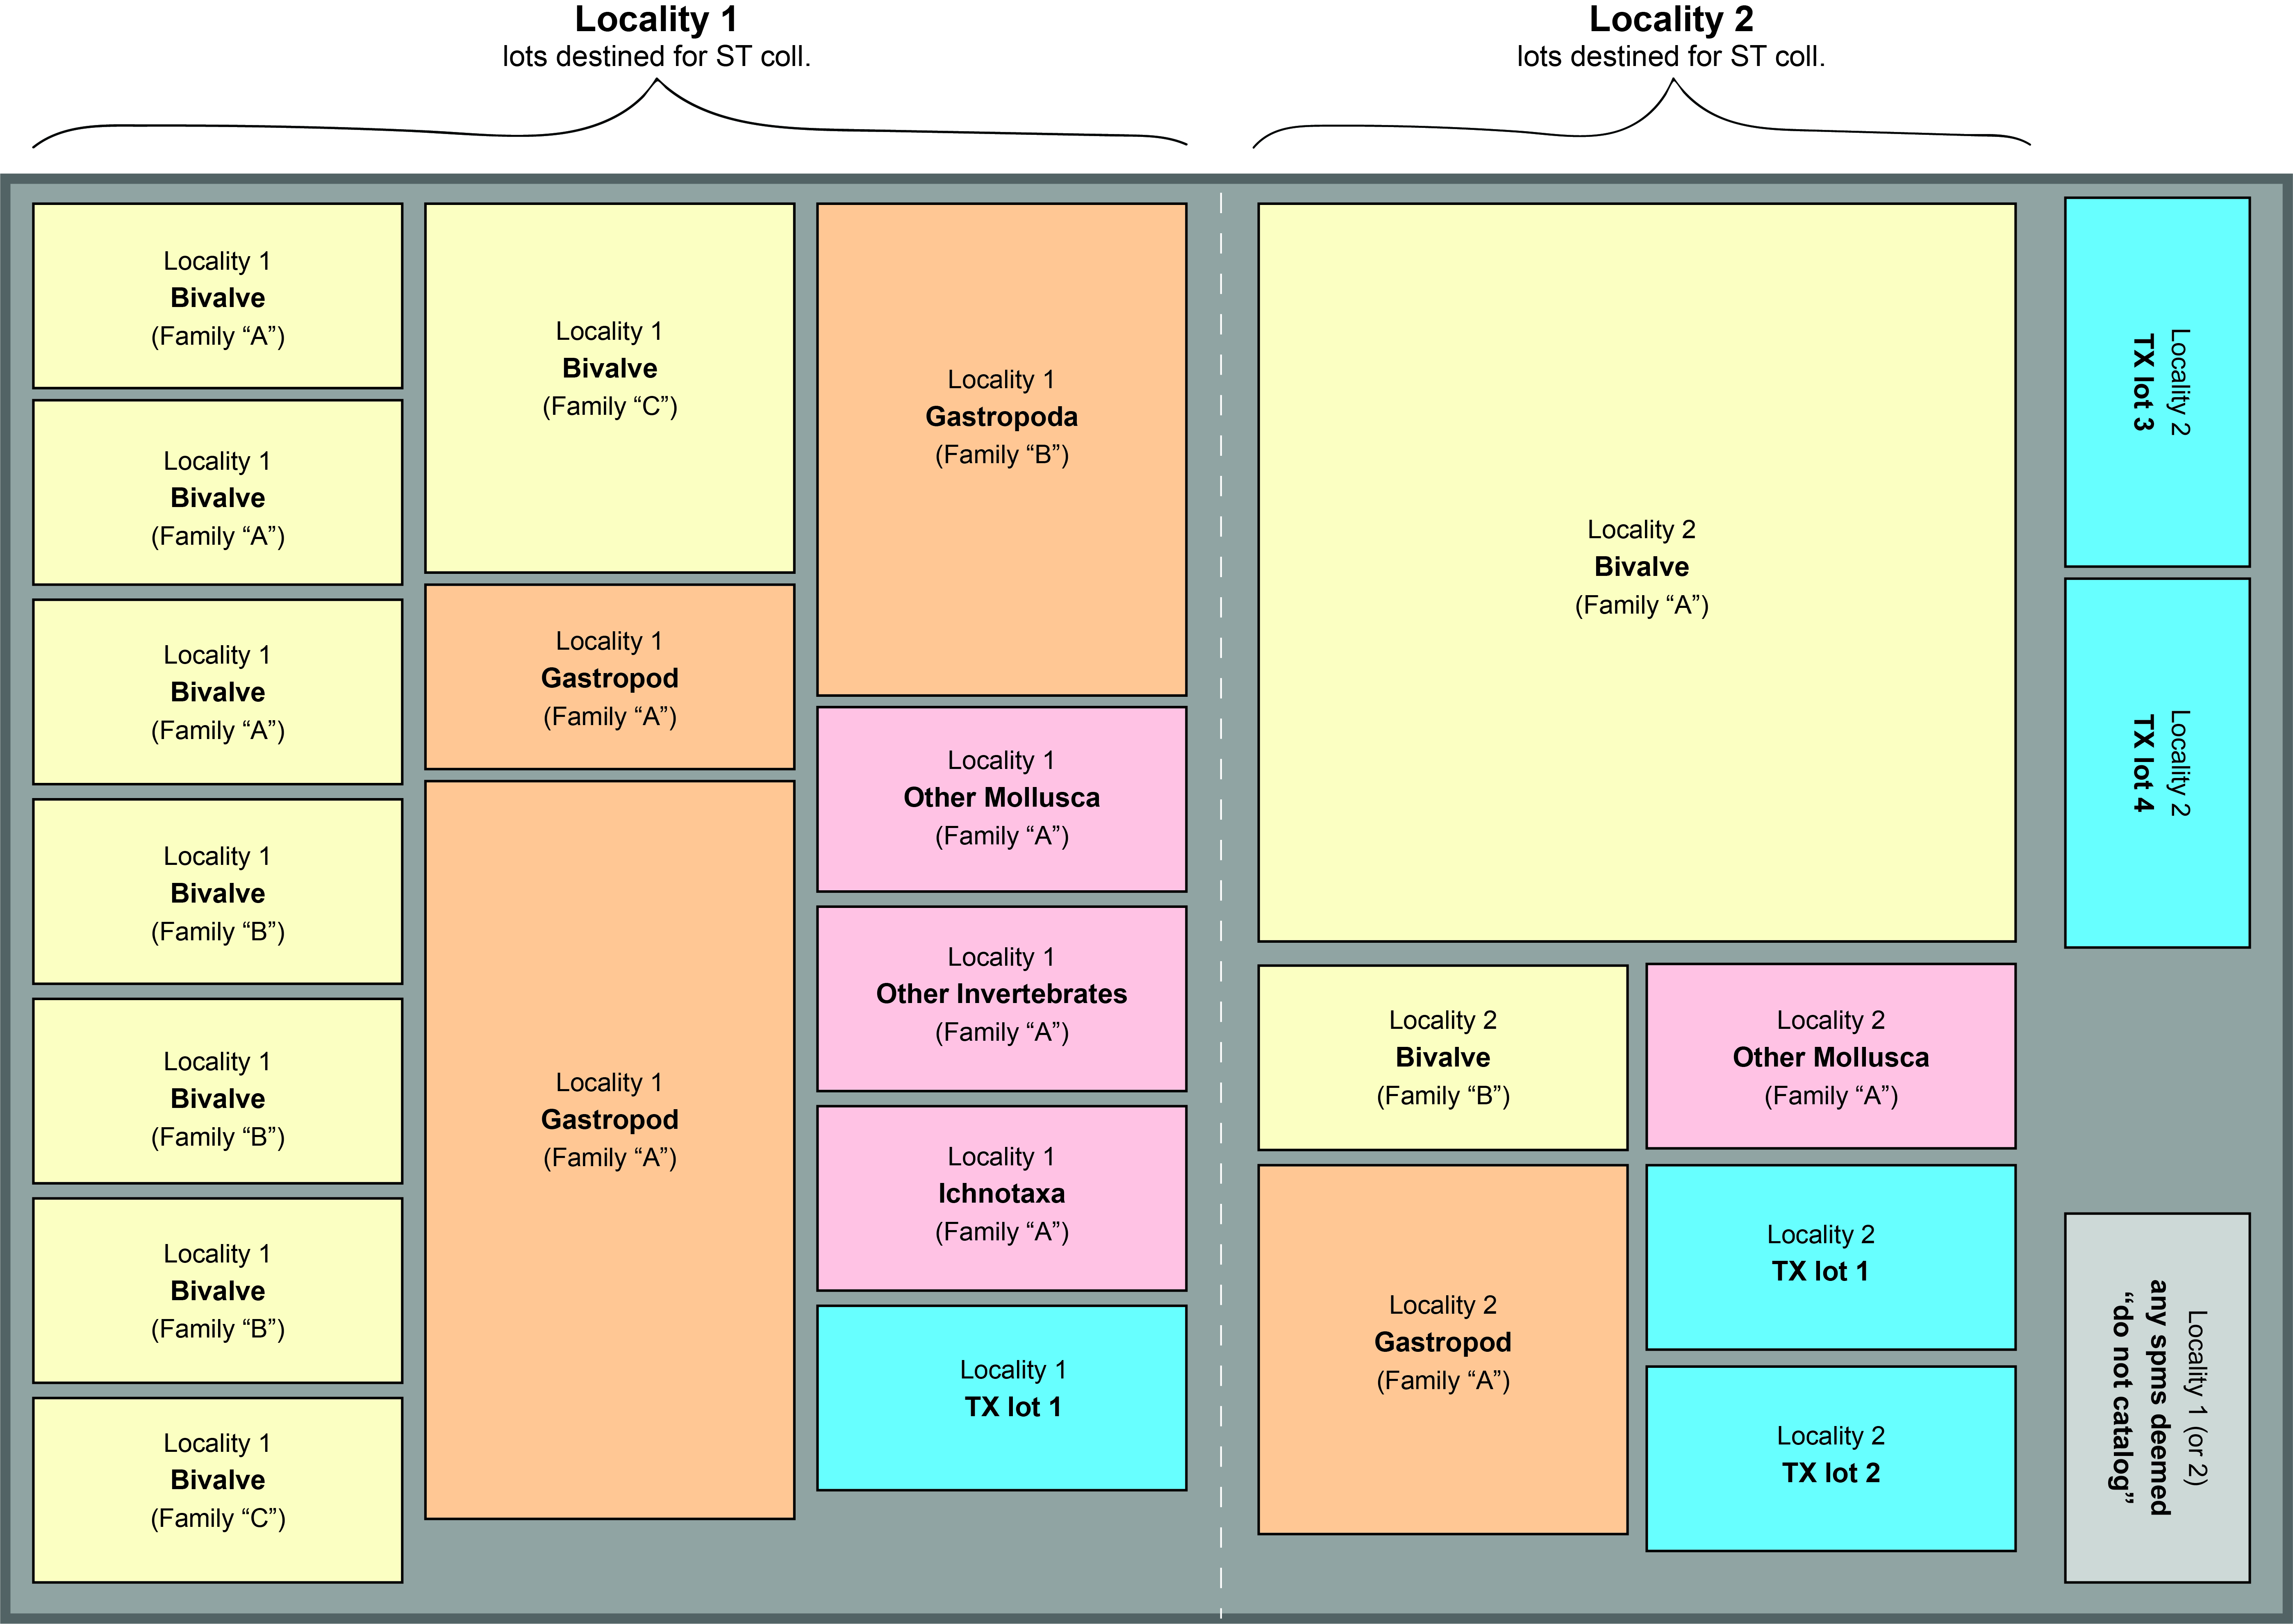
- Primarily by locality. Do not intermix lots from different localities within the tray.
- Secondarily by taxon. Beginning with lots containing bivalves, arrange the boxes from left to right (and back to front) in this order: Bivalvia > Gastropoda > Other Mollusca > Other taxa & trace fossils
- If a box contains multiple lots (e.g., a bivalve and gastropod), arrange the box according to whichever specimen you deem to be most significant.
- Taxa from the same family should be placed together, e.g. keep all Veneridae lots from the same locality together.
- All TX lots should be placed together; this helps ensure that these lots will be correctly entered as “ST” or “TX” during cataloging, as do the blue TX tags.
- Lastly, if you decide some specimens should not be cataloged, they should remain separated by locality, but condensed, if possible. Place these boxes at the far right of the tray. For these lots, add an ID tag with the locality number followed by an “X” (e.g. “LACMIP 12345.X”) and write “do not catalog” in the space for New Name.
Storing uncataloged trays
After all specimen lots in a tray have been sorted, identified, and rehoused, they must be returned to the collection until someone is available to catalog them.
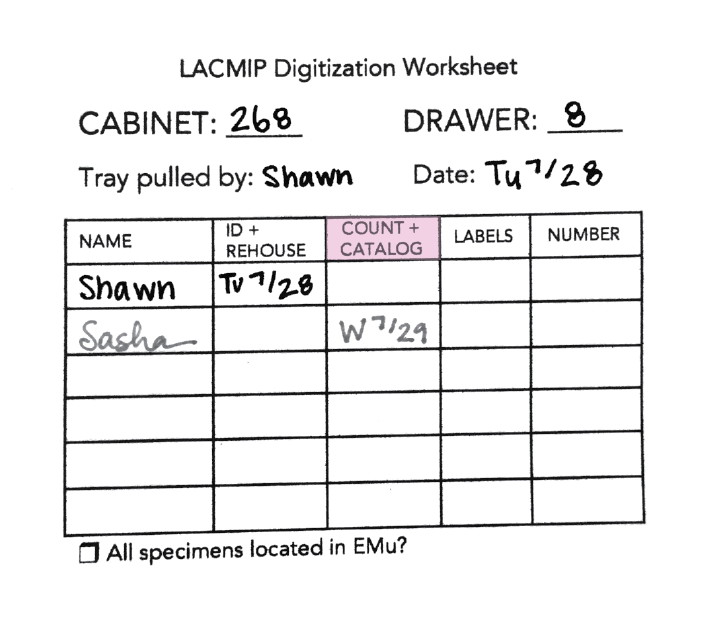
- In EMu’s Locations module, search: Level 3 = cabinet # & Level 4 = drawer #
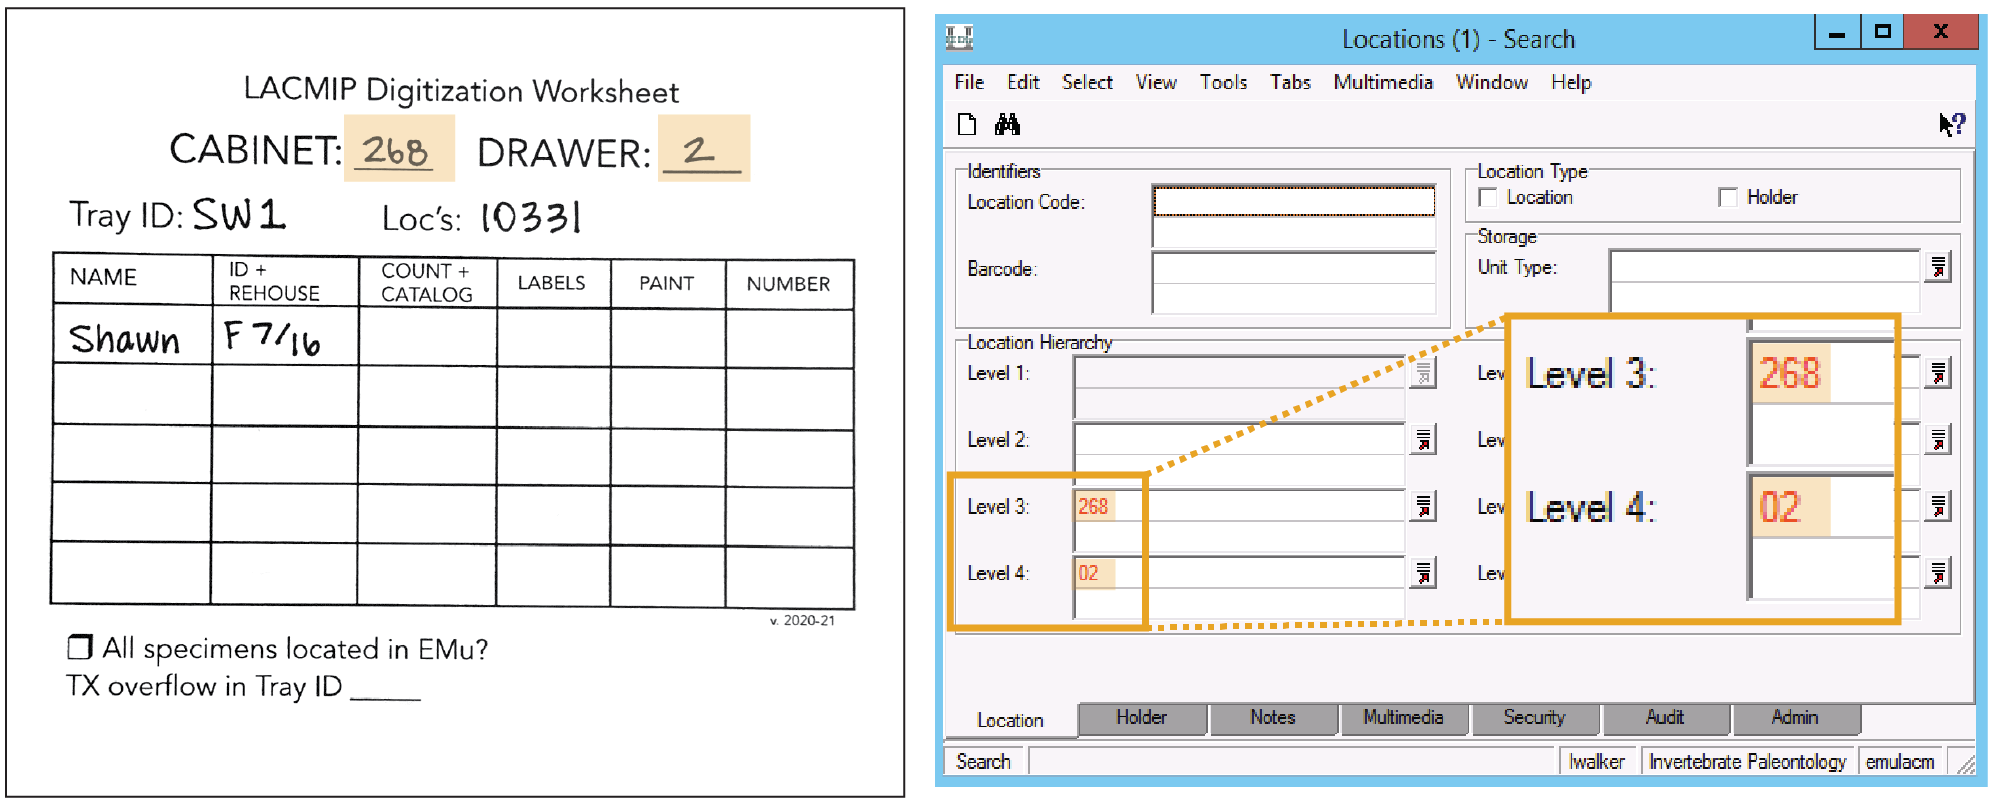
- Open the record for the drawer and navigate to the Notes tab.
- Begin (or continue) a list of trays in the drawer that are ready for cataloging in this format: “Tray ID - Localities”, e.g. “SW1 - 10331, 22470”.

Leave the digitization worksheet in the tray when you return it to the collection.
Digitization
There are three major components of the LACMIP digitization workflow: cataloging, georeferencing, and imaging. Most of these activities are completed by volunteers or interns.
Cataloging
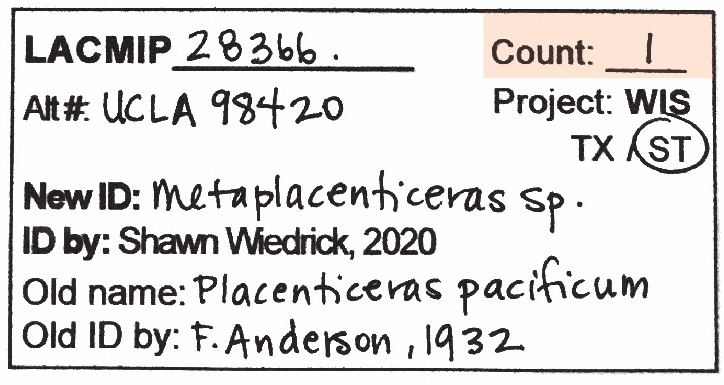
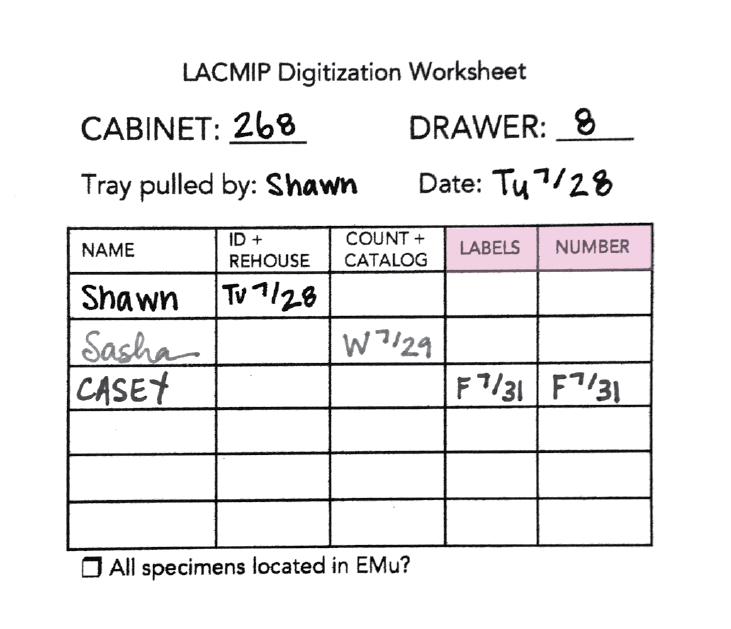
Before you begin cataloging, add your name and the date to the Count+Catalog field on the tray’s digitization worksheet:
See separate documentation for the complete cataloging workflow.
Counting
Check that Count is filled out on all ID tags. If it’s blank, you’ll need to complete this information before or during cataloging.
A few tips for counting…
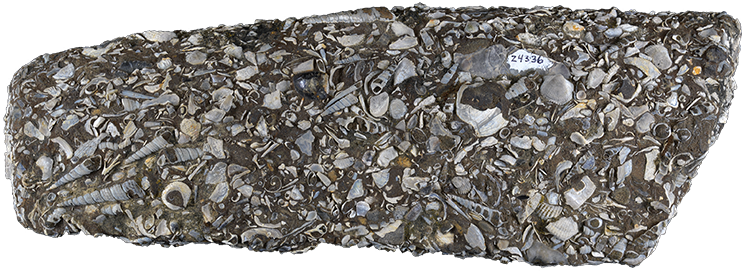
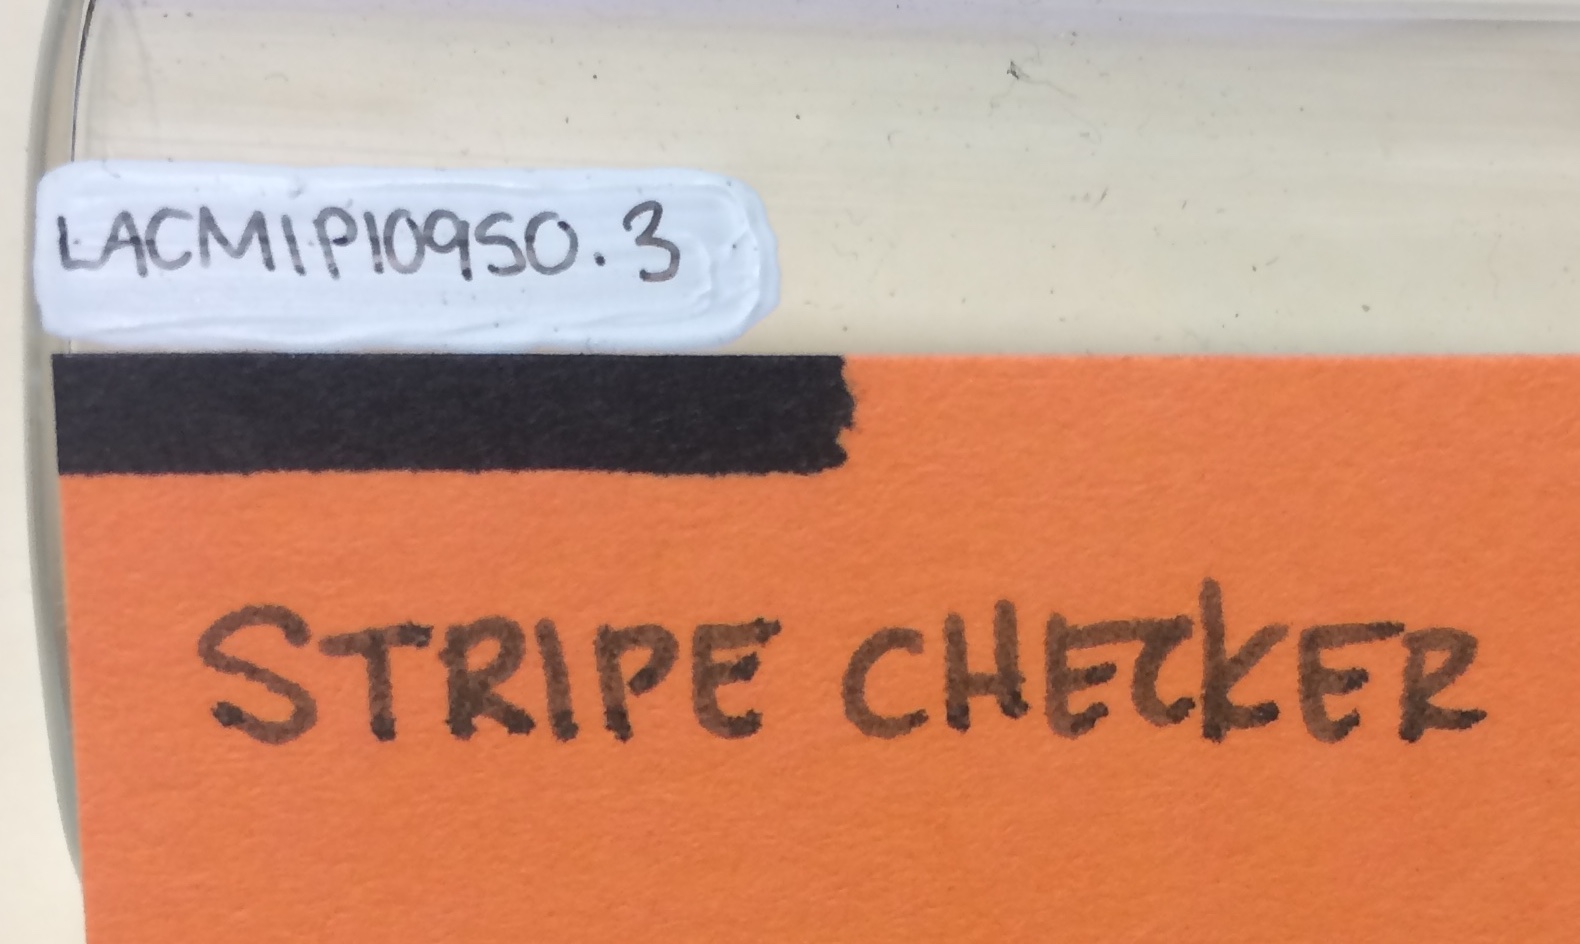
- Every separate and distinct piece of material counts as one specimen. For example, the Lot Count for the sample below is “1”, even though it has multiple shells stuck to it.
- Very small and incomplete fragments should not be counted. Ask if you are unsure when a fragment is too small to count.
- Unsorted fossils and unsorted sediment always has a count of one.
- If a bivalve is articulated (i.e. the valves are attached to each other), both valves are counted as individual specimens unless the bivalve is an internal mold (i.e. the impression of a fossil with no shell left). This is not common in the older parts of the collection.
- The easiest method for counting large lots is to group specimens in piles of 10 and then tally the piles.
- Do not include synthetic objects, like rubber peels, in the count.
Georeferencing
See separate documentation for georeferencing. Georeferencing can occur at any point in the digitization workflow, but preferably before labels are printed.
Imaging
Specimen image capture and processing are essential components of digitization. Complete documentation for this step is forthcoming. The current protocol for imaging insect compression fossils can be accessed here.
Post-digitization
Post-digitization curation steps important components of the overall digitization process. LACMIP staff, volunteers, and interns all participate in various parts of this workflow.
If you participate in any post-digitization activities for a given tray, please add your name and date to the appropriate columns on the digitization worksheet:
Painting -ARCHIVED from Digitization PEN: Collaborative Research: The Cretaceous World: Connecting the Cretaceous Seas of North America
As of ** 2022** LACMIP will no longer paint their specimens. Instead, LACMIP staff will only label taxonomic specimens. Please follow the updated workflow on specimen labeling. Transcribe the catalog number on an archival sheet of paper using a Micron pigma pen and use Paraloid B-72 20% to affix the tag to the specimen. Paint a thin layer of Paraloid B-72 10% over the affixed specimen tag.
Most LACMIP specimens already have locality numbers glued or painted on them. For this reason, the need for painting is limited, and this step is mostly completed by LACMIP staff. A few tips for painting…
-
All vials should be painted with a stripe extending ~3/4” from the bottom and is ~1/8” wide. The “stripe checker” tool, as seen in the image here, can help guide you when you are new to this process.
- If a specimen has multiple ID tags (indicating multiple lots), you will need to paint multiple stripes to provide space for each catalog number. Additional stripes are always painted below one another in a row on vials.
- Do not paint loose specimens unless directed to do so by LACMIP staff.
- Steady the vial against a hard surface.
- Stand vials on their lids (upside-down) to dry.
- Paint should left to dry overnight before numbering.
Do not let paint dry to your brush! This will ruin it. Keep a water cup and paper towel handy for quick cleaning. As soon as you have finished painting or need a break, wash your brush thoroughly.
Numbering
Vials can be numbered one day after painting.
A few tips for numbering…
- Use either a 01 or 005 black Pigma Micron pen to number.
- Press lightly and use short pen strokes, as though you are “painting” the letters and numbers on.
- Steady the vial against a hard surface.
- Avoid touching the ink before it’s dried. (Complete drying takes several hours.)
- If a specimen lot has more than one catalog number, both need to be written on the vial.
- Neatness counts!
Writing on semi-dry paint will ruin Micron pens; please wait at least 24 hours after painting to number vials.
Labels
Once specimens have been cataloged, LACMIP staff will print and place specimen labels in their respective trays. These will need to be cut and placed in their respective boxes before the specimen tray can return to its permanent storage location.
LACMIP staff: Before printing labels, recall all catalog records in the tray to check for missing data and incorrectly databased identifications. Use the digitization worksheet to search by Inserted By and Date Inserted.
LACMIP staff: You may wish to update specimen locations in EMu at the time of label printing. This step can also be accomplished after printing using the barcode scanner.
| Step | Labeling task… |
|---|---|
| 1 | Cut. Use the paper cutter to cut labels as neatly as possible, leaving a thin border around the black outline. The LED light strip can be very useful in guiding this activity. Only cut one sheet of labels at a time. |
| 2 | Sort. Arrange them in piles by locality, then sort each pile consecutively by lot number. |
| 3 | Fold. Neatly fold each label on the dotted line. Keep them in locality-lot order. |
| 4 | Place. Locate the box each label belongs in and place them according to the guidelines below. |
Labeling guidelines
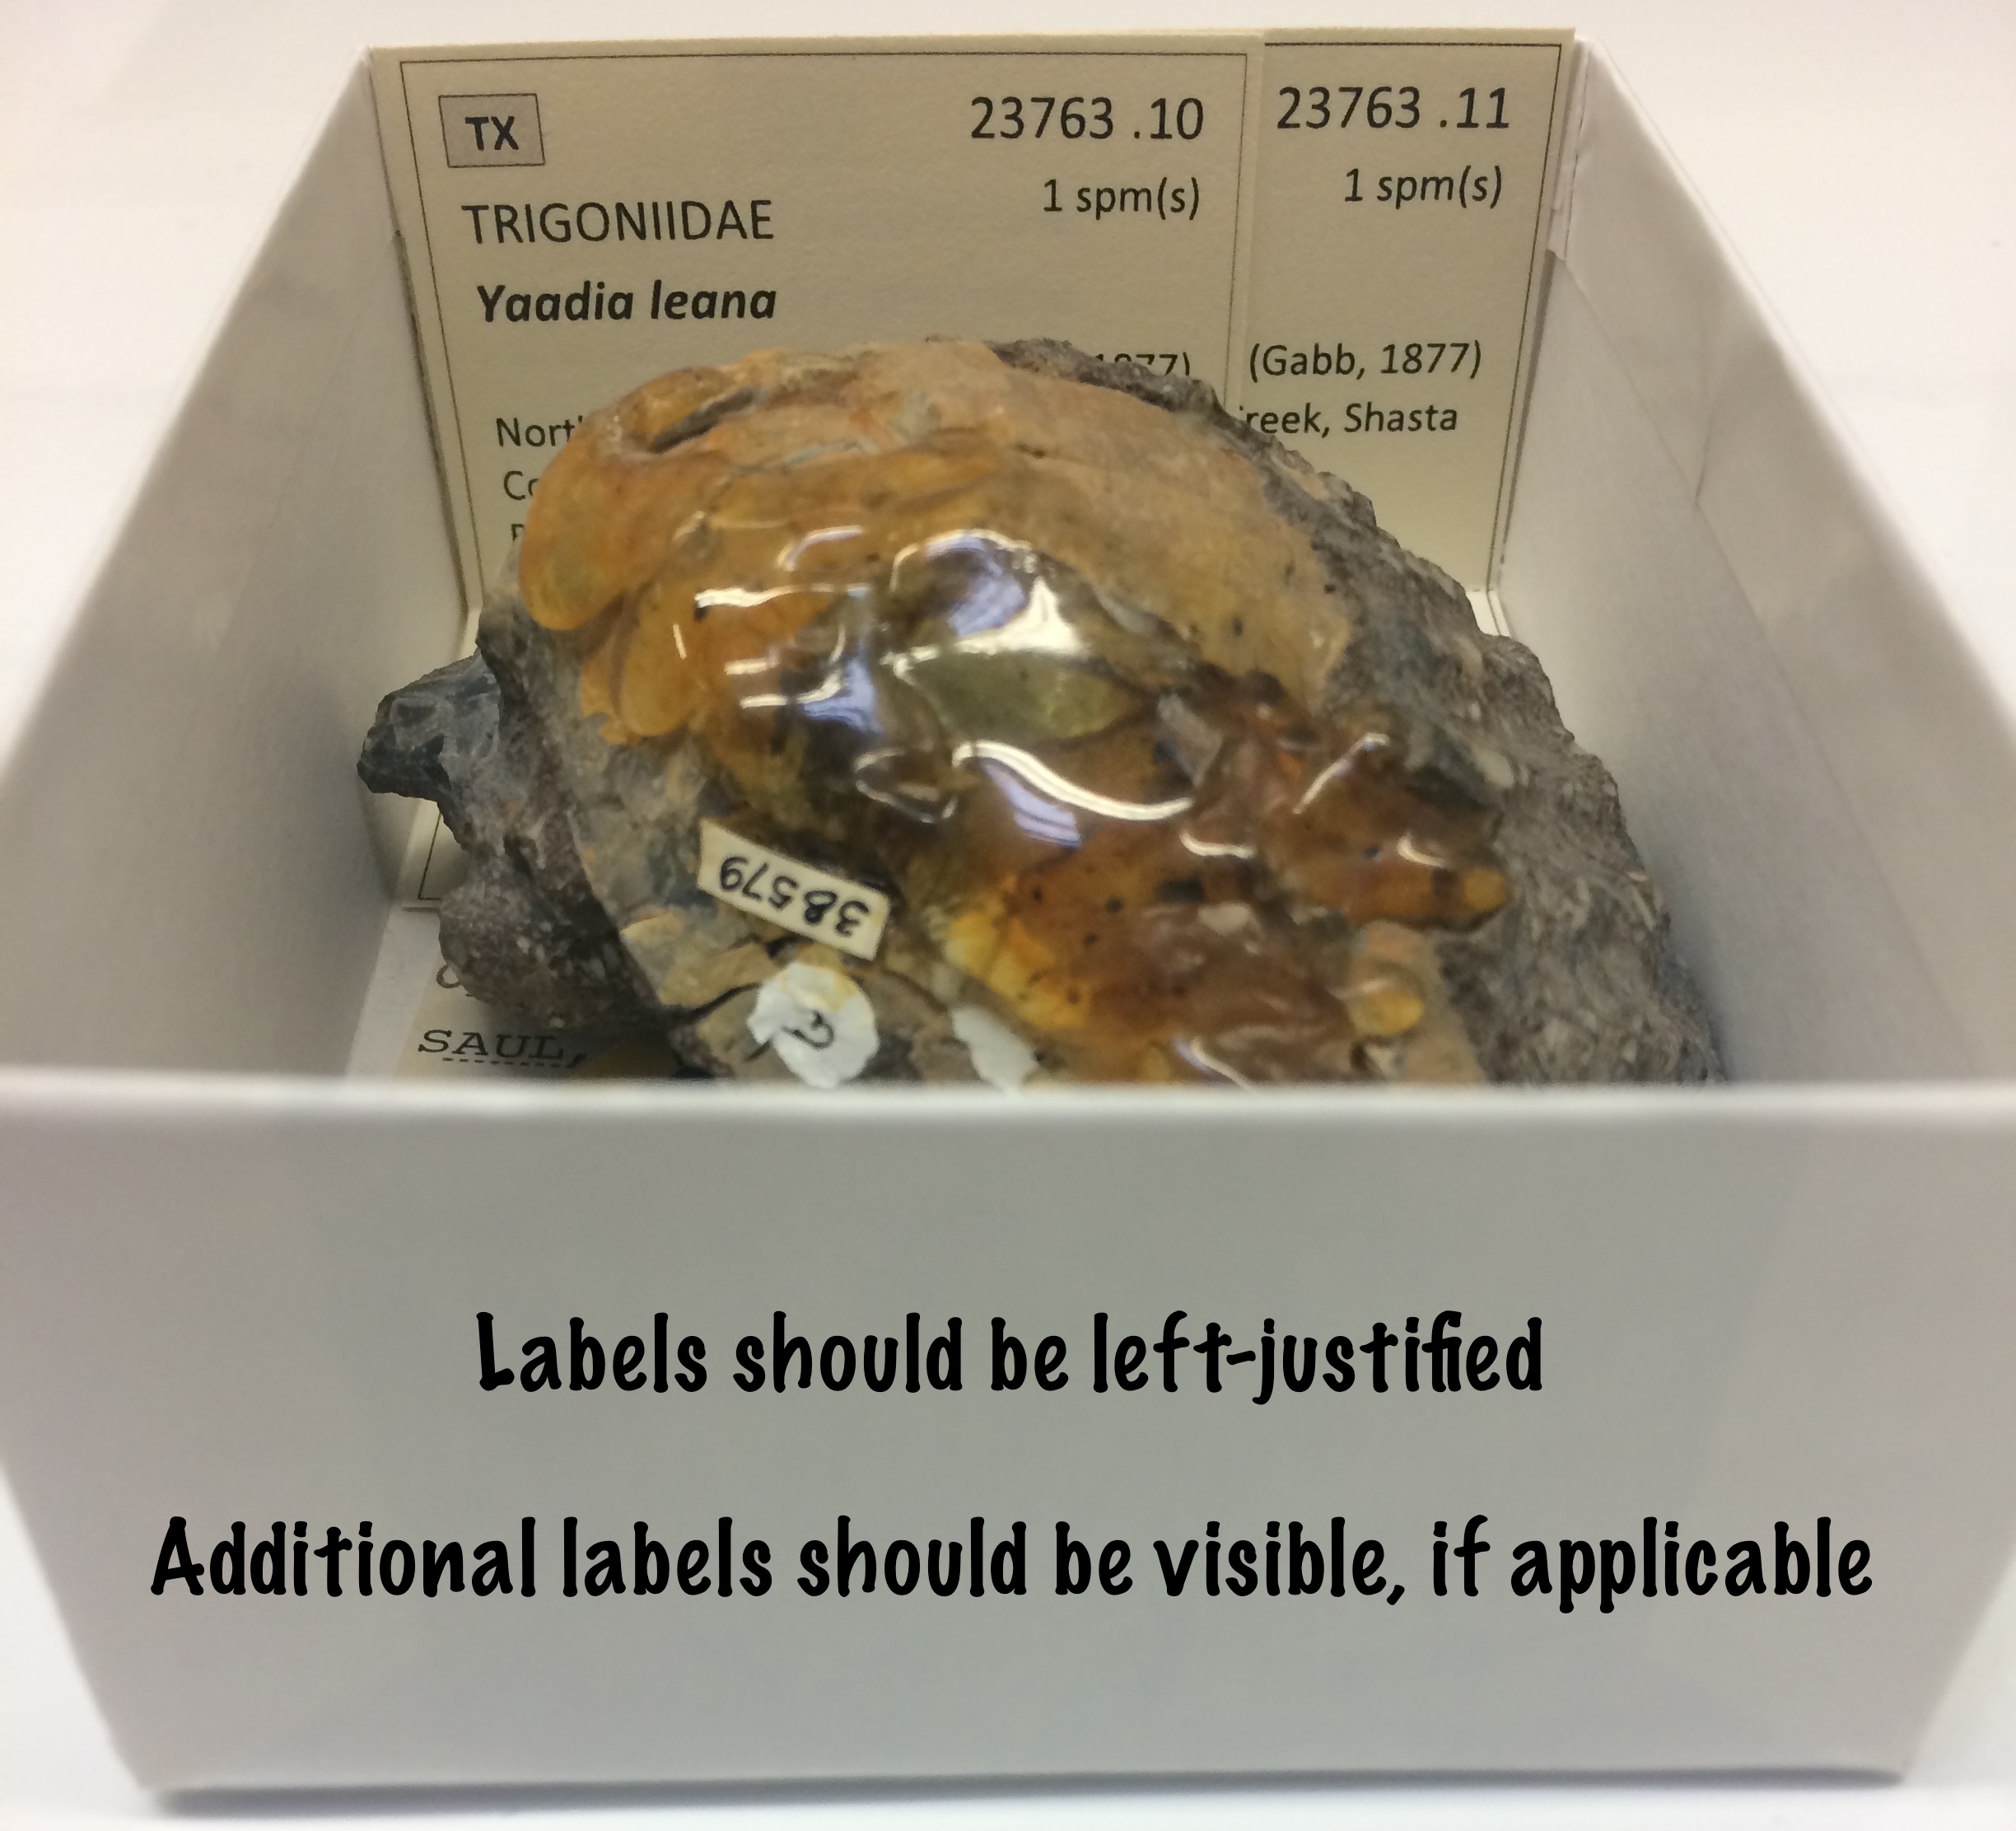
- Left-justify labels in boxes.
- When present, older labels should go under or behind the new label.
- Some boxes will require multiple new labels (i.e., one per cataloged lot). In this case, the label for the lowest lot number should be the furthest left-justified and on top of the others, which should be arranged numerically and visible, as in this example:
- Watch for labels with missing/incorrect information - they will need reprinting! Spot check the lot count and taxonomic identification between the handwritten ID tag and the printed label as you work.
Never remove older labels from their boxes. This includes the original ID tags, as well as any labels dated c. 2004-2013 that are printed on white paper.
Locate specimens
In EMu, search for all ST catalog records associated with the tray. Batch assign them to the location recorded on the digitization worksheet. Likewise, assign all TX catalog records to the taxonomic collection. This can be accomplished using the barcode scanner and/or by selecting records at the time of printing and using the Relocate tool. Check and date the corresponding box on the digitization worksheet.

Quality control
Quality control (QC) checks are completed at the end of the digitization workflow. LACMIP staff are responsible for these activities.
| Step | QC task… |
|---|---|
| 1 | Check the arrangement of the boxes. If they were reorganized during cataloging or curation, or need some final straightening up, fix them now. |
| 2 | Remove the paper ID tags. Check that 1) the new labels were placed correctly, that this information matches what was recorded on the ID tags; 2) replace any printed labels that have errors; 3) for boxes with multiple lots, make sure these specimens are properly associated on the Relationships tab. Note that the archival ID Comment tags should remain in their boxes. |
| 3 | Integrate TX lots into the taxonomic collection. Remove the blue TX tags from these boxes and consolidate them; place them in the tray destined for the stratigraphic collection. |
| 4 | Double-check the location assignments. Make any refinements, if needed. |
| 5 | Is the tray metal or wooden? If it’s wooden, switch it out for a metal tray. |
| 5 | Return the tray to the collection. Place the completed digitization worksheet in the worksheet inbox located in the Cretaceous Corner. |