Importing Data
EMu’s import tool is the primary way for LACMIP users to get bulk data into the database, primarily for records in the Catalogue, Bibliography, and Sites modules. Keep in mind that there are some modules which LACMIP staff do not have permission to import data into (e.g. Taxonomy).
Other modules have import access restricted to a group of users. E.g. to import data in the Sites module you must be logged into the “IP Importer” group, which you can select by right-clicking the command center and going to Options > Security. If you do not see this group your account may not have the proper permissions; contact the Museum’s database manager for assistance.
The import tool expects to see a text file (CSV, TAB, TXT, XML) formatted with column names that correspond to EMu field names. Remember that the field names are different than the display names you see in the EMu interface, e.g. IPCollName vs. Collection. To find the name you need, use the question mark tool to click inside a field and bring up the help dialog box, then look under Field Information > Column. Your file should not include any columns that don’t correspond to an EMu field, and it must include a column that uniquely identifies an EMu record (e.g. by irn, by Loc. No, etc.).
If you need help setting up your import file, reach out to LACMIP staff or the Museum’s database manager. In general you should use the import functionality of EMu cautiously because it does not provide all of the data quality checks that direct data entry does, for instance you can import a duplicate catalog number but not create one directly in EMu.
Please note that there is an extra step if you are accessing EMu via the VPN. To get a file from your local computer onto the remote desktop of the VPN, simply drag and drop it into the browser window. The VPN will put the file into the folder This PC > G on Guacamole RDP. If EMu has trouble reading your file, try opening it in Excel from within the VPN and re-saving.
Using the import tool
Once you have prepared your import file, navigate to the import tool (Tools > Import…) from whichever EMu module you’d like to add records to.
If you are not already working on a wired PC, you may want to close the VPN and move to a computer with a wired internet connection to complete the import. If the connection is interrupted, the file may not correctly or completely import.
The import tool will guide you through the steps outlined below. For more details, please see Axiell’s import documentation in addition.
- Select the file you want to import and click Open.
- Confirm the import file type and change the Encoding to “UTF-8” for files that originated on a Mac (or others that you know are UTF-8 vs. ANSI). Click Next.
- Choose the “Custom” import type, and click Next.
- Tell EMu what function you’d like to do: Validate the format (i.e. make sure your field names correspond to EMu field names), validate the data (i.e. validate the format and also check to make sure dates are going into date-type fields, numbers into number-type fields, etc.), or import the data. If you are new to using the import tool, or importing data that is different from what you typically import, it is highly recommended that you validate the data first, then return to the tool and import it once you know it is valid. Otherwise, select “Import data” and click Next.
-
Leave the default settings as they are when EMu asks you to choose how attachments are processed during the import. Your import file includes attachments if you have any field names including “Ref” e.g. SitSiteRef_tab(1).irn.
Default What it does None found If no records are found in the attachment table, EMu will create a new record. One found If only one record is found in the attachment table, EMu will attach the found record and continue importing. Many found If multiple records are found in the attachment table, EMu will pause and ask which of the found records you want to attach. Only search records imported in this batch Default unchecked. Checking this box forces the import to only attach records being created during the current import. This would prevent the import from searching EMu’s existing records to attach. It would be extremely rare to check this option. Exclude empty fields from attachment search Default checked. If checked the import assumes empty fields are unknown vs. intentionally empty. Therefore, an import of Genus and Species where Species is empty means EMu will pause and ask which record that begins with that Genus you want to attach. If unchecked the import assumes empty fields are intentionally empty. Therefore in an import of Genus and Species where Species is empty EMu would attach the Genus record only. - Leave the default settings as they are when EMu asks how many records to process (Starting record = 1; Records to process = 0). A time when you may want to change these settings is if you want to only load the first few rows as a test, e.g. you could tell EMu “Starting record = 1; Records to process = 5” and if those records were imported successfully use the same file to load the remainder by setting “Starting record = 6; Records to process = 0.”
- Tell EMu if you want to impose any import restrictions. If you are trying to create new records, select the “Update” restriction. If you are trying to add data to existing records, select the “Insert” restriction. Never use the “None” option. Click Next.
- Choose how much information you want reported back after the import tool runs. Typically “Errors” or “Detailed” is sufficient. “Verbose” is true to its name. Click Next.
- Assign an import identifier. When possible this should be the same as the spreadsheet filename to make back-tracking easier if something goes awry with this upload, e.g. “FIC-Statz-catalog_2019-02-12.csv.” EMu will also assign a unique import identifier. Click Next.
- Start the import. EMu will display a progress bar, and upon completion will open the report it generated so that you can check that everything was imported successfully, or else see what errors occurred.
Once the import is complete, cycle through your records to make sure the data were correctly imported. Check that the same number of records you intended to import were successfully brought into EMu. If they do not look correct, contact the Museum’s database manager, who can help you figure out what went wrong, and if necessary mass delete records to start over. Conveniently, EMu will save records that could not be imported in a separate CSV file, allowing you to fix the problematic records and re-import them again. Save all error logs if the import was not successful and you need assistance to undo the import. To avoid this kind of situation, it is a good idea to import several test records to ensure your data will import properly!
Special considerations
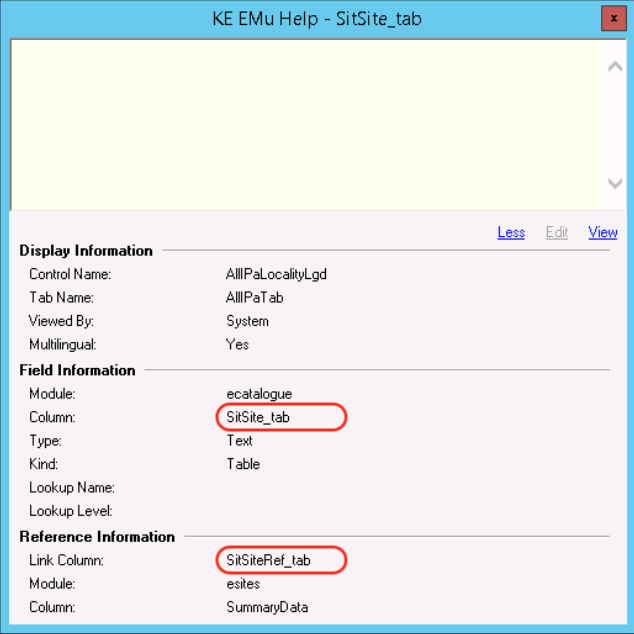 The most difficult aspect of using the import tool is preparing your import data file. If you need to import data into an attachment field (typically those indicated by a green plus sign in the EMu interface), your column name should be what is listed under Link Column rather than Column, as highlighted in the screenshot to the right. In addition, you need to tell EMu what field from the attachment module you are referencing, e.g. in the example here we could have a column called SitSiteRef_tab.irn where the irn from the Sites module is recorded.
Importing data into a nested table is another situation where your column names need to be adjusted. The most common format LACMIP uses for naming columns that refer to EMu fields within a nested table is [column name](-), e.g. LatRadiusNumeric_tab(-). The minus sign indicates that the new data should be prepended to the table (conversely, use a plus sign to prepend data). When you have a nested table within a nested table, as the coordinate data on the Lat./Lon. tab of the Sites module is, you need to tell EMu what to do with each table, e.g. LatLatitudeDecimal_nesttab(-:1). Within the parentheses the first number is the outer table and the second is the inner, so the example here is telling EMu to prepend the outer table value and place the LatLatitudeDecimal_nesttab value into row 1 of the inner table. Dealing with nested table imports can be very confusing. For example, if you do not import data into every column of a nested table, your rows will be misaligned unless you format them with a group attribute. You should read up on Axiell’s documentation about this topic and also feel free to ask for help setting up your file from the Museum’s database manager.
When preparing data for import into EMu, it is best to open/save relevant CSV files as text. This will preserve any formatting (such as trailing zeroes and dates) that may be inadvertently altered in Excel. To open a file as text: Excel > File > New > Data > From Text. Select the file you wish to open and any relevant delimitors. For Data Format, choose Text and highlight all columns in the preview window, then Finish. Choose the first cell in the spreadsheet to complete your import.