Pyrite Decay Mitigation
Introduction
This workflow details the steps for inventorying specimens that are experiencing pyrite decay, quantifying the severity of the decay, and building anoxic microenvironments for the specimens that are still viable. For more detailed information about pyrite decay and the effectiveness of anoxic microenvironments, please refer to The Geological Curator, Volume 11 and your institution’s Conservation department.
Tips for Identifying Pyrite Decay:
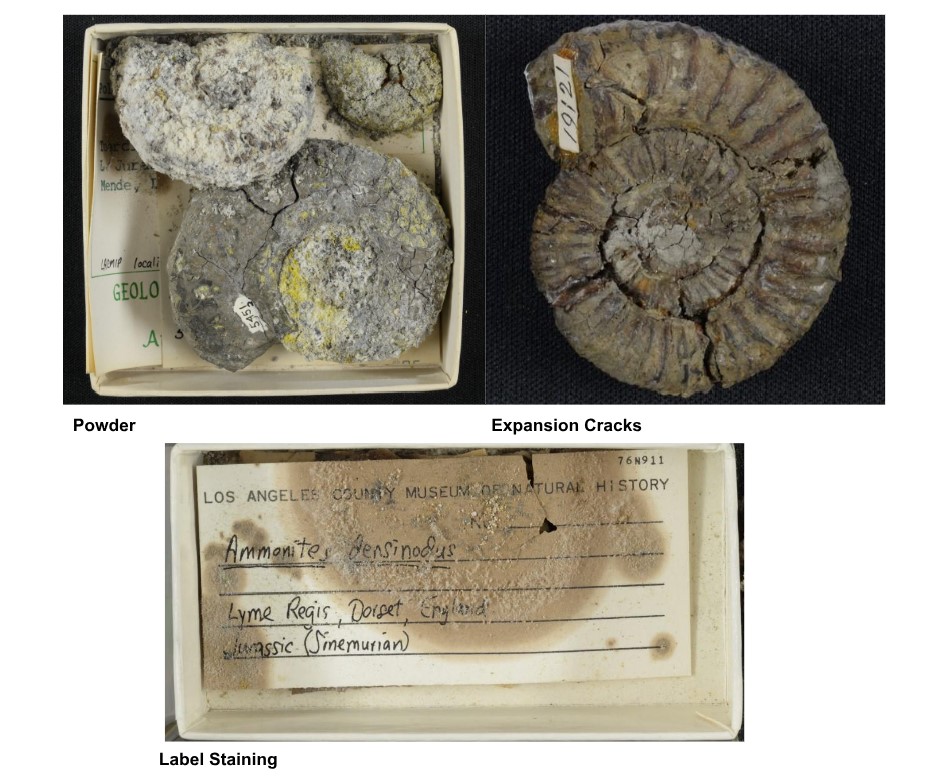
- Signs of decay include efflorescent powder, expansion cracks, and acid burns on either the label or the tray that the specimen is housed in.
- Efflorescence can be many different colors. Most of the efflorescence we observed in the Jurassic specimens was either gray or yellow.
- Some material will only display one of the signs, and the effects may only be visible on a small section of the specimen.
- Be sure to look at both sides of each fossil to ensure that you do not miss any symptoms.
Inventorying
- Systematically inventory the target cabinets. We pulled all of the pyritized specimens from the Jurassic. Examine each specimen in the cabinet for signs of pyrite decay.
-
Before pulling any pyritized material be sure to complete “Specimen Removed” tags for each one and add their corresponding data to a specialized Pyrite Decay inventory spreadsheet. An example of the spreadsheet formatting can be seen here. The spreadsheet should have columns in which you should record each of the following:
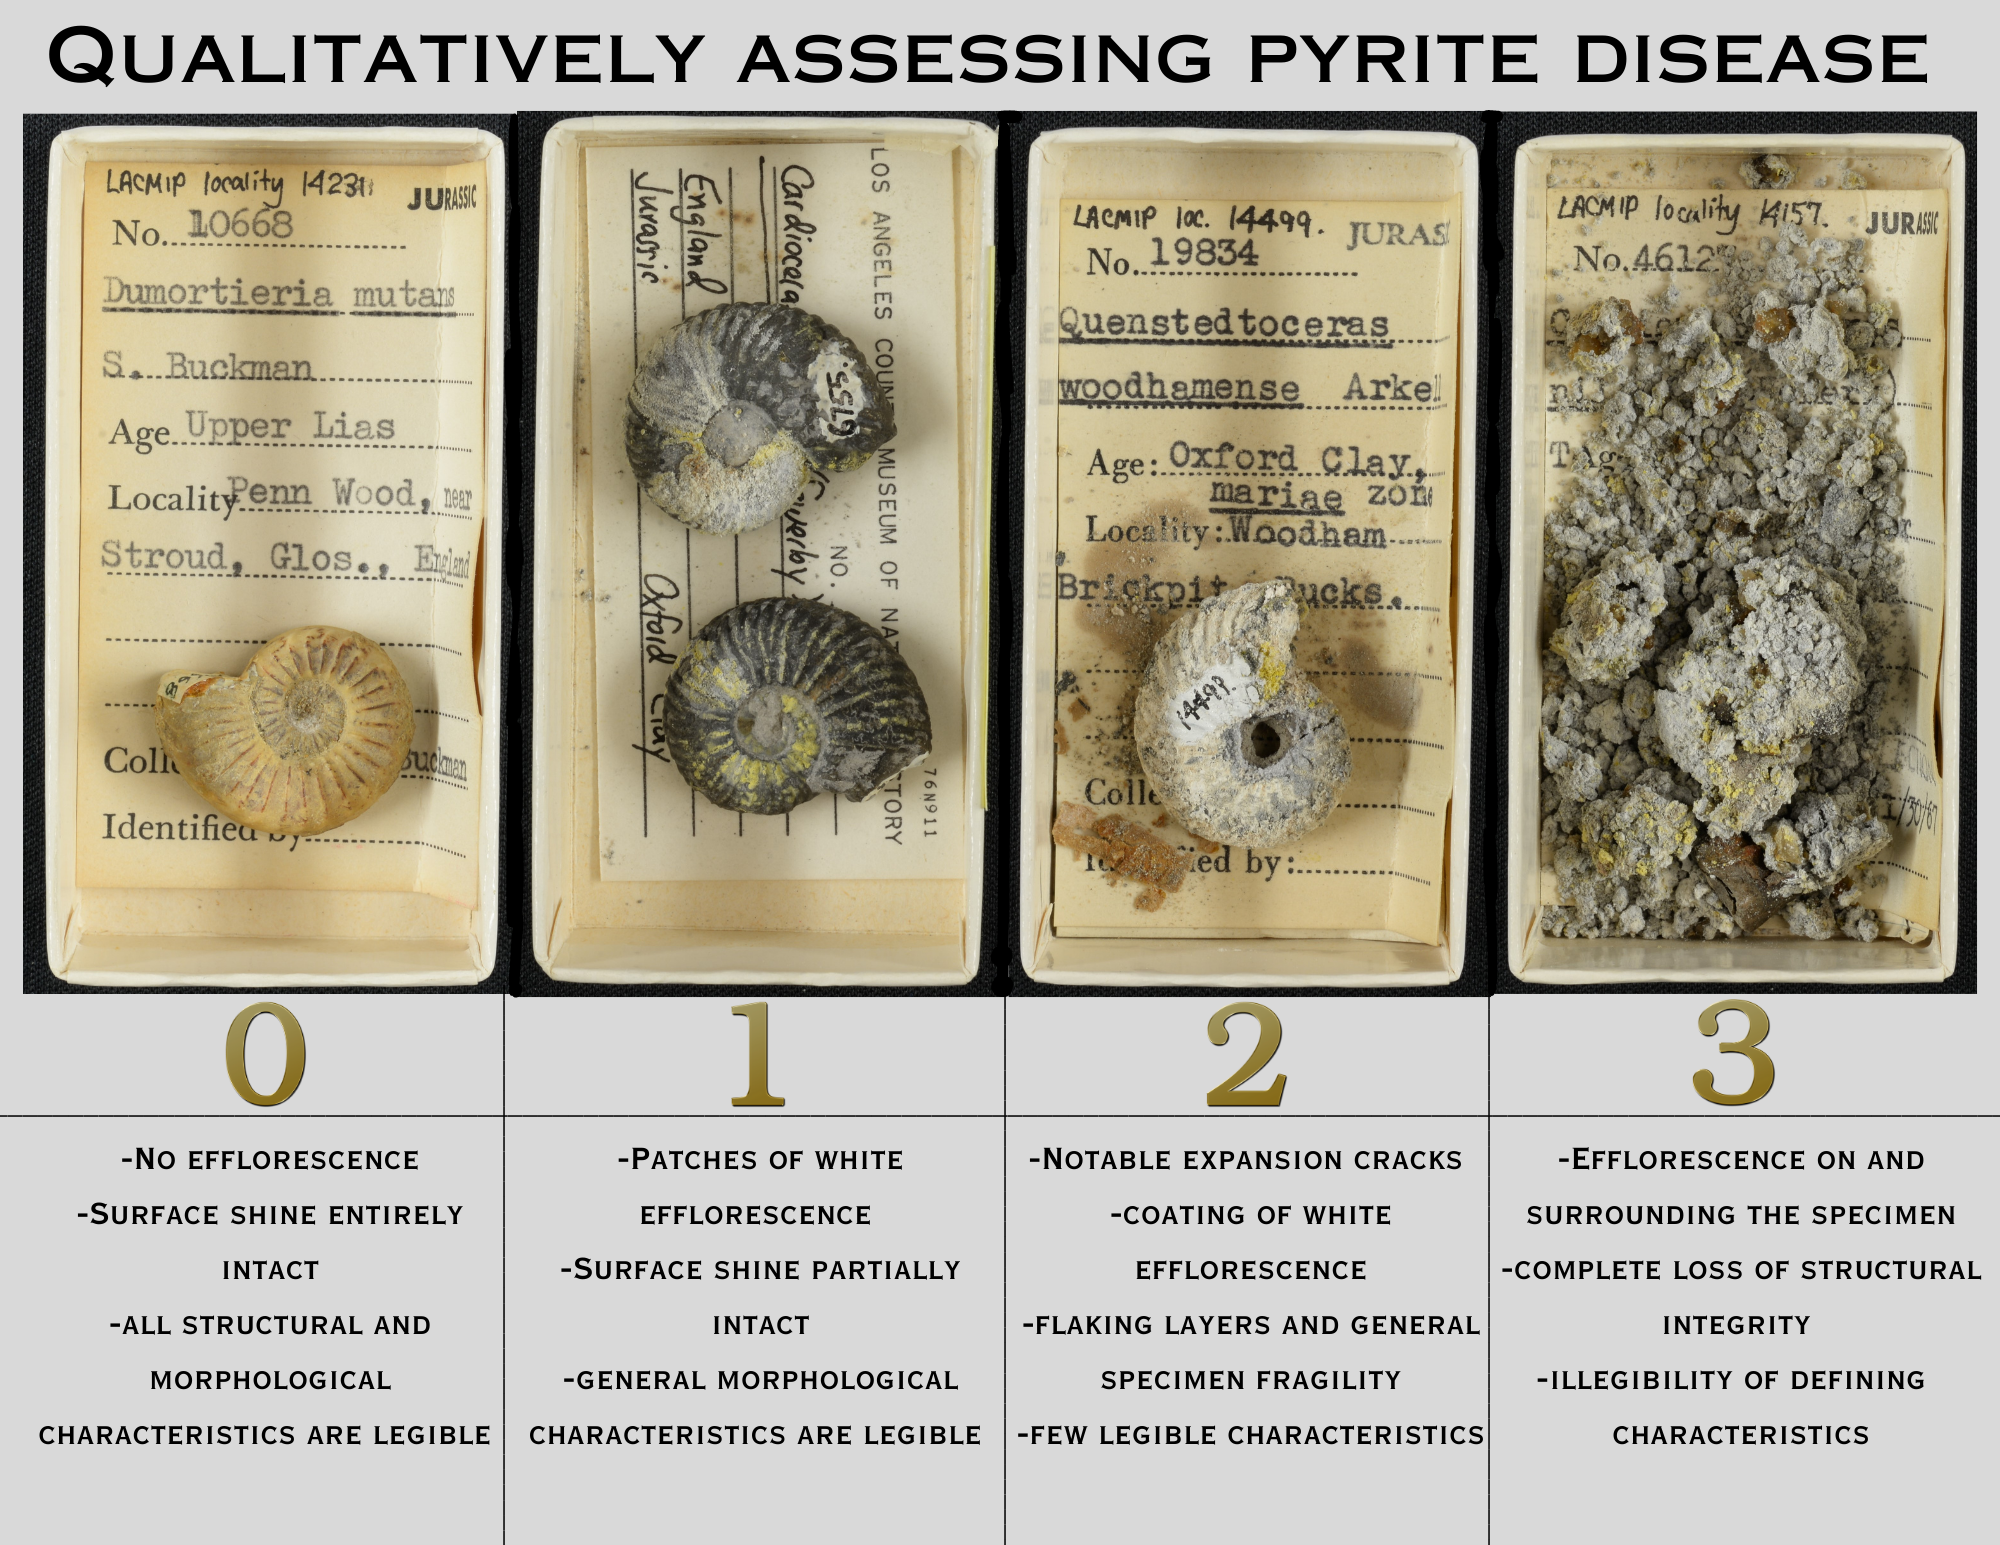
Column Information Geologic Time Period Triassic, Jurassic, Cretaceous, etc. Cabinet Number The number of the cabinet that the pyritized specimen was removed from. If the specimen was displaced, check the original LACMIP inventory for that time period and attempt to cross reference a cabinet and drawer number from that. If unable to find the original cabinet or drawer number, it is okay to then put “unknown.” Drawer Number The number of the drawer that the pyritized specimen was removed from. Remember for most cabinets in the collection drawers are counted going downwards, so drawers 1-6 are on the lefthand side and drawers 7-12 are on the righthand side. If the original location of the specimen is unknown, follow the same instructions as above. LACMIP Loc The LACMIP locality number as represented on the specimen’s label or on white paint on the surface of the specimen. If there is no LACMIP locality available, record any other institution’s numbers that are visible. Pyrite Scale Using your own judgement, quantify the severity of the pyrite decay using the qualitative assessment graphic. Note that any specimens classified as a 3 are no longer viable research specimens and should be deaccessioned. Still include these specimens in your spreadsheet. Taxonomy Taxonomic name of the specimen. If unavaible, add in the highest known classification of the specimen. Ex. “Ammonoidea” if the specimen is an ammonoid without proper identification. Lot Count The number of specimens in that specific lot. Visual Notes Description of the specimen and pyrite decay. Ex: “coating of white efflorescence,” “patches of yellow efflorescence,” “small expansion cracks,” “severe expansion cracks,” “minimal crumbling,” “extreme crumbling of the entire specimen,” “complete pile of ash.” Specimen Tray Notes Description of the tray if it is affected by the pyritization. Is there any staining on the tray? Is the tray ripping or broken due to the decay? If there are no visible effects on the tray, leave this cell blank. Label Notes Description of the label if it is affected by the pyritization. Is there any staining or burn marks on the label? If there are no visible affects on the label, leave this cell blank. Tray Type Record whether the specimen was housed in a “wood” or “metal” tray. Notes Use this cell to record any other comments on the specimen if necessary. For example, record if there are no labels or locality information associated with the specimen or if the specimen is so severely damaged that it is impossible to obtain any of the other information.
Digitizing the Specimens
- Catalog the specimens in EMu if they are not already. Follow the Cataloging Workflow. Print specimen tags.
- The project that the specimens belong to is PYR.
- Make sure to differentiate any specimen numbers from a previous institution.
- Relocate the specimens in EMu to their original cabinet and drawer location, using the information you recorded in your Pyrite Inventory spreadsheet. Then, relocate again to the First Aid Cabinet.
- Image the specimens according to the instructions in the Imaging Workflow including the barcoding reading script.
- All pictures should be taken with the specimen’s cataloged barcodes. In some severe cases, the specimen cannot be cataloged and will not be imaged with a barcode.
- First, get an untouched view of the specimen/s and label/s in their original tray without moving anything.
- Then, get an image with the specimen/s and label/s removed from the tray. Keep the orientations of the specimens the same throughout all the images. If necessary, take pictures of both sides of the material to ensure that all institution numbers and instances of pyritization are properly recorded.
Escal and RPSystem Calculations
More detailed information about the oxygen absorber packets can be found in the RPSystem Brochure. Be sure to only look at the information for your specific RP agent.
- When it comes time to group the fossils for their microenvironments, make small groups of between 5-10 specimens. Arrange specimens primarily by pyrite decay severity and secondarily by LACMIP locality number.
- Arrange the specimen trays into a rectangular shape and use a ruler to measure the length and width, in inches, of the grouping. These are the minimum measurements that your foil and escal material will be.
- When cutting the escal to build the microenvironment, cut out enough to allow for 2in of extra material on three sides and 4in of extra on the other, allowing for space to properly reseal the material together if it ever needs to be cut open.
- You need one piece of the foil material for underneath the fossils and one piece of the clear escal of the same size to go on top of the specimens. The clear escal is helpful because it allows you to see each of the fossils in the microenvironment.
- To determine how many packets of oxygen absorbers, or RP agent, you will need, measure the length, width, and height of the specimen grouping in centimeters. Determine how many cubic cm of air volume the material occupies by multiplying your length, width, and height measurements. Air volume is measured in mL which is equivalent to cubic centimeters, so measuring in cm is helpful for conversions.
- One packet of our RP Agent accurately accounts for 300mL of air volume.
- Divide your air volume calculation by 300 and that is the minimum number of packets of RP Agent you need to add in the microenvironment. If the answer is a decimal, round up to the nearest whole number.
- For the security of the microenvironment, add in a few more packets just to ensure that there will bo no oxygen or humidity.
Building the Microenvironment
- Make sure that the surface you are working on is completely clean. If the escal or foil material gets scratched, it can break the barrier and allow oxygen into the microenvironment.
- Plug in the heat sealer and allow it to heat up. Use any scrap pieces of material to test whether the clamp is ready to use and to gauge whether the heat setting is sufficient.
- Lay down your foil with the clear escal material on top.
- Use the heat sealer to join two sides of the material together. This creates a pocket that you can use to nestle all of your specimen trays inside of the microenvironment.
- Leave a small gap between the seal and the edge of the escal material so you can check that the sealing worked once it has cooled down. Don’t test the seal immediately after the heat is removed! The material will still be malleable while it is hot and you can damage the seal.
- Once all of your specimens are inside the microenvironment, work quickly to place the appropriate amount of RP Agent packets either between the specimens or around them. Add in a Humidity Indicator. Try your best to make the indicator visible without obstructing the view of any specimens. This indicator will allow you to discern the humidity within the microenvironment and will designate when you need to replace the RP Agent packets.
- Still working quickly, use the heat clamp to seal the remaining two sides. Check each side after cooling to ensure that the heat sealer worked properly.
- Your microenvironment is finished! Store in the First Aid Cabinet where the escal material will not be damaged in any way. Check back after a week or so and read the humidity indicator to ensure that the RP Agent packets are working properly to lower the humidity within the microenvironment.